Magnetic Split VR Gun Stock
thingiverse
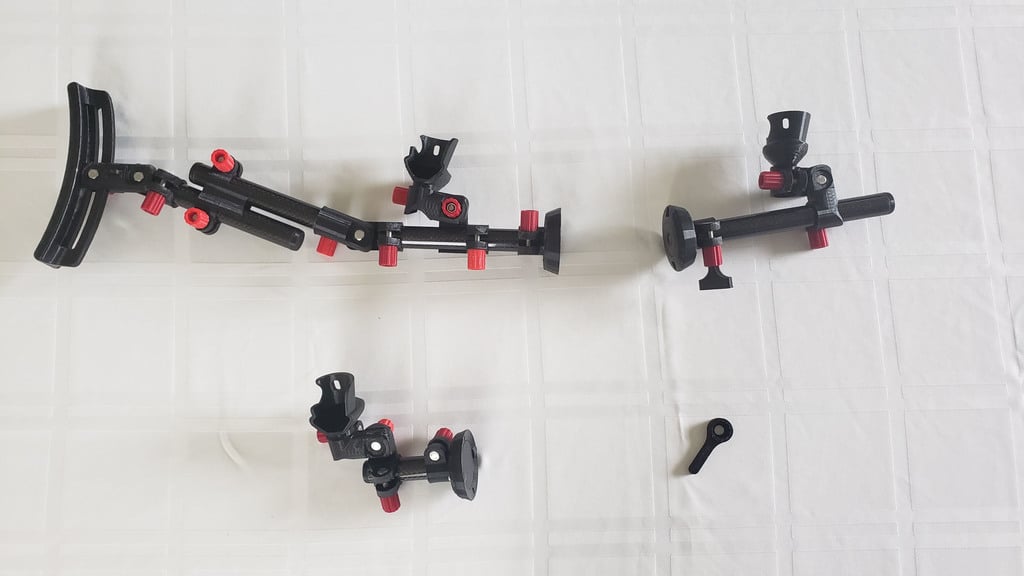
Overview ======= This project started as my attempt to come up with a solution for a "short" VR gun stock that would be suitable for use in a game such as Population One, where there is a heavy need for being able to use both hands independently and freely for climbing, gliding, etc., but in the end, I think I came up with an approach that works fairly will as a full VR gun stock for games such as Onward as well. Rather than relying on a sling or strap to support the stock when both hands are needed, and having to deal with finding the stock again in the heat of battle, this approach attempts to balance the weight and bulk in each hand by splitting the stock in the middle. The short version pictured (3" rod for the back hand, and a 5" rod for the front hand) works very well in Population One, and allows me to climb freely, fly freely, reload, drink a cola, etc., without any issues. The full stock (5" rod for back and front hand) with the butt attached works quite will with Onward, without the need for a shoulder strap. Even with the butt attached to the back hand, I find I'm still able to freely toss a grenade or hold the tablet without any issues. Remixes & Reuses ======= Most of the STL files included were designed specifically for this project, but I did rely on a simple remix for the following parts. * Maxim7745's Index Adapter for the [Index Mount (L/R)](https://www.thingiverse.com/thing:4365135) * Jonni's bottom bracket tool for the [Finger Nut Tool](https://www.thingiverse.com/thing:976049) Also, for the butt stock, I use Grapho's Buttstock.stl from [this thing](https://www.thingiverse.com/thing:4545149) unmodified. This is not included in my downloads, but the specific stl can be downloaded [here](https://www.thingiverse.com/download:8535037). My downloads simply include an adapter to allow that buttstock to be connected to one of my MALE I-Joints. Non-printable Parts =============== In addition to the 3D printed parts, you will also need the following additional parts. I've included links for where I ordered these parts, but any part that matches the spec should work. * [18mm OD Carbon Fiber Rod](https://www.amazon.com/ARRIS%C2%AE-Wrapped-Carbon-Glossy-Surface/dp/B00RX7TVVW/ref=sr_1_1_sspa?dchild=1&keywords=18mm+carbon+fiber&qid=1622487323&sr=8-1-spons&psc=1&spLa=ZW5jcnlwdGVkUXVhbGlmaWVyPUExWVA3VVNDVVZOU0hUJmVuY3J5cHRlZElkPUEwMjg5MTI0QThPOTY3UFU4TlhCJmVuY3J5cHRlZEFkSWQ9QTA1NzgwMDEyMUFDQTRGN0dYUFFNJndpZGdldE5hbWU9c3BfYXRmJmFjdGlvbj1jbGlja1JlZGlyZWN0JmRvTm90TG9nQ2xpY2s9dHJ1ZQ==). I used carbon fiber, but any rod with an 18mm outer diameter would work. The carbon fiber rod can be cut to length using a simple [pipe cutter](https://www.harborfreight.com/tubing-cutter-40913.html?cid=paid_bing|||40913&utm_source=bing&utm_medium=cpc&utm_campaign=&utm_content=&msclkid=1340a3c002911c4eb62dc37530c240f5). As an alternative, I've also included an STL for a 3D printable 18mm rod in the uploads. This actually works surprisingly well for shorter lengths. * ~6x [M5-0.8 x 20mm Hex Head Bolts](https://www.amazon.com/gp/product/B08NF9LPXF/ref=ppx_yo_dt_b_asin_title_o09_s01?ie=UTF8&psc=1) * ~12x [M5-0.8 x 25mm Hex Head Bolts](https://www.amazon.com/gp/product/B08NF6ZCRC/ref=ppx_yo_dt_b_asin_title_o09_s01?ie=UTF8&psc=1) * ~18x [M5 Hex Nuts](https://www.amazon.com/gp/product/B07BKTBZYM/ref=ppx_yo_dt_b_asin_title_o09_s00?ie=UTF8&psc=1) * 4x [#3 x 3/8 in. Phillips Round Head Brass Wood Screw](https://www.homedepot.com/p/Everbilt-3-x-3-8-in-Phillips-Round-Head-Brass-Wood-Screw-6-Pack-809931/204587525) * 2x [#3 x 3/8 in. Phillips Flat Head Brass Wood Screw](https://www.homedepot.com/p/Everbilt-3-x-3-8-in-Phillips-Flat-Head-Brass-Wood-Screw-6-Pack-809451/204587519) * 2x [#3 x 3/8 in. Phillips Round Head Brass Wood Screw](https://www.homedepot.com/p/Everbilt-3-x-3-8-in-Phillips-Round-Head-Brass-Wood-Screw-6-Pack-809931/204587525) * 5x [30mm x 3mm N52 Strong Neodymium Disc Magnets](https://www.amazon.com/gp/product/B08NJWNWCW/ref=ppx_yo_dt_b_asin_title_o04_s00?ie=UTF8&psc=1) or 8x [32mm x 2mm N35 Neodymium Disc Magnets](https://www.amazon.com/gp/product/B07PWP9DWC/ref=ppx_yo_dt_b_asin_title_o03_s00?ie=UTF8&psc=1). I have included adapters to support either of these magnet sizes. Other Comments ============= L-Joint & I-Joints ---------------------- Note that my L-Joints and I-Joints were specifically designed to provide as much adjustment as possible. Each stop give about 9 degrees of adjustment, as compared to 15 to 20 degrees that is typical with a lot of joints I've seen from other 3D printed gun stocks. This really helps when dialing in the stock to match the virtual gun. This extra precision does come at a cost, as the joints are more likely to strip if put under force when not tightly connected. I've found that they actually need to be a little more tightly connected than just finger tight. I've provided a finger nut tool to make it easier to tighten up those connections. Note that the finger nut connector is a tight enough fit that you can just snap it on one of the finger nuts and it will stay put, even during game play. I recommend the joints be printed in a stronger filament such as PETG or ABS, as they are under stress. With PLA+, I found over time they tended to break at the point where they are clamped onto the rod. Magnet Cups ------------------ The magnet modules are specifically designed to print flat on the print bed to create a very thin but sturdy layer of filament to hold the magnets in place. This interface is .6mm thick, so with initial layer settings at .3mm, you should get two layers. This give enough strength to keep the magnets in place, while also not being thick enough to have a significant effect on the magnetic fields. The modules fit between the base and top pieces. There are two edges along the rounded outside edge that are slightly flatter on the magnet module, top part, and bottom part. Just align these flat edges before snapping them together. You can also use the pre-drilled pilot holes to help with the alignment. You may need to file the edges a bit to account for elephant foot, but it is a tight fit regardless, so don't be afraid to use a bit of force during assembly. Also, while I recommend printing the joints with PETG or ABS, I have only printed these module parts in PLA+. Not sure how well they will work in PETG or other materials. A note about the design of the magnet cups. It might seem overly complex, but there is a reason to this approach. It would have been much easier to simply use magnets with a countersunk hole and opposing poles, and screw them to the top of the cups. This is the approach taken by some commercial magnet-based gun stocks. However, I found it nearly impossible to source countersunk magnets with opposing poles, and when I was able to find them on specialty sites, there were quite expensive in pairs. I also tried using single pole countersunk magnets paired with a steel contact plate, but those really do not center well at all...the magnet is just as happy to attach to one edge or the other of the steel plate as it is to center in the middle. Contrast that to disc magnets, which center very well, are relatively inexpensive and easy to source from Amazon, and can just be flipped over to get the correct North/South pole pairing. In addition, you can stack between 2 and 5 of these disc magnets inside the magnet modules to increase the attraction. A thin layer of tape around the magnets can also help get a nice tight fit. I find that these had excellent centering and a very good balance between how firmly they hold and how much force is required to break the connection with either of the magnet sizes and powers I used. Final Thoughts =========== I consider this thing to be a final version, as I've gone through numerous iterations to arrive at this design, and I am now using them personally as currently designed. I welcome any feedback or suggestions, but I don't expect to spend very much additional time refining this design. Others may feel free to remix or refine as desired. Hopefully someone else will find this useful!
With this file you will be able to print Magnetic Split VR Gun Stock with your 3D printer. Click on the button and save the file on your computer to work, edit or customize your design. You can also find more 3D designs for printers on Magnetic Split VR Gun Stock.