Magnetic Tensegrity Table
myminifactory
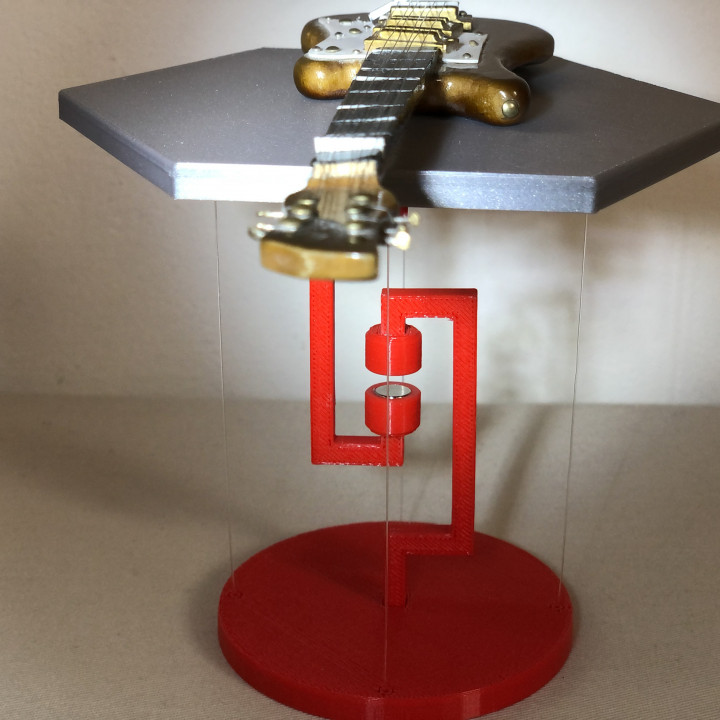
This is my third contribution here on MMF to the topic "Tensegrity". The main difference to the other models is that the tension in the middle is not created by a thread but by magnetism. Therefore the top is of course not as loadable as with a thread or a nylon string. But all the more interesting for the eye! After all - so I show in my video - the construction can carry a small pliers of 80g weight. Please note that if the magnetic tension is too high - for example, if the magnets are too close together - this can soon lead to the printed parts bending. There are two tops to choose from. Here's a video: https://youtu.be/lwLGZ7oSHqY As magnets I used two small 8x3mm neodymium magnets with a very high adhesive strength. Unfortunately they are only available in larger quantities, like for examplehttps://www.amazon.de/dp/B072FDBHBF/ref=cm_sw_em_r_mt_dp_U_jfQSEb0A14M3J As tension string I took a nylon string Ø 0,35mm:https://www.amazon.de/dp/B07HLF6SYY/ref=cm_sw_r_cp_tai_x1BUEbP9ACF3G Start to insert the middle parts into the top and the socket ... into the holes provided. The arrows at the bottom show you how to insert the middle parts correctly and how top and base must be aligned with each other. You should place them as shown in the 5th picture! To ensure a good fit, the fitting accuracy is very tight. It may be necessary to correct the fit with a cutter knife or sandpaper. Then apply superglue. For a correct alignment you should use a stop angle! Then the magnets can be inserted into the magnet holders ... so that they attract each other! They are actually quite tight, but should better be fixed with some superglue. Afterwards the magnet holders can be glued to the middle parts. When the middle parts are glued tightly, you can start with the more difficult part. You need 4 threads of about 25cm. Thread or dental floss will also do the job. At the bottom of the hexagon you see 4 mounting points. Take one thread and make a multiple knot at one end and then pull the thread through the hole. Place the hexagon with the bottom side facing up. Then feed the thread through a hole in the socket. Pay attention to the alignment of top and base! At first just clamp the string. If the notch is not clean, try to open it with a cutter knife. Do the same with the other 3 strings. Now you can start with the adjustment. The distance between the magnets will be about 3-4 mm. So when the strings are slightly tightened, socket and hexagon are aligned horizontally and the force of attraction is sufficient to ensure a stable stand, then you can secure the strings. Hurray! You did it! … the hexagon is floating! I hope that I did not forget anything in my description. If you have any questions please contact me!
With this file you will be able to print Magnetic Tensegrity Table with your 3D printer. Click on the button and save the file on your computer to work, edit or customize your design. You can also find more 3D designs for printers on Magnetic Tensegrity Table.