Magnetospeed Sporter Mount
prusaprinters
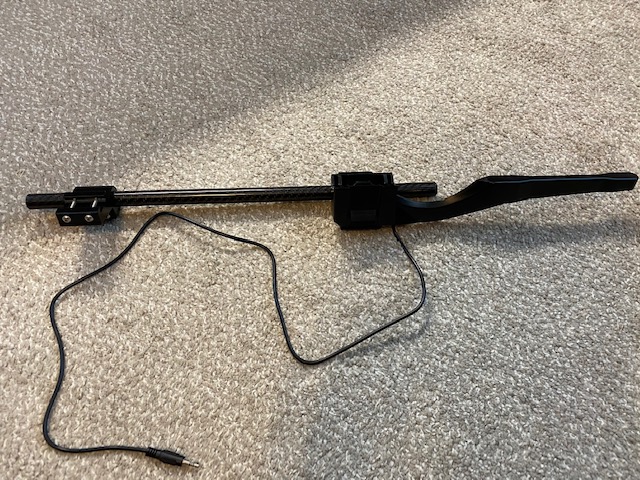
<p>Update 23MAR21: I've uploaded V5 of the mount, and also added the display mount. V4 was still a solid design, but I made some very subtle changes based on my range outing last weekend where I was using it on a handgun.</p><p>The Magnetospeed Sporter chronograph has some mounting limitations compared to the V3 model, so I wanted to correct that without paying the additional $200+ for the V3. This design utilizes a rail mount attachment which is then connected to the Magnetospeed mount via a boom of necessary length. I've designed a version for both Picatinny/STANAG rails and Arca Swiss Rails - the end which holds the Magnetospeed is interchangeable between both versions. It's designed for a 16mm tube as the boom - I used carbon fiber, but aluminum or even wood could be used if on a budget. Hardware is all M4 (I use button head hex cap screws, but standard cap or pan head would work) and I used square nuts in some key areas (which I would advise), but the design will work with standard M4 hex nuts as well. </p><p>There is 22mm of vertical adjustment in this design to properly align the Magnetospeed to the bore, and it can accommodate roughly 18mm to 46mm from bottom of rail to bore OD measurement. Total weight of all printed components and hardware for the picatinny version at the print specs shown is 103g and the 16mm x 14mm x 420mm carbon fiber tube weighs 29g (~.7g per cm). With this design, you don't use the Magnetospeed strap, buckle, knob, or pad, so total weight increase with the full 420mm CF tube is 67g or roughly 2.4oz.</p><p>Depending on whether you want the Picatinny or Arca versions, you'll need to print P1, P2, P3, P4, and Backer STL files. The Backer drops down inside the Magnetospeed and holds a nut which the screw comes through from the bottom - you don't necessarily have to have it, but it makes things much easier. The tube caps are designed for a 16mm OD/14mm ID tube, so if that's the type your using then they will work.</p><p>The display mount consists of a belt clip (handy if you're using it on a handgun) and a snap on picatinny mount if you're putting it on a rail. The belt clip attaches to the flat portion of the picatinny mount, and you'll choose the picatinny mount base on where the rail is located. The display is always on the left side, but will depend on if you have want to attach it to bottom rail, side rail, or top rail.</p><p><strong>Hardware Needed:</strong></p><p><i>Magnetospeed Sporter Mount/Tube Clamp and Backer (P1/P2/Backer)</i> - One (1) M4x25mm screw, Two (2) M4x35mm screws, One (1) M4 hex nut, Two (2) M4 square nuts</p><p><i>Picatinny/STANAG Mount/Tube Clamp (P3/P4)</i> - Two (2) M4x25mm screws, Two (2) M4x35mm screws, Four (4) M4 hex nuts</p><p><i>Arca Swiss Mount/Tube Clamp (P3/P4)</i> - Four (4) M4x25mm screws, Two (2) M4 hex nuts, Two (2) M4 square nuts</p><p><strong>Component Suppliers I Used, but It's Standard Stuff:</strong></p><p><a href="https://www.amazon.com/gp/product/B08FJFYQYZ/ref=ppx_yo_dt_b_asin_title_o03_s00?ie=UTF8&psc=1">https://www.amazon.com/gp/product/B08FJFYQYZ/ref=ppx_yo_dt_b_asin_title_o03_s00?ie=UTF8&psc=1</a></p><p><a href="https://www.amazon.com/gp/product/B07PJMQV4X/ref=ppx_yo_dt_b_asin_title_o00_s00?ie=UTF8&psc=1">https://www.amazon.com/gp/product/B07PJMQV4X/ref=ppx_yo_dt_b_asin_title_o00_s00?ie=UTF8&psc=1</a></p><p><a href="https://www.ebay.com/itm/Stainless-Steel-Button-Socket-Head-Screws-ISO-7380-Metric-M2-M3-M4-M5-M6-M8/233089554790?ssPageName=STRK%3AMEBIDX%3AIT&var=532576512937&_trksid=p2057872.m2749.l2649">https://www.ebay.com/itm/Stainless-Steel-Button-Socket-Head-Screws-ISO-7380-Metric-M2-M3-M4-M5-M6-M8/233089554790?ssPageName=STRK%3AMEBIDX%3AIT&var=532576512937&_trksid=p2057872.m2749.l2649</a></p><p>(I've been using that seller for hardware for quite sometime and he's legit)</p><p><strong>Assembly:</strong></p><ol><li>Remove knob/strap/pad from Magnetospeed.</li><li>Insert square nuts into channels on inside of P1 and hex nut into Backer.</li><li>Put upper tab of P1 into slot on outside of Magnetospeed, drop Backer down inside the Magnetospeed, and then insert screw into bottom of P1, tighten into backer to secure it.</li><li>Insert 35mm screws into P2 and then secure to outside of P1. Orient as shown in images - these screws both clamp down on the tube and secure vertical adjustment.</li><li>Insert nuts into P3 (4 hex nuts on Picatinny, but the 2 square nuts on Arca go into the nut pockets on top of the mount.</li><li>Insert 35mm screws through P4 (25mm on Arca), and insert 25mm screws into tube clamping side of P3.</li><li>Place P3 on Picatinny/Arca mounting rail, and place P4 on the other side of right, tightening screws to clamp to rail.</li><li>Place boom tube into both tube clamping fixtures, and once length/height of magneto speed is properly adjusted you can tighten everything down.</li></ol><p>Hopefully the above info helps and everything else is self explanatory, but let me know if you have any questions.</p><p><strong>Print Settings:</strong></p><p>3 perimeters, 40% infill, orient on bed as shown in image.</p>
With this file you will be able to print Magnetospeed Sporter Mount with your 3D printer. Click on the button and save the file on your computer to work, edit or customize your design. You can also find more 3D designs for printers on Magnetospeed Sporter Mount.