Make 90 degree cuts with clamping Miter Box, adjustable saw width
prusaprinters
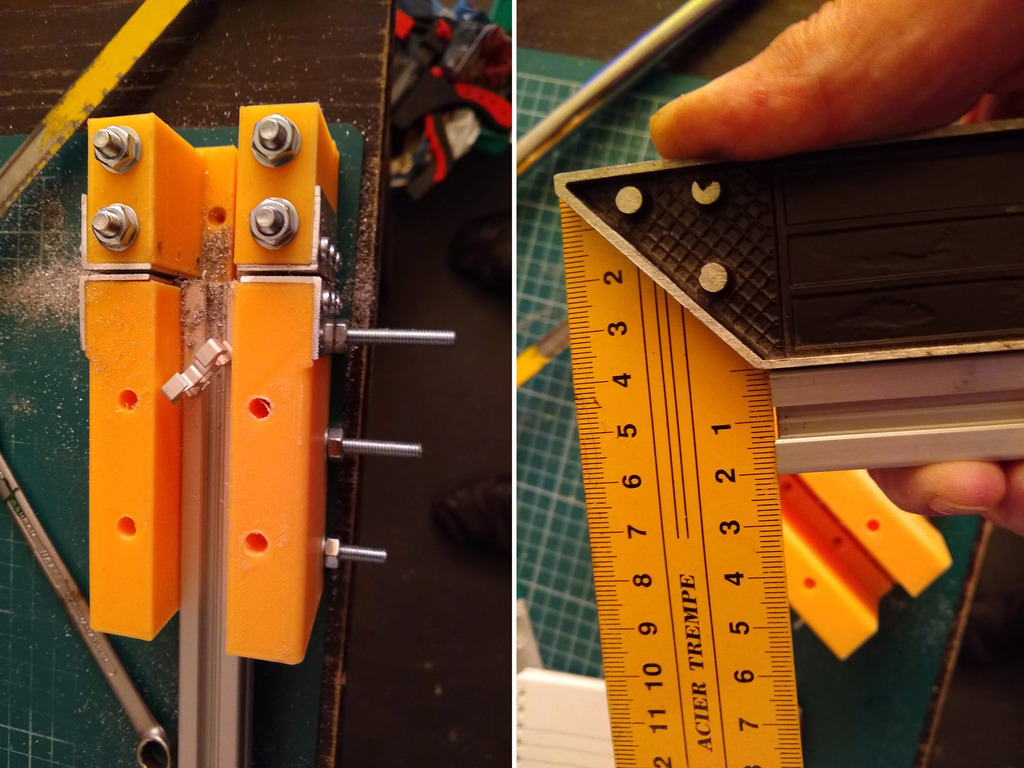
<p>A very nice tool to cut your metal (and wooden) profiles at 90 degrees.</p> <p>If you are like me, it is a pain to saw straight edges. With this tool it will become much easier.</p> <p>The saw width is adjustable to guarantee there is no play. The box it self also acts as a vise/vice and secures your part as strong as you want.</p> <p>To prevent it for fast degeneration the beaks for the sawguides are metal (aluminium or steel, 1.5 or 2 mm thickness). Along with the ability to replace these metal parts, it will significantly extend the lifespan of the tool.</p> <p><strong>Adjusting the width of the beak:</strong></p> <p>Assemble the two blocks with the four bolts, place your hacksaw in the beak and move the blocks so that your saw is just not stuck. Tighten the bolts securely. Try the saw from top to bottom.</p> <p><strong>What is the maximum width of your object/profile?</strong></p> <p>That is up to you: If you use 80 mm long threaded rods the maximum net width will be around 20 mm (which is also the minimum width). Every extra length over the 80 mm will extend the possible width with that same length.</p> <p>If your workpiece is narrower than 20 millimetres, use something to fill that width. Calibration cubes are ideal for this. Be aware that the part behind the saw-guide is not clamping (on purpose).</p> <p><strong>Two versions:</strong></p> <p>The normal version has a net height of 40 mm and a length of 10 cm for the clamping area (part before the saw-guide). There is also a XL-version with a net height of 50 mm and a length of 13.5 cm.</p> <p><strong>Extra's:</strong></p> <p>Table-hook/edge (sorry, don't know the correct translation) to secure the miter-box against the edge of your workbench. If you dont mount the box to your workbench or waste-board with screws or bolts (holes are included) , this extra part will greatly help to keep it stable. Usable on both sides.</p> <p>Stop-block. If you mount the miter-box and this stopblock directly to a board or workbench, you have a fixed length.</p> <p>Well the pictures will explain more then words, so take a look at them. Also read the print settings and Post-printing sections.</p> <p>Happy sawing :)</p> <p>Look for more tools and the like here: <a href="/Coat/collections/coats-toolbox">https://www.thingiverse.com/Coat/collections/coats-toolbox</a></p> <h3>Print Settings</h3> <p><strong>Supports:</strong></p> <p>No</p> <p class="detail-setting infill"><strong>Infill: </strong> <div><p>25% or more</p></div> <p><strong>Notes:</strong></p> <p>To make it a solid tool, use walls of minimal 2 mm and a good infill. I used a 0.6 nozzle with 0.36 layer-height.</p> <h3>Post-Printing</h3> <p>Use a 6 mm drill to ensure that the holes for the M6 bolts, and more important the threads, are tight but easy to move with a minimum of play. For mounting the corner-profiles, see the pictures.</p> </p> Category: Tools
With this file you will be able to print Make 90 degree cuts with clamping Miter Box, adjustable saw width with your 3D printer. Click on the button and save the file on your computer to work, edit or customize your design. You can also find more 3D designs for printers on Make 90 degree cuts with clamping Miter Box, adjustable saw width.