Make a Lithophane project
thingiverse
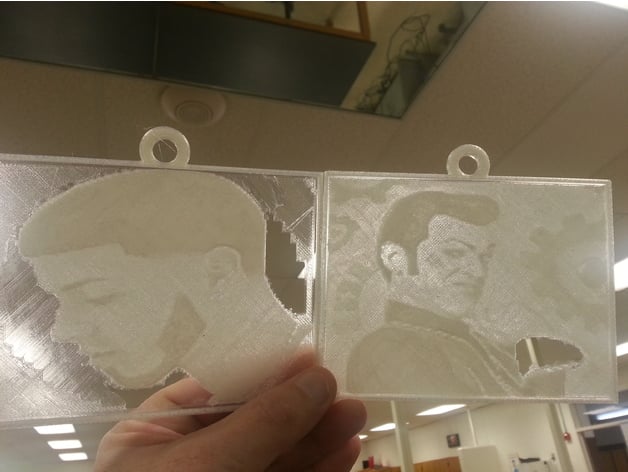
Here is an updated version of this project that works better, I suggest you use it instead: https://www.thingiverse.com/thing:2899947 In this project students will turn a picture into a lithophane using the MakerBot's customizable Lithopane. http://www.thingiverse.com/thing:74322 Students were able to successfully create lithophanes using the customizer. Some students chose animated figures (Bugs Bunny, Pokemon) which, because of the small number of colors in the art, did not turn out well. We also had some trouble with pictures that had white backgrounds. These had a very thin first layer which tore when we removed it from the build plate. This was easily fixed with clear packing tape to hold it together. Standards NGSS Overview and Background This project is part of an 8th grade science unit on light and touches on subjects like transparent, translucent, and opaque. In this project students were permitted to select any appropriate picture to transform into a lithophane. The project would work well for other subjects. For example the students could choose a picture representing African American history for Black History Month, or an important woman for Woman's History Month. Or use a family photo to make something for Mother's Day. Lesson Plan and Activity Students first must find a picture that has a lot of shades of light and dark works best. A light background is great, but a white background will make a thin first layer which can be fragile. Students could also take their own picture. Students will need an account on Thingiverse, which will require an email address. After logging into thingiverse go to the Lithopane Customizer at http://www.thingiverse.com/thing:74322 Use Choose File to select the picture and then pick the right setting for Picture Shape and Picture Orientation to match the picture. Look at the blue preview to make sure it's correct. Click on Invert Colors --> this is an important step that students sometimes forget. Open up Adjustments and choose the right Layer Height and Number of Layers. Layer Height is determined by your slicing software. We made ours with a Layer Height of 0.15 mm and 20 Layers Click on Create Thing. Give it a name. If it's a personal photo you should think carefully whether you want to publish it so that everyone can see it. Thingiverse doesn't let new users publish their work for 24 hours after making an account. It will take about 5 minutes for the lithophane to be created. After it's done the STL file can be downloaded. Slice the STL file, we used Cura. Make sure the Layer Height matches the value you used when you made the lithophane. Print with 100% fill using white plastic. Materials Needed Works best with translucent plastic. If you use white plastic they need to be thinner.
With this file you will be able to print Make a Lithophane project with your 3D printer. Click on the button and save the file on your computer to work, edit or customize your design. You can also find more 3D designs for printers on Make a Lithophane project.