Maker Knife 3D Printed Version
thingiverse
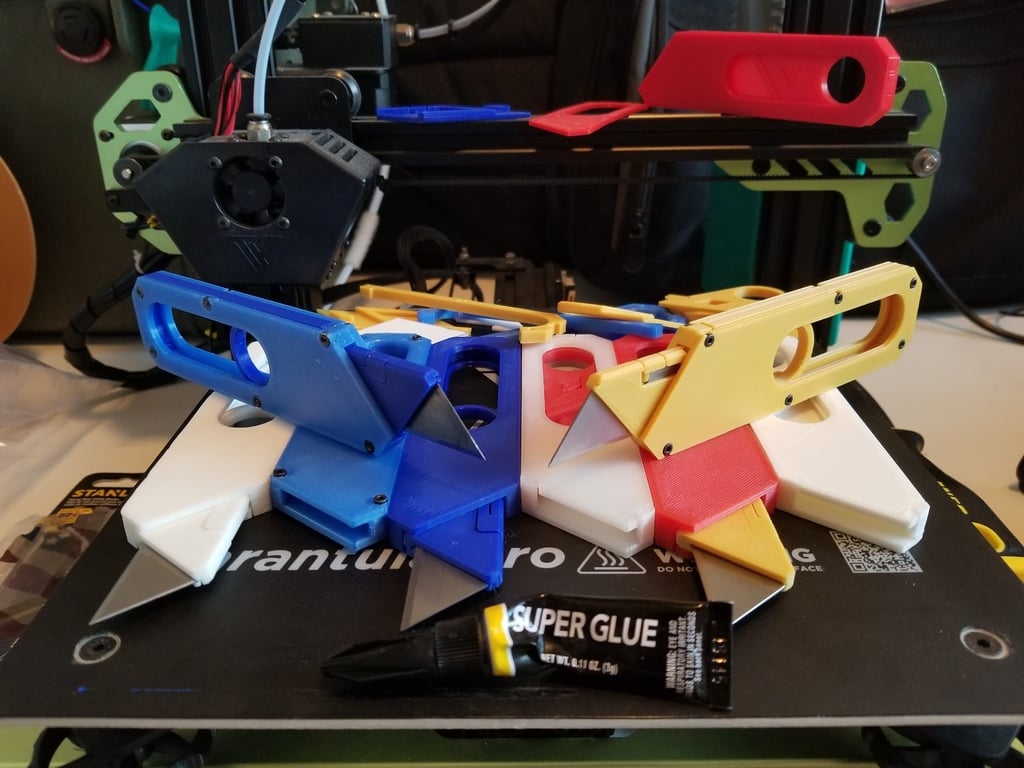
Print it. Make it. Use it. I present to you, the Maker Knife 3D Printed Version! For everyone who doesn't know, Giaco Whatever and David Windestal teamed up a while back to create the Maker Knife: https://giaco.com/products/maker-knife It's an awesome EDC utility blade holder that is extremely ergonomic and visually appealing. The Maker Knife is so cool, that I had to try my hand at making a 3D printed version of it! My only reference were online pictures and HandWerkStadt's "MakerKnife 3D Printed Top Plate" https://www.thingiverse.com/thing:3644798 After a ton of off and on hours working on this thing, finally it is done! It functions very similar to the real deal and looks an awful lot like it too! Now to explain everything. There are two versions I have made, one held together with super glue (or any other glue), and one held together with m2x8 socket head bolts and m2 nuts, with the words "Super Glue" and "Bolts" on the end of the file names, respectively. Both versions use the same "Blade Left Cover," "Blade Holder," and "Ring Slider" files. You only need to print one of each file per Maker Knife. I recommend making the bolted together version because it's a lot easier to build and works better. After assembling either version's parts, slide in the Blade Slider assembly into the Handle. To remove the Blade Slider assembly after putting it in, extend the Blade slider assembly, slightly pull on the Blade Holder and Ring Slider in opposite directions, and then pull out the Blade Slider assembly while maintaining the opposite pulling force. To insert a utility blade into the Maker Knife, push the tab on the Blade Holder to the right while sliding the blade into the blade holder. Let it snap into position. I recommend printing the parts in different colors that go well together. Super Glue Construction Additional Materials needed: Super glue, or some other glue Follow the assembly pictures showing the white Maker knife being made. The first area to put super glue on is outlined in blue. After assembling the latch onto the right side of the handle, put super glue on the black outlined areas in the picture. BE CAREFUL not to use too much super glue so that it seeps out the sides, it will greatly inhibit the functionality. As a precautionary measure, wait a good while (a few hours) before you try to slide the Blade Slider assembly into the Handle. That way, if there's any super glue on the inside walls, it dries before anything might contact it. Otherwise, the in and out sliding motion will function very poorly. Bolts Construction Additional Materials needed: Super glue (a little bit), m2x8 socket head bolts (6), m2 nuts (6) After printing, you will probably notice that there are no holes for the bolts in the right and left handle sides. This is on purpose and allows for no supports to be used. Use an X-acto blade or a utility blade to cut out the plastic according to the pictures depicted above. Do not clear out all the plastic, just enough for the bolts' threads to pass through. You will see that the plastic you shouldn't remove is thicker than the plastic you do remove inside the holes. After the hole clearing is complete, line up the 3 handle parts and put the 6 bolts though the side with the round indents and the nuts on the side with the hexagonal indents. The Blade Holder assembly is the same as with the Super Glue version. Congrats! You made something! Now use it to make something else I guess, or just carry it, or put it in a drawer. I don't care just enjoy! Happy printing & making! Update 9/2/20: I added the STEP files for the parts.
With this file you will be able to print Maker Knife 3D Printed Version with your 3D printer. Click on the button and save the file on your computer to work, edit or customize your design. You can also find more 3D designs for printers on Maker Knife 3D Printed Version.