MakerBot 5th Gen Dial Indicator, Smart Extruder Snap-on
thingiverse
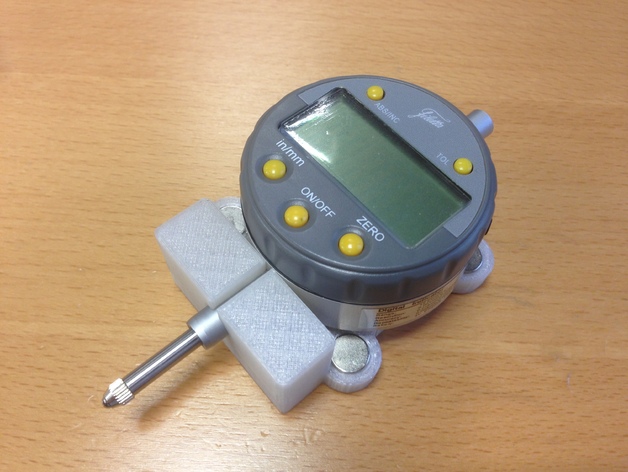
This fixture aids leveling for MakerBot's 5th Gen and Z18 3D printers. The build-in leveling on the Z18 isn't accurate enough, so we use this fixture instead. It fits right where the Smart Extruder goes, just swap them out. The magnets are from an old Smart Extruder, 9.5 mm in diameter and 6.35 mm high. The hole for the dial Indicator is 8 mm across. For the Z18, start leveling and cancel when the build platform is in place - that's your reference point. Loosen all the bolts beneath the build plate like you would for regular leveling. Move the extruder carriage to the back center spot, where the set screw is for leveling. Set your dial Indicator to zero here. Then move it to the front right position above the setscrew and turn the setscrew until the indicator hits zero again. Repeat this for the front left spot, then you're done when you tighten the platform screws again. The normal offset between a default calibration and one with this fixture is between 0.1 and 0.3 mm. After leveling like this, the points should be close to level, less than the layer height. This improves adhesion a lot for large prints. We tried using Simlify3D but it won't let us move anything manually - all commands except loading filament are disabled. If you know how to automate movement, please comment below. Printer Settings: * Printer Brand: MakerBot * Rafts: Doesn't Matter * Supports: No Design Notes: The design was printed on a Replicator 2. For the 5th Gen, I'd print without rafts since it's pretty flat and that helps with the Smart Extruder position. I designed this in Design Spark Mechanical.
With this file you will be able to print MakerBot 5th Gen Dial Indicator, Smart Extruder Snap-on with your 3D printer. Click on the button and save the file on your computer to work, edit or customize your design. You can also find more 3D designs for printers on MakerBot 5th Gen Dial Indicator, Smart Extruder Snap-on.