Makerbot End / Limit-Switch Holder 4 Anycubic I3 MEGA
prusaprinters
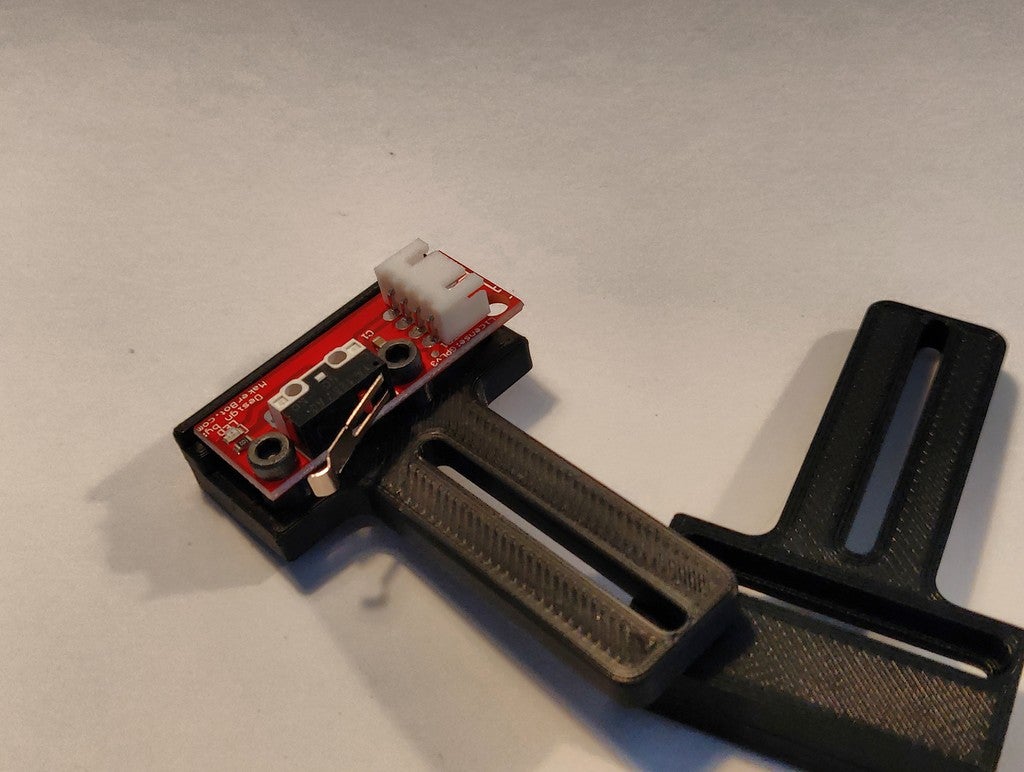
<p>After half a year of use in manufacturing, the limit switches on my AnyCubic I3 MEGA are due for replacement. Unfortunately, it is quite difficult to get matching limit switches. Luckily, there are good alternatives that work with minor adjustments on the AnyCubic I3 MEGA as well. One example is the MakerBot standard limit switch, which you can buy for a handful of dollars from every corner of the Chinese Market of your choice.</p> <p>The easiest way is to replace the limit switch for the Y-axis. (You break your fingers the least here). But because of the different arrangement of the mounting holes an adapter is necessary. (For the other limit switches, I will make suitable adapter on occasion. Stay tuned!)</p> <p>I designed this from scratch. It is<strong>mainly intended for use with the <a href="https://3drapid.de/shop.html#!/products/3d-rapid-xt-1-tr%C3%A4gerplatte-anycubic-i3-mega">3D Rapid XT1</a> carrier plate</strong>, but should also be used for the standard carrier plate. I am very sorry, I can not test this, because I no longer use this configuration. If the adapter fits you - fine, then<strong>please write a short comment!</strong></p> <p>The only electrical adjustment you need to make concerns the connector: For the AnyCubic limit switch, this is a three-pin JST connector, for the Makerbot limit switches it is a four-pin connector. In both cases, however, only the existing three cables are connected!</p> <p>For the conversion you need no crimping pliers, you just have to get the actual plugs out of their plastic cladding. For example, the handy tweezers that came with the printer. It is great for this purpose.</p> <p>The Makerbot switches are supplied with a 4 pin JST / Dupont cable set. You can just use the JST connector housing from this cable set! I recommend starting with the cable and practicing it, then it will be easier for the printer's connector, and if you have a mishap, you are still on the safe side.</p> <p>This is also easy with a pointed object by pressing the small barbs of the connector down and then pull on the cable. But gently! That should be solved without resistance. After you've fumbled the three plugs out of the three-pin connector housing, you plug these into the four-pin connector housing. Finished.</p> <p>Mount the makerbot limit switch as shown on the second photo. You will need 2 M3x8mm allen screws to screw the limit switch onto the adapter. The nuts come in the groove on the bottom of the adapter, so that you can loosen or tighten the screws at any time comfortably. With 2 other screws you can then secure the switch in the 2 threads in which the original switch was attached.</p> <p>I recommend following sets of screws, so you have enough of them for the rest of the Week ;-) : 460 Countersunk Screws and 1080 Cylinder Head Screws.</p> <p>Important: Notice the pin assignment and the cable colors! Test the function of the limit switch by pushing the small lever in the direction of the switch. The red LED must light up. If not, you have made a mistake while connecting. Best you take a picture<strong> before</strong> you dismantle the original switch ;-)</p> <p>You can adjust the Z axis of the limit switch with the washers, its X- or Y-axis by pushing back and forth in the oblong holes. The switch is triggered by contact of the lever with the bearing closest to the switch. Align the switch accordingly. He must get in any case contact, otherwise your printer will make some strange noises.</p> <p>No risk - no fun - but: it's your risk. So definitely use your brains ;-)</p> <p>So, here ist is, printed with my AnyCubic i3 MEGA, with Filament from Goedis: <a href="https://shop.goedis.de/PLA-Schwarz-175mm">Black PLA</a>.</p> <p>I suggest<strong>20% infill</strong>, 0.20mm Height of Layer, 1,06% Flow, 215° Nozzle, 60° Heatbed and 60% Cooling. (I use an Titan Extruder and Sunon Fans, you'll try it with your Standard PLA Settings). Also, I recommend to add supports for the recess. In S3d I use 2mm Supports. See Screenshots.</p> <p>And now much success!</p> <p>Some of the links are Affiliate. If you buy something, I get a small commission. The price you pay is the same. Thank you.</p> <h3>Print instructions</h3><h3>Category: 3D Printer Parts Summary</h3> <p>After half a year of use in manufacturing, the limit switches on my AnyCubic I3 MEGA are due for replacement. Unfortunately, it is quite difficult to get matching limit switches. Luckily, there are good alternatives that work with minor adjustments on the AnyCubic I3 MEGA as well. One example is the MakerBot standard limit switch, which you can buy for a handful of dollars from every corner of the Chinese Market of your choice.</p> <p>The easiest way is to replace the limit switch for the Y-axis. (You break your fingers the least here). But because of the different arrangement of the mounting holes an adapter is necessary. (For the other limit switches, I will make suitable adapter on occasion. Stay tuned!)</p> <p>I designed this from scratch. It is<strong>mainly intended for use with the <a href="https://3drapid.de/shop.html#!/products/3d-rapid-xt-1-tr%C3%A4gerplatte-anycubic-i3-mega">3D Rapid XT1</a> carrier plate</strong>, but should also be used for the standard carrier plate. I am very sorry, I can not test this, because I no longer use this configuration. If the adapter fits you - fine, then<strong>please write a short comment!</strong></p> <p>The only electrical adjustment you need to make concerns the connector: For the AnyCubic limit switch, this is a three-pin JST connector, for the Makerbot limit switches it is a four-pin connector. In both cases, however, only the existing three cables are connected!</p> <p>For the conversion you need no crimping pliers, you just have to get the actual plugs out of their plastic cladding. For example, the handy tweezers that came with the printer. It is great for this purpose.</p> <p>The Makerbot switches are supplied with a 4 pin JST / Dupont cable set. You can just use the JST connector housing from this cable set! I recommend starting with the cable and practicing it, then it will be easier for the printer's connector, and if you have a mishap, you are still on the safe side.</p> <p>This is also easy with a pointed object by pressing the small barbs of the connector down and then pull on the cable. But gently! That should be solved without resistance. After you've fumbled the three plugs out of the three-pin connector housing, you plug these into the four-pin connector housing. Finished.</p> <p>Mount the makerbot limit switch as shown on the second photo. You will need 2 M3x8mm allen screws to screw the limit switch onto the adapter. The nuts come in the groove on the bottom of the adapter, so that you can loosen or tighten the screws at any time comfortably. With 2 other screws you can then secure the switch in the 2 threads in which the original switch was attached.</p> <p>I recommend following sets of screws, so you have enough of them for the rest of the Week ;-) : 460 Countersunk Screws and 1080 Cylinder Head Screws.</p> <p>Important: Notice the pin assignment and the cable colors! Test the function of the limit switch by pushing the small lever in the direction of the switch. The red LED must light up. If not, you have made a mistake while connecting. Best you take a picture<strong> before</strong> you dismantle the original switch ;-)</p> <p>You can adjust the Z axis of the limit switch with the washers, its X- or Y-axis by pushing back and forth in the oblong holes. The switch is triggered by contact of the lever with the bearing closest to the switch. Align the switch accordingly. He must get in any case contact, otherwise your printer will make some strange noises.</p> <p>No risk - no fun - but: it's your risk. So definitely use your brains ;-)</p> <p>So, here ist is, printed with my AnyCubic i3 MEGA, with Filament from Goedis: <a href="https://shop.goedis.de/PLA-Schwarz-175mm">Black PLA</a>.</p> <p>I suggest<strong>20% infill</strong>, 0.20mm Height of Layer, 1,06% Flow, 215° Nozzle, 60° Heatbed and 60% Cooling. (I use an Titan Extruder and Sunon Fans, you'll try it with your Standard PLA Settings). Also, I recommend to add supports for the recess. In S3d I use 2mm Supports. See Screenshots.</p> <p>And now much success!</p> <p>Some of the links are Affiliate. If you buy something, I get a small commission. The price you pay is the same. Thank you.</p> <h3> Print Settings</h3> <p><strong>Printer Brand:</strong> Anycubic</p> <p><strong>Printer:</strong> All-metal Mega</p> <p><strong>Rafts:</strong> No</p> <p><strong>Supports:</strong> Yes</p> <p><strong>Resolution:</strong> 0.2</p> <p><strong>Infill:</strong> 20-25%</p> <p><strong>Filament:</strong> Goedis PLA Black</p>
With this file you will be able to print Makerbot End / Limit-Switch Holder 4 Anycubic I3 MEGA with your 3D printer. Click on the button and save the file on your computer to work, edit or customize your design. You can also find more 3D designs for printers on Makerbot End / Limit-Switch Holder 4 Anycubic I3 MEGA.