MakerBot Mini Gantry Support
thingiverse
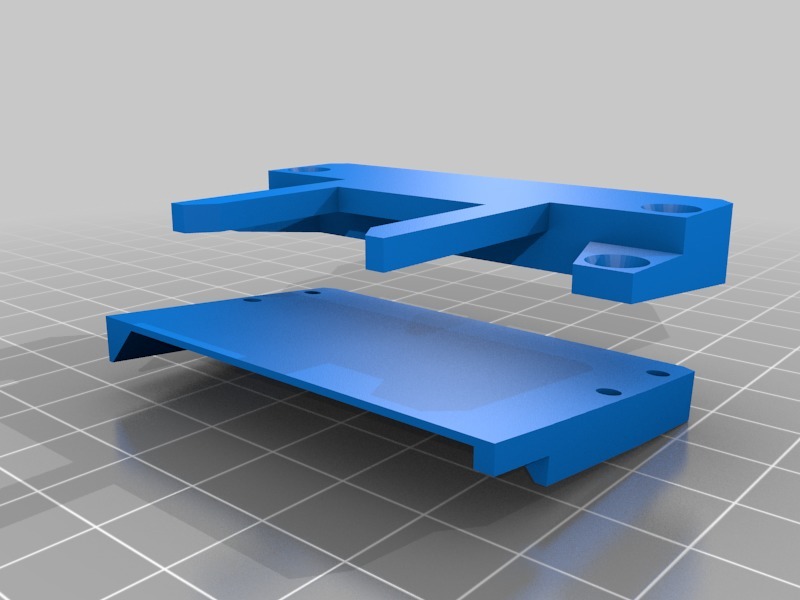
I was given a MakerBot Mini, and one of the first things I noticed was how weak and flexible the support that holds the gantry that the Smart extruder clips on to was. Horrid little plastic recess, that slots around a metal plate. It all wears and gets weak and allowed the print head 5mm or more freedom to slop around in the Y-axis. This is two part and requires 4 extra screws and drilling through the black plastic casing with a 2.5 or 3mm drill bit. Screws closest to the front of the machine are 3mm x 15mm and the others are about 8mm. both countersunk to all the heads to pass underneath the X-axis bump stops. Might need a little bit of further tweaking so I have included the Sketchup Files too. You need to pop off the Extruder, then move the gantry to the front to give clearance to get a Torx driver in to the two screws that hold the gantry to the metal plate. A slightly smaller Torx driver takes off two screws in the body that allows the catches to be popped and the unit stripped in half. Watch you don't drop it and pull the fan wires or the ribbon cable. Remove the ribbon cable.It does pop out easy enough when the clip either side of the fitting is given light pressure with side of a flat screwdriver. If you lie the machine on its back you can now see 4 hex head screws that hold the metal gantry support plate on to the carriage. You don't have to take this off, but it is easier if you do. You will see that the drive belt is clipped in to a plastic clip that just presses off. Possibly to make this easier , look to the back of the machine and locate the X Y axis motor tension screw and loosen the drive belt. To release belt tension there are two screws locking the motor to stop it sliding on the left hand rear motor, and a tension adjuster screw not eh back. slacken the two locking screws near the motor, then unwind the tension screw,..shoudl give you about 10mm of movement. When I did mine I actually cut one tooth off of the split belt and re assembled it in the the plastic unit . Belt tension was always a little slack, even with tension fully adjusted, so this gave proper adjustment back Put the metal carriage hanger plate back on to the main body with its two screws and clip the front half of the unit that holds the fans back on to the rear. You should now see how the Outer section with the arms slips over the metal plate. Slip it over and drill through the holes in the and outer carefully through the black plastic of the body. Disassemble the unit and take the metal plate off again. Refit the metal plate to the carriage slider and tension the belt etc. Now slip the newly printed inner Gantry Support plate in to the unit above the filament feed motor. so the back of it is just about flush with the back edge of the motor. Line up its holes with the holes you have drilled. Re connect fan cables and ribbon cable if removed, and clip the front back on. Fit your 4 new screws, lightly seat them in to the new part. If you tighten them now, you wont be able to get the assembly back on to the metal plate. Don't forget the two original screws act hold the two halves of the assembly together. Fit assembly back on to the metal plate The two smaller screws, can be accessed from the top. You need to slide the carriage fully left/right and you will see holes on the top where you can get to the screw heads. Now you will see why they need to be countersunk. If they are not, they do not slide underneath the rubber ends stops. The front screws can just about be accessed.. If you have used hex head countersunk screws, then a ball head driver will make the job easier. I cannot do any further work on this as both my Smart Extruders died and I was not going to spend more money on this dirty little printer, so the Mini has been scrapped, stripped of the stepper motors and trashed.
With this file you will be able to print MakerBot Mini Gantry Support with your 3D printer. Click on the button and save the file on your computer to work, edit or customize your design. You can also find more 3D designs for printers on MakerBot Mini Gantry Support.