MakerBot Percussion
thingiverse
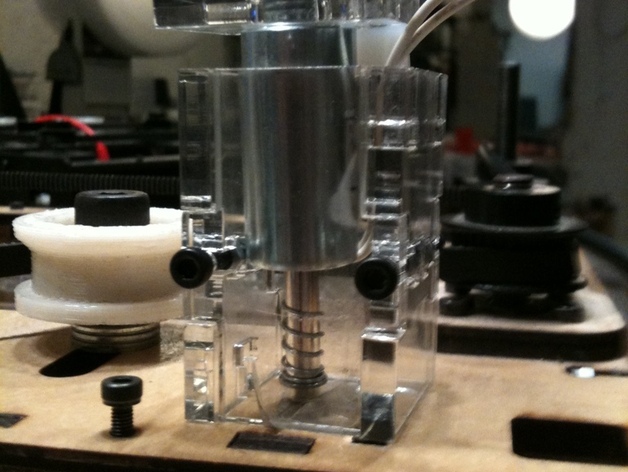
Calling all cars, I need some help! I\'ve uploaded the housing for a solonoid, (link). If it works, we\'ll have a really awesome solenoid drumbeat to control through gcode to compliment your Makerbot music. The goal is to make it so that as your playing music on your machine with the steppers, a solenoid can hammer out the beats. I\'ve been having fun working on it, but I\'ve hit a wall. Here\'s where I\'m at: The maximum number of voices a Makerbot can produce is three (x, y, and z axis). Harmonies can be made with these three step motors, yet the tempo and pitch of the motors are not always consistent. My initial idea was to build an external percussion instrument with a solenoid, which would perform along with Makerbot step motors. The extruder module includes: OWM driver board, DC motor driver board, temperature sensor board, RS 485 comms and arduino. Pressure valve control can be toggled on the control panel or called with the M command (M126/ M127). I chose the latter method. Pressure valve on/ off command was manually inserted between lines of the step motor command. Because there was not an easy way to realize beats in g code, the pressure valve commands were inserted randomly. Adding the command lines manually for the entire song was nearly impossible. As a result, the solenoid percussion was not playing with the Makerbot music at all. To synchronize the percussion with step motors, I created a percussion part on the z- axis of the step motor. The pitch was low enough not to be heard, and the notes were used as a guideline to enter the pressure valve command. Yet, this method was limited since it occupied one of the step motors, and the pressure valve command had to be manually entered still. To avoid adding pressure valve commands line by line with G code, I built a solenoid circuit with Arduino independently. The arduino sent signals to the three pins - two input signals for push buttons and one output signal for the solenoid. The solenoid looped with delays. The delay time determined the tempo of the solenoid percussion. One of the buttons changed the delay time to half of the other resulting in a subdivision of the beat. From this stage, Zeeshan Muphal, an intern a Makerbot, joined to work on code. *********Creating beat generator. quarter note(ms ) = 60000/BPM 8th note (ms) = 60000/BPM/2 16th note (ms) = 60000/BPM /4 The pressure valve is controlled by pin 12 on the extruder board Arduino chip. Via the MOSFET transistor, 5V is changed to 12V signal, which acts as a relay, and the gate of the MOSFET sends the digital signal to another source. When current passes through, the MOSFET turns the LED on and opens up the gate, which is the same command as M126. On our circuit, the power was drawn from Makerbot z axis step motor which contained a 5V and 12V DC source. The 5V source powered up the external Aruino board and the 12 V source was driving the solenoid. We connected the outboard Arduino board to the pressure valve terminal. The result was not what we expected. The solenoid was not triggered and the external Arduino board got overheated fast. We tested the extruder board, which seemed to work properly. Harry’s,(Makerbot engineer) theory was that the N channel of MOSFET is internally wired to Atmega 368 processor and unavailable to use as a digital output signal from its terminal. Theoretically speaking, the Arduino should have read the signal from the MOSFET, but the Atmega 368 processor was over driving pin12. However, Adam (another Makerbot engineer) thought it was still possible to use the pressure valve terminal(C+ only). But the result was the same. : Ok, if you have ideas on how to get this to work, I\'d love to get your feedback and ideas. This project isn\'t finished, but I\'m to the point where it needs help from you to get it so that our MakerBots around the world can pump some beats! Leave comments! Instructions Here is the arduino code that I\'m using. //This code was write by Haeyoung Kim and Zeeshan Mughal. int pushpin1 = 4; int pushpin2 = 5; int outputPin=13; int val1 = 0; int val2 = 0; int led = 12; boolean run1 = false; boolean run2 = false; int extruderIn = 8; void setup() { pinMode (pushpin1,INPUT); pinMode (pushpin2,INPUT); pinMode (extruderIn,INPUT); pinMode (led, OUTPUT); pinMode (outputPin, OUTPUT); Serial.begin(9600); Serial.println(\"start\"); } void loop () { val1 = digitalRead (pushpin1); val2 = digitalRead (pushpin2); if (extruderIn == LOW) { if (val2 == LOW) run1 =false; if (val1 == LOW || run1 == true) { digitalWrite (led, LOW); digitalWrite (outputPin,HIGH); delay(100); Serial.println(\"push pin1\"); digitalWrite (outputPin,LOW); delay(100); run1 = true; } else { digitalWrite (led, HIGH); digitalWrite (outputPin,HIGH); delay(500); digitalWrite (outputPin,LOW); Serial.println(\"push pin2\"); delay(2000); run1 = false; } } }
With this file you will be able to print MakerBot Percussion with your 3D printer. Click on the button and save the file on your computer to work, edit or customize your design. You can also find more 3D designs for printers on MakerBot Percussion.