Makerbot Replicator Quiet Fan mod

Makerbot Replicator Quiet Fan mod

thingiverse

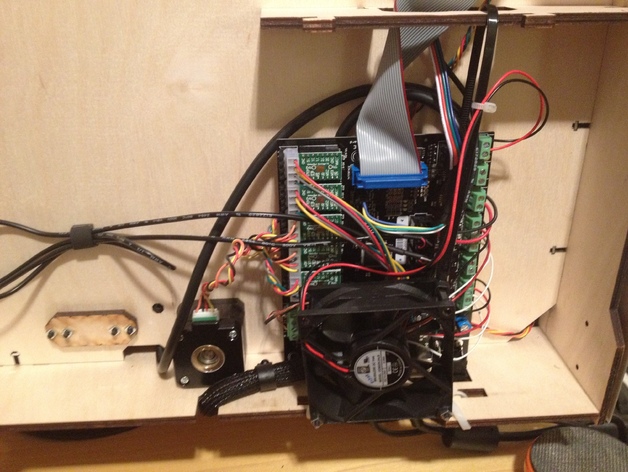
I've only had my Makerbot Replicator for less than a week, and I was already tired of the level of fan noise when the machine is idle. My job requires me to be on the phone when I work from home, and people could hear the fan blasting over the phone. So, I tracked down a larger, lower RPM fan to replace the tiny, angry little fan in the Replicator. I tried doing a solid mount with a metal bracket, but too much fan vibration was being transferred to the case. The noise was only moderately better. I then tried suspending the fan between 3 zip ties, and that isolated a majority of the noise. You can watch this vid to see a comparison of the original, the direct mount, and the zip tie mount: www.youtube.com/watch?v=0A_AMbNscj8& Doing this means that you can't have the bottom cover in place. However, fan airflow is greatly increased with this 80mm fan, so the board should run even cooler. The installation of the fan meant that the fan would touch the table surface if the normal rubber legs are installed. I removed the rubber legs on the base and replaced them with Bench Dogs, which are normally used in woodworking as anti-slip mats. The double-neoprene coating isolates a lot of the Replicator's movement during printing, making the unit quieter overall. They also add about an inch to the unit's height, allowing ample clearance for the fan. As a side note, the small fan appears to be the same one used on the extruders. So, you'll end up with a spare fan as a bonus. Instructions What you need: This Orion 24vdc 80mm fan:http://www.mouser.com/ProductDetail/Orion-Fans/OD8025-24LB/?qs=sGAEpiMZZMtffRBI%2F27p9D9Z%252b0ndCFBuddsQFKTde%2F8%3D 4 Bench Dogs:http://www.amazon.com/Bench-Dog-10-035-Cookie-Grippers/dp/B0037Z7D0A/ref=sr_1_2?s=hi&ie=UTF8&qid=1345958247&sr=1-2&keywords=bench+dogs Some long zip ties Allen key for removing bottom panel and original fan A small flathead screwdriver for loosening and tightening the fan wire connections Tin snips, bolt cutters, or another device capable of cutting screws easily Steps: Unload both extruders and remove the spools and spool holders Turn off the Replicator and unplug any cables attached to it Turn the unit onto its back. Remove the bolt and nut which secure the bottom into place, and remove the bottom plate Locate the 2 bolts/nuts which hold in the current fan in place and remove them. Put them aside for the moment, as we will be using them later Find the fan connector on the motherboard. Make a note of the polarity of the wires (or snap a picture), then use a small screwdriver to loosen the terminals. Remove the wires and set the fan to the side. Take the nuts you removed from the original side and insert them into the bracket on one side of the fan. Secure the nuts with the bolts, and then use tin snips or bolt cutters to trim off the excess bolt length. These bolts will be used as mounts for the zip ties which will hold the fan in place Connect the new fan wires to the motherboard, being sure to observe the correct polarity. Tighten the terminal screws to makes sure the connection is as tight as possible. I found this to be a little fiddly, as it is sometimes hard to get the wires into the correct position in the terminals. Take your time. Locate the 2 slots near the back of the machine which used to hold the bottom plate in place. Orient the fan so that the label is facing away from the motherboard and the bolts are facing the rear slots, and use zip ties to secure the fan to the 2 slots. Putting the fan in this orientation will pull air away from the motherboard instead of pushing air towards it. I wouldn't recommend putting the fan the other way around. When I tested the fan in the other orientation, the fan blew enough air that there was a breeze coming into the build area from the holes in the corners. That might be enough to warp your ABS parts. Use a long zip tie to connect the opposite side of the fan to the vertical support where the other side of the bottom plate used to connect. See the attached picture if that isn't clear. Make sure that any wires that might be in the way of the fan are moved or zip-tied out of the way. I used a couple small zip ties to make sure that the excess fan wires were moved neatly out of the way. Place the 4 bench dogs on your work surface where the Replicator will sit. Carefully pick up the Replicator and place it onto the bench dogs, making sure that the bench dogs are supporting the corners of the Replicator. Plug everything back in and turn the power on. If everything went well, you should enjoy a much quieter replicator.

Download Model from thingiverse

With this file you will be able to print Makerbot Replicator Quiet Fan mod with your 3D printer. Click on the button and save the file on your computer to work, edit or customize your design. You can also find more 3D designs for printers on Makerbot Replicator Quiet Fan mod.