MAKERFRONT Full Graphic LCD Mount
thingiverse
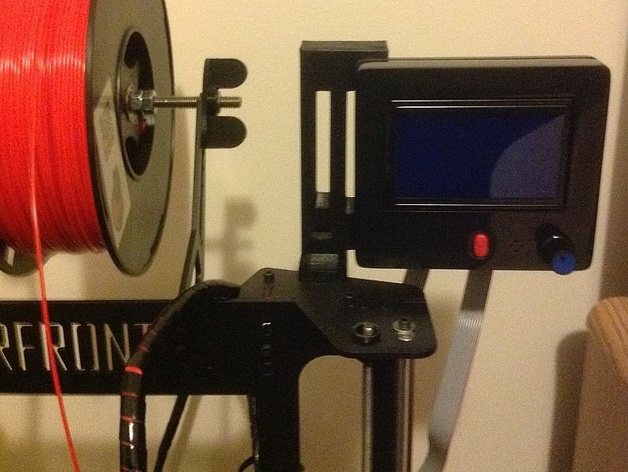
I Created this display mount to be used with the Full Graphic Smart LCD Controller case:http://www.thingiverse.com/thing:87250 It was a nice case, but I wanted to use it with my MAKERFRONT i3PROXL 3D printer. So I designed this in TinkerCad. I printed it with 100% infill ( I wanted it to be strong). I used OrbPolymer ABS 1.75 filament and it turned out well for me. I used three m3 40mm in length socket screws that I purchased from Bolt Depot. One socket screw is m3 12mm in length. The hole in the front is for an 11 inch plastic zip tie to keep it in place, but it fits so tight I am not using one. I did not want to alter the frame by drilling holes and this case is the best anyway! I just added the new file with a cutaway for the SD card. No need for pliers to take SD card out. That would be the file named: final_of_lcd12864_holder.stl Print Settings Printer: MAKERFRONT i3PRO3XL Rafts: Doesn't Matter Supports: No Resolution: .2 Infill: 100 Notes: I used a brim when I printed my mount. Layer Height: 0.2 Shell thickness: .8 Fill Bottom/Top thickness: 0.8 Fill Density %: 100 Print speed: 90 Printing temperature: 230 Bed Temperature: 100 Support: Brim Filament OrbPolymer ABS Diameter: 1.75 Flow: 100 Nozzle Size: 0.4 How I Designed This How I designed this I used my electronic calipers and took measurements of the frame thickness. I then measured the case dimensions. I figured out what dimensions I needed and loaded up TinkerCad with some square shapes and sized them to what I needed. I added the slots by dropping some square shapes and turning them into holes and adjusting them so not to use too much plastic. I tried to line up the holes where the three m3 40mm socket screws go to screw the case and mount together. I kept printing out a thin layer to check alignment and then I would stop the printer. It worked so I stopped working on the holes. Feel free to make them better. After all this I should have made a cutaway for accessing the smartcard. I use a pair of small needle nose pliers to pull the card out. In the future I will add a cutaway. I am sure this will work with less infill. I printed it at 100% because I wanted a strong mount. This mount with the display will not interfere with the height of models in your MAKERFRONT printer. In fact it is not in the wires way either!
With this file you will be able to print MAKERFRONT Full Graphic LCD Mount with your 3D printer. Click on the button and save the file on your computer to work, edit or customize your design. You can also find more 3D designs for printers on MAKERFRONT Full Graphic LCD Mount.