Makergear M2 Dial Indicator Mount
thingiverse
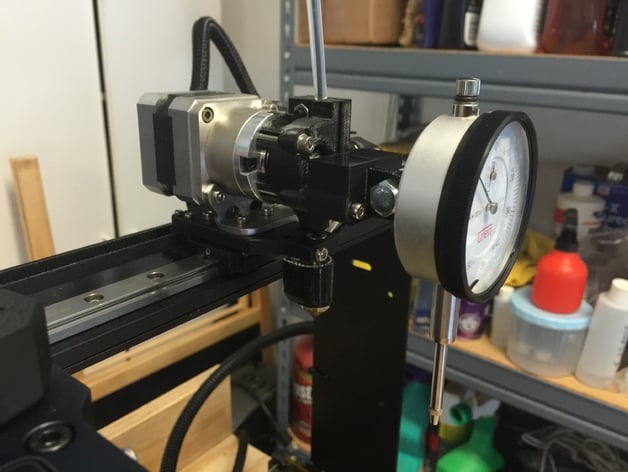
This bracket mounts a dial indicator to the Makergear M2, specifically with the V4 extruder/hotend assembly. The bracket is designed for easy installation and precision bed leveling. I printed it in ABS, but it should work well with PLA too. The design allows for shrinkage due to cooling. Installation: 1. Remove the bottom left screw from the extruder fan. 2. Place both fans on the X-axis rail out of the way. 3. Use the removed screw to insert into the bracket hole facing towards you. 4. Screw the bracket into the extruder assembly where the fan was removed, snugly but not overtightened. 5. Place the dial indicator lug to the right side of the mount point on the bracket. 6. Insert a bolt through both holes and tighten a nut, snug but not overtightened. That's it! Use the software interface to move the Z-axis up until the plunger engages. The exact Z height is not critical; just make sure all four corners are level relative to each other. I set my bed to 80C and manually moved the X and Y axes to position the dial indicator over each corner. Adjust the other three corners to match the highest point. It took me about 5 minutes to get my bed perfectly aligned, then removed the bracket and installed the fans again. Make sure to adjust your Z height after leveling the bed. I used the M2 Quick Start App to set my Z height correctly. Print this bracket and give it a try – you'll never go back to using anything else for precision bed leveling! Good luck! Dial indicator: TÜRLEN DIAL INDICATOR 0-1" AGD SPEC 0.001" w/LUG BACK Print Settings: * Printer Brand: Makergear * Printer Model: M2 * Rafts: No * Supports: Yes * Resolution: 0.2mm * Infill: 20%
With this file you will be able to print Makergear M2 Dial Indicator Mount with your 3D printer. Click on the button and save the file on your computer to work, edit or customize your design. You can also find more 3D designs for printers on Makergear M2 Dial Indicator Mount.