MakerSlide Mendel
thingiverse
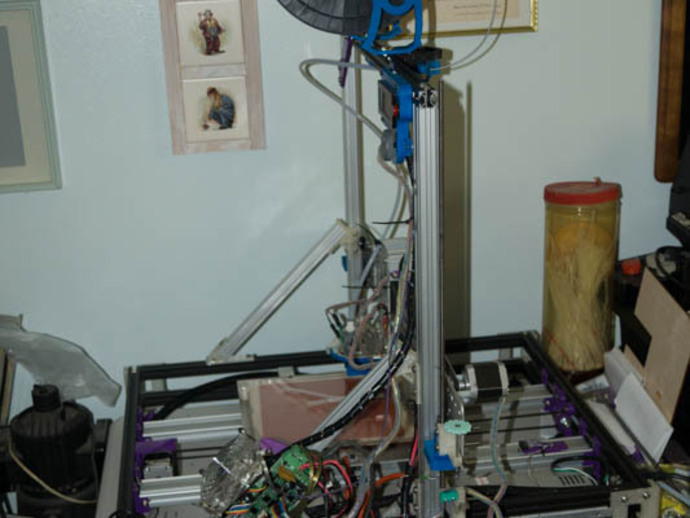
A 3D printer utilizing Makerslide for its X, Y, and Z-axis movement, with the size depending on the length of Makerslide used and heatbed dimensions. My particular build features a 9"x9" print surface; extra room is available to expand further. The setup employs a Bowden setup to supply the hot end and an eBay LED ring for bed illumination. An updated version (2/6/14) provides files for a fender washer and rod bracket to mount a 608-bearing supported rod that keeps the Y-axis belt steady, preventing it from whipping up and down during printing and avoiding loss of steps. The belt_bearing.stl file attaches to the sides of the Y-axis Makerslides for rod support. Additional hardware required includes four nuts, two standard washers, and a length of all-thread. A subsequent update (3/10/16) revealed that the MS_upper_base is unnecessary for Z-axis stability. The bed heater's relocation under the aluminum bed lowered its height, preventing X-axis collision with upper base and hotend contact with the bed. Various other fixes have been uploaded since the last update, including the elimination of springs for Z-nut holders. Photos illustrate assembly steps, while a Bill of Materials (BOM) lists required components, though some items might be incomplete. The BOM includes Misumi 2020 extrusions and Makerslides for X, Y, and Z-axis movement, along with assorted spacers, wheels, nuts, bolts, and other hardware. A 5mm tap is needed to thread the Makerslide. Post-assembly extrusion nuts are also recommended. Misumi extrusion nuts, spacers for #10 screws (3/8" long), and specific lengths of threaded rod and acme screws are detailed, along with V-wheel kits, an idler wheel kit, and various bolts in different sizes. Assembly instructions indicate the number of wheels on each carriage and specify motor mount requirements for NEMA 17 motors. The printer utilizes SCAD files from Josef Prusa's PrusaMendel repository, along with parts from Thingiverse designs such as http://www.thingiverse.com/thing:21334 (base) and http://www.thingiverse.com/thing:15163 (Y-axis). A belt adjuster from another Thingiverse design is also employed, while extra support at the top of the Z-axis can be derived from MendelMax designs. Various Thingiverse files contribute to components such as Y-idler, Y-motor mount, X&Y endstops, and a RAMPS board holder. The extruder mount is constructed with 1" aluminum angle and 1/8" 6061, adapted for Greg's extruder.
With this file you will be able to print MakerSlide Mendel with your 3D printer. Click on the button and save the file on your computer to work, edit or customize your design. You can also find more 3D designs for printers on MakerSlide Mendel.