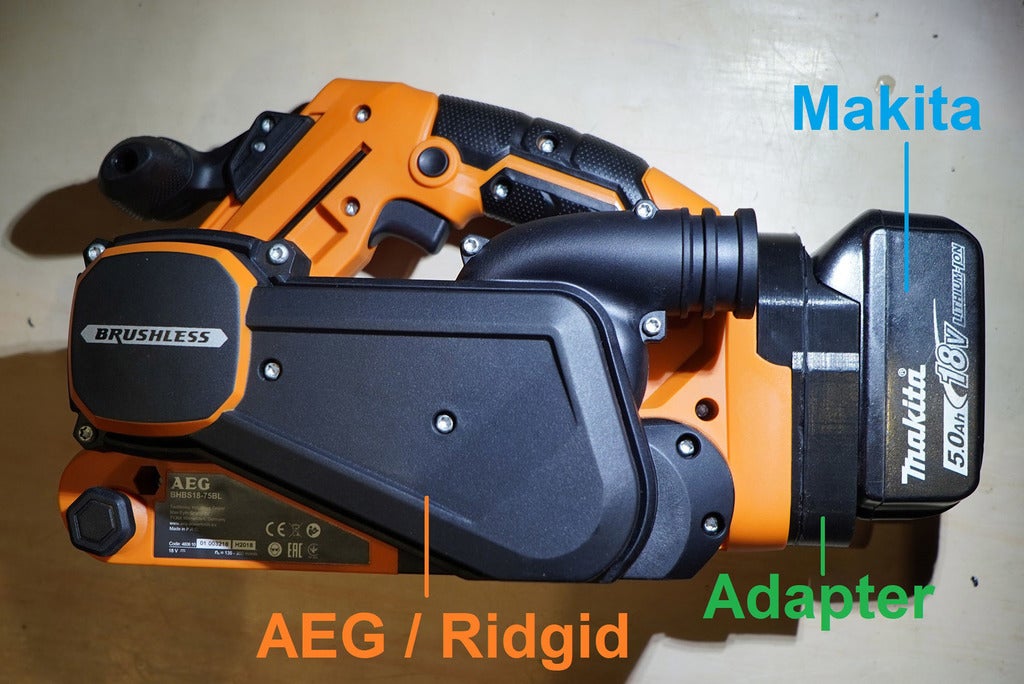
Makita 18v to AEG/Ridgid battery adapter
prusaprinters
<p>This is an adapter to use Makita 18V batteries in AEG (Ridgid) tools.</p> <p>This adapter uses geniune Makita terminals pad (such as 643852 or 643838). If you don't have it - either purchase it, or print/make it yourself - see<br/> <a href="https://www.thingiverse.com/thing:863257">https://www.thingiverse.com/thing:863257</a></p> <p>Important:<strong>DO NOT use this adapter with any AEG/Ridgid chargers!!!!</strong><br/> Important:<strong>Makita's battery without star symbol does not have over-discharge protection in the battery</strong>. Use carefully with this adapter and AEG/Ridgid tools, as a tool can drain battery completely - making it unusable. Always check remaining charge when using batteries without star symbol.</p> <p>Parts are oriented in assembly orientation. I suggest to rotate parts to optimize supports. I recommend to print parts by placing internal side on the bed, so when you connect both parts together - they will fit nicely, two flat surfaces will match without gaps.</p> <p>You will need:</p> <ol> <li>Two metal strips with approximate size 6x32 mm: <ul> <li>You can cut strips from flat metal sheet / fixture from your local hardware storage.</li> <li>Nickel-plated strips for welding 18650 is also an option.</li> </ul> </li> <li>Some thick wires - no more than 3mm in diameter (including isolation).</li> <li>Makita terminals pad.</li> <li>One or two weak springs. The holes are 6x13 mm, so 5.55x17.46 spring should fit nicely. You can shorten / cut spring if it will be too strong.</li> <li>4 self-tapping screws or normal screws + tapping tool. M3 or M4 are best, M5 is probably an option. Screws should not be longer than 18 mm.</li> <li>Hot glue or other adhesive (epoxy is an option).</li> <li>Soldering iron.</li> </ol> <p><strong>Assembly</strong>:</p> <ol> <li>On Makita terminals pad: cut the barrier between contacts flush with the rest of the pad. If you are going to print the model by yourself - you can edit it to exclude this barrier.</li> <li>Print all 3 parts (Makita's part, AEG's part, and the latch).</li> <li>Check if your screws fit. You may need to drill / enlarge holes. You may also need to tap holes if you are using normal screws (not self-tapping).</li> <li>Cut two 6x32 metal strips. If you are using thin metal (like Nickel-plated strips for 18650 welding) - then cut longer strips and fold it few times until a good thickness is archieved.</li> <li>Use flux to put solder on ends of both strips and Makita terminals pad.</li> <li>Solder wires to two metal strips.</li> <li>Insert metal strips from the back of AEG part. There should be sufficient spacing to fit. Refer to images to know polarity. Red is +, black is -.</li> <li>Position metal strips so they are inserted into appropriate grooves. There should be a gap at the bottom - as displayed on the image. Move strips just a bit inward, so they are not visible from the top. Once positioned - fix them with hot glue or whatever you are using.</li> <li>Shorten wires, so they are no longer than AEG part - as displayed on the image.</li> <li>Solder wires to Makita terminals pad as displayed on the image.</li> <li>Route wires as displayed on the image.</li> <li>Insert latch and the springs. Refer to the assembly image if in doubt.</li> <li>Use Makita's part to cover everything. Align both parts, make sure wires are not pinching.</li> <li>If everything looks OK - press parts together and use screws to fix them.</li> </ol> <h3>Print instructions</h3><p><strong>Printer Brand:</strong> Prusa<br/> <strong>Printer:</strong> I3 MK3S<br/> <strong>Rafts:</strong> No<br/> <strong>Supports:</strong> Yes<br/> <strong>Resolution:</strong> 0.2<br/> <strong>Infill:</strong> 25%<br/> <strong>Filament:</strong> ABSMaker PETG Black</p> <p>Four perimeters should be enough. Brim is recommended, because it is important that internal sides will be as flat as possible.</p> <p>The fit for Makita terminal pad is tight. The fit for adapter and battery should be normal (not tight, not loose). Depending on your printer, its accuracy, used filament, and filament's dimentional accuracy (shrinkage rate) - you may need to adjust the model slightly or post-process printed parts; I have used 0.2 mm and 0.3 mm as a gap for close fit surfaces.</p>
With this file you will be able to print Makita 18v to AEG/Ridgid battery adapter with your 3D printer. Click on the button and save the file on your computer to work, edit or customize your design. You can also find more 3D designs for printers on Makita 18v to AEG/Ridgid battery adapter.