Shapeoko 3 Bitsetter and Probe Holder
thingiverse
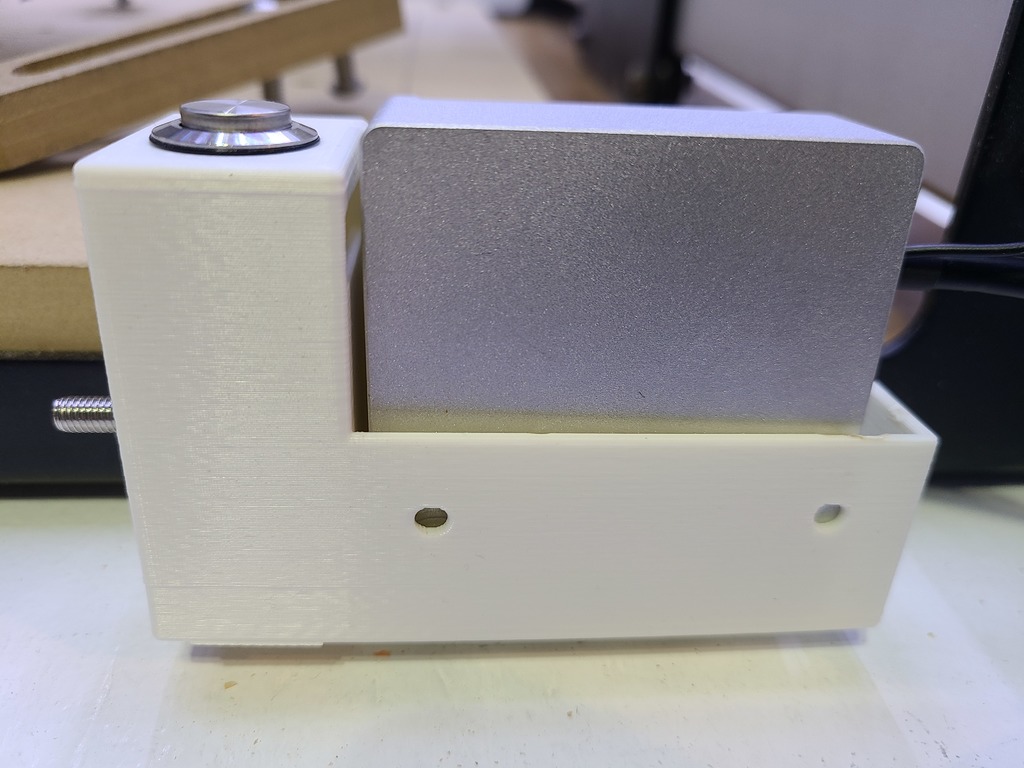
I had some fitment issues using <a href="https://www.thingiverse.com/wdoler/about"> Wade Oler's </a> bitsetter & probe holder on my 2015 Shapeoko 3, and decided to build one that would meet my design requirements: - 30mm of height from by table surface to the top of the metal bar on the front of the Shapeoko (There are no feet on the early versions.) - Setscrews accessible from the front of the machine to secure the bitsetter to the frame - Using the touch probe as the electrical path back to the Carbide processor board - Incorporate an access hole to assist in getting the button nut on the button I am using a Dog River probe and 16mm switch from Amazon: [Dog River XYZ Probe](https://smile.amazon.com/gp/product/B07TBRFQWQ/ref=ppx_yo_dt_b_asin_title_o00_s00?ie=UTF8&psc=1) [16mm Pushbotton](https://smile.amazon.com/gp/product/B07931588C/ref=ppx_yo_dt_b_asin_title_o00_s00?ie=UTF8&psc=1) Additional hardware required: - 2 M3x6 button-head screws for setscrews - 1 M5x20 screw (head type is irrelevant) for your ground post, nut & washer - 2 M3 4mm thick by 5mm diameter [Threaded Inserts](https://smile.amazon.com/Glarks-Threaded-Embedment-Assortment-Printing/dp/B07L96KVP3/ref=sr_1_1_sspa?dchild=1&keywords=threaded+inserts&qid=1592394062&s=industrial&sr=1-1-spons&psc=1&spLa=ZW5jcnlwdGVkUXVhbGlmaWVyPUEyTUhCM09RRFI1VzBLJmVuY3J5cHRlZElkPUEwMTE4MjY4MktXQlFHWThNS0cxNyZlbmNyeXB0ZWRBZElkPUEwMjcxNzkxMzFMV1lGM0xDN1pDOSZ3aWRnZXROYW1lPXNwX2F0ZiZhY3Rpb249Y2xpY2tSZWRpcmVjdCZkb05vdExvZ0NsaWNrPXRydWU=) - 22 gauge solid-core wire (what I used, YMMV) I printed in PLA using 15% infill, .25mm layers, 4 layers on all sides and supports generated only on the bed. The supports come off easily with a set of needle nosed pliers. Once printed I attached my wires to the button and installed it, pre-stripping the working ends (one with about 2in/50cm of bare wire, one with 10"/25cm of bare wire). Wrap the short end around the head of the M5 screw and secure with the nut and washer. I wove the long bare wire through the holes in the bottom of the probe holder area to ensure good contact when the probe is in place. Overkill, I know... Use a soldering iron to press the threaded inserts into the plastic through the large holes on the waste board side of the probe holder, cut/pick away any excess plastic on the inside before it gets cool. I found using a long M3 screw helped clearing the hole, as well as a positioning aid if you need to re-heat the insert to get it just where you want it. Insert your set screws from the front and install. I've included my Fusion 360 file in case you want to tinker. Please note that V4 is pictured above, V5 shortened the probe holder area by 6mm (It was using extra filament for no purpose.) Edit 6/19/2020: I made a new version that is ~20mm shorter for those of you who use longer bits and need the Z height. STL and Fusion 360 files have been added for the Short version.
With this file you will be able to print Shapeoko 3 Bitsetter and Probe Holder with your 3D printer. Click on the button and save the file on your computer to work, edit or customize your design. You can also find more 3D designs for printers on Shapeoko 3 Bitsetter and Probe Holder.