Mario Zoetrope for Your Bike
pinshape
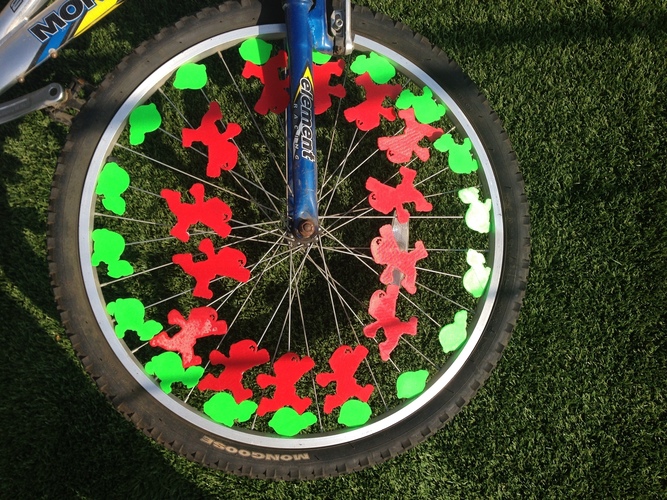
This is my Mario bike zoetrope, that I originally created for the bike accessory contest, but then decided to do a different animation instead, because the Marios are a little tricky for placement with this one. When you spin the wheel, Mario hops around bopping the Koopas!* The design was created for 36 spoke wheels, using the 18 spokes on one side of the wheel, however, it would be relatively easy to add or remove sections of the Koopa animation for a different number of spokes. I created the spoke clips to be able to fit 2mm or 3.5mm spokes in diameter, so measure your spokes first so that you know which ones to print. The biggest piece is supermario, and he's only just under 3.5", so this print should fit fine on most printers. Print the bike clips at the highest resolution you can for a better fit on the spoke. You will also need a powerful glue to attach the prints to the bike spoke clips. I suggest E6000, which is what I used for mine. Print out 2 each of: Koopa2, Koopa5, Koopa6, 4 each of: Koopa1, Koopa3, Koopa4, and print 14 of Supermario. Start with 18 of bikecliplong in either 3.5 or2mm for the Koopas, and then you will have to play around with the placing of the Marios to estimate how many of each of the bikecliplong and bikeclipshorts you will need. The long ones are best to use on the main body, but there will be some cases where you only have arms or legs touching the spokes, and these are what you print the short ones for. The sequence for the Koopas goes 1, 3, 4, 6, 5, 4, 3, 2, 1, and then you repeat the cycle over again so that the whole wheel is two cycles of the animation. Place the long clips as close to the wheel rim on each of the 18 spokes on one side, and then go to each one and glue the sequenced Koopas down one by one. For Mario, you can try to position them the way they are shown in my full-wheel photo above, or you can work out an arrangement on your own. Just remember that he not only has to change vertically with each move, but also be slightly angled a little bit on each new placement, because he is spinning around a wheel rather than just moving forward on a plane. After you know how you want him positioned, attach the bike clips in the appropriate spots where sections of him touch spokes, and then glue him down to the clips. Once everything is dry you can spin the wheel, and look through your cell phone lens at it to see the animation! You can view a video of the animation here: youtu.be/a1F7r4ZAe9A *NOTE: You can only see the animation through a digital camera lens, such as your cell phone's, or by using a strobe light on it at night. To the naked eye it will just be a blur when you spin it.
With this file you will be able to print Mario Zoetrope for Your Bike with your 3D printer. Click on the button and save the file on your computer to work, edit or customize your design. You can also find more 3D designs for printers on Mario Zoetrope for Your Bike.