Marionette Probe
thingiverse
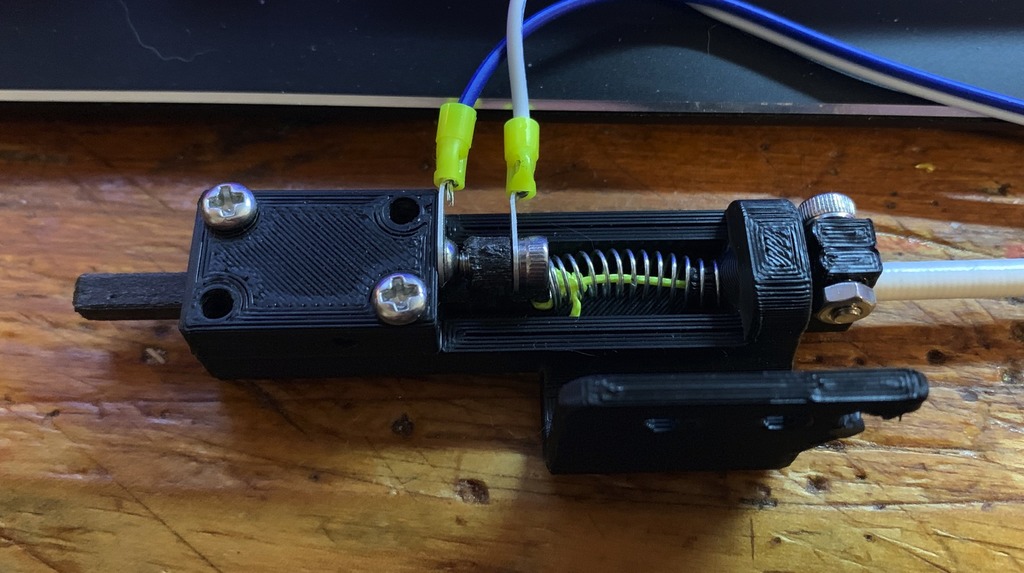
This probe was named by JohnOFCII on the RailCore DIscord because it uses a string and a remote servo for retraction :D It was inspired by Josh Vasquez's (https://www.thingiverse.com/poofjunior/about) TC project with remote servo/stepper driving the lock via strings/wires through a spring guide. It's very precise and repeatable; I routinely get sample runs of 100 probes with < +/-0.0015 variance (i.e., from 0.001 to 0.004). I bought a bunch of assortments from amazon, because I like having a bunch of parts. I'm sure you can find individual parts cheaper. I like the curtain wire as a spring guide because the vinyl covering looks pretty nice and keeps you from messing it up. Also it's cheap. This probe can be adapted to any printer. I'll publish the (messy) F360 files soon for anyone who wants to mess with it. ==BOM for marionette probe:== Assortments of things I bought for projects, and used bit M3 self-tapping assortment https://amzn.to/2xJXzJe used 6 screws, TONS left over $11.88 M2 Self-tapping assortment https://amzn.to/30Tz6h9 used 1 (ONE) screw, TONS left over $13.59 M2.5 button head assortment https://amzn.to/30TNuWG used ONE screw, TONS left over $11.99 piscifun braided dyneema fishing line https://amzn.to/30OpXGG used maybe 1.5M $13.99 Wire and dupont connector for end stop connection Other things bought specifically for probe: Curtain Wire (same as spring guide, essentially, but cheaper) https://amzn.to/311Cxm5 enough for 3 probes $6.99 Servo for probe https://amzn.to/30OpHYe enough for four probes $20.99 wire eyelets from mouser https://www.mouser.com/ProductDetail/3m/10-6-wn/?qs=IwP4MzewXAiNtD5F8EXVPw%3D%3D&countrycode=US¤cycode=USD need 2 for a probe $0.73 per You'll need a spring, something ~1"/25mm long, fairly low strength, and just big enough to go over the pin end and the guide. ==Assembly== The pin and channel don't offer much clearance. If you're overextruding at all, it won't slide. Even when you're dead on the money you may have to sand a tiny bit to get smooth motion, but it should fall freely from gravity. Anyway, print up the parts, make sure pin works smoothly, use a high temp filament (I used PC+ from SnoLabs the last time I printed it). I recommend .2 layer height, .5 line width, four perimeters and 20% infill. Once you get the parts, get your fishing line ( the dyneema stuff, not monofilament - this is important ) and tie it through the hole in the top of the pin. Thread the spring onto it, and poke the spring through the hole in the top of the main body. Pull the string through and align the pin with the groove it rides in with the loop facing out. Put your eyelets on your wire for the probe connection (I used the E0 stop on the Duet Wifi). Get the m2.5 button head screw, about 4-5mm long, and thread it in the hole in the end of the cover (the rectangular block with four holes in it) with one of the eyelets captured. Get a stainless steel M3 screw (I used socket cap head) 6mm long and thread it through an eyelet and screw it into the loop on the pin. Now place the cover block on the front of the body, with the M2.5 screw at the top, and put two M3 self-tapping screws into two diagonal holes like the picture shows. They should be about 8-10mm long. Once this is complete, you should be able to hold the probe, pull on the string, and break contact; and when you release the string, the spring shoudl push the top screw down against the button head of the bottom screw. Now cut the curtain wire to the necessary length (from the probe, through the wire whip, to the place you want the remote servo to be when you're done). Thread the string through, press the curtain wire into the clamp on the probe and clamp it with an M3 screw and nut. On the other end, take the servo base and mount the servo to it with a couple more self-tapping M3 screws. Trim the horn as shown in the pictures, and install it with the servo rotated fully CCW, such that the end of the horn is close to the hole the string will emerge from. Feed the string through the hole in the servo mount, push the curtain wire into the clamp and clamp with an M3 screw and nut. Feed the string through the hole in the servo, and pull it out until it's *just* loose, and the screws are still touching. Now stick a 3mm M2 self-tapper (or other screw that fits) through the hole in the servo arm to retain the string. Connect the servo to a servo controller on the Duex2/Duex5, and configure your deploy probe and retract probe appropriately (I'll publish my settings soon). Connect the wires from the two screws to an endstop and configure M558 for your end stop (Again, I'll publish my settings soon.) Duet configs: config.g: M574 Z0 M558 P4 C2 I0 ; marionette in Z endstop M307 H4 A-1 C-1 D-1 ; set duex4 "heater 3" to control the Servo Deployprobe.g: M280 P4 S185 ; Marionette - adjust S for proper string tension (loose) on deploy G4 P600 ; wait for it to deploy retractprobe.g M280 P4 S80 ; marionette - adjust S for full retraction G4 P600
With this file you will be able to print Marionette Probe with your 3D printer. Click on the button and save the file on your computer to work, edit or customize your design. You can also find more 3D designs for printers on Marionette Probe.