Marking Gauge - Traditional Woodworking Tool
thingiverse
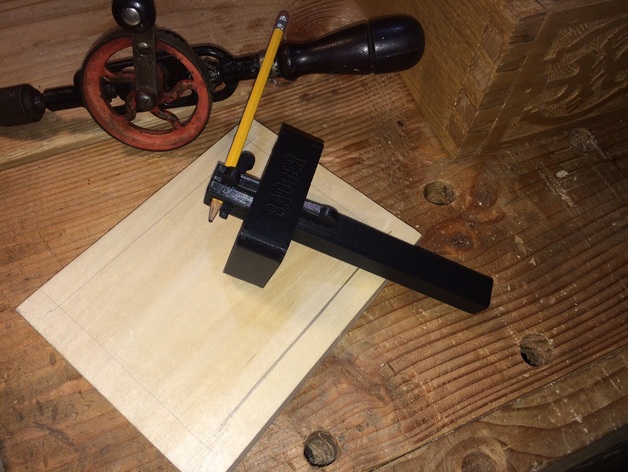
In addition to 3D printing one of my hobbies is "traditional" aka Hand Tool woodworking. One of the tools that I use a lot is a marking gauge, and it never hurts to have extra around. So I thought I would model it up and see how well it would work in modern materials. The marking gauge is an ancient tool, and examples have been found back as far the 1500's What is it used for? A marking gauge is typically used to scribe a line parallel to the edge of board. It allows you to make repeated markings of the same width on any number of boards. If you're making a table you want all the legs to be the same width, and you can measure once and mark multiple times with this tool. I also use it for marking the border around a board for carving designs. This design borrows a lot from the historical examples, using a captive wedge to hold the beam in place, and a wedge to hold the pencil in place using friction. I opted for the pencil instead of a cutting/scratch gauge using a nail or metal blade which is also common. I might make an additional beam that allows for that later. Instructions I printed mine in PLA on a Printrbot Metal Plus. Print one of each, including the two sizes of pencil wedges. I found that the standard Yellow #2 Pencil worked well with the larger one. Slide the captive wedge into the slot (might need to sand it slightly) so that the angles match on the inside. You want the captive wedge to be flat against the beam when you slide it in. This allows you to slide the wedge back and forth to trap the beam in place, and slide back to release it for changing the setting. Slide the beam in so that it is 90 degrees off from the captive wedge. If you have it in the same plane it will interfere with your marking. Slide the pencil, and insert the pencil wedge until it's tight. You want the pencil to protrude a little under an inch. Line up your pencil point where you want it to mark on the board, and tighten the captive wedge to lock it in place. If you need to adjust you can tap it slightly with a small hammer, or release the beam and reset. In practice you should be able to lock the captive wedge with your thumb. Might be worth roughing up surfaces with a light sandpaper to increase friction if you getting slippage. Happy woodworking!
With this file you will be able to print Marking Gauge - Traditional Woodworking Tool with your 3D printer. Click on the button and save the file on your computer to work, edit or customize your design. You can also find more 3D designs for printers on Marking Gauge - Traditional Woodworking Tool.