Marmo Over-Engineered 3d Printer Control Box - Tevo
thingiverse
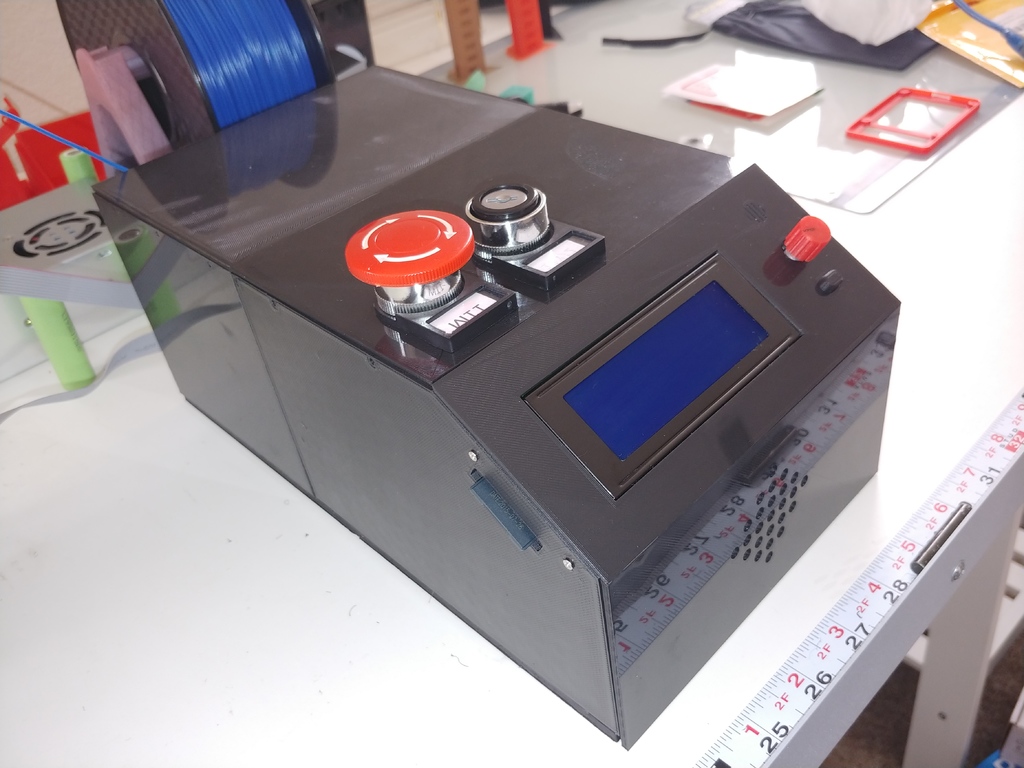
What I have designed here is an over-engineered control box that will hold an S-300-12 PSU, RaspberryPi (via separately printed bumper and then glued in place), 1 hot bed Mosfet, the MKS 1.4 board, a LM2596 Buck Converter and, the top cover of the MKS board that holds the fan. Yes, I know... ANOTHER control board case... This is my FIRST ever designed part and I hope it works for you. This case will hold the PSU tight from the top and bottom and is designed to vent to the side through the spiral cutout. Cooling is passive but the PSU fan draws enough air in from the front that heat should not be an issue. If it is, the holes in the front are designed to fit a 40mm fan using bolts and nuts. Parts should be printed FLAT with no support. Parts that need support have them built in as tear-away tabs that are easy to snap off and will break clean. The top forward panel has two holes to place emergency stop button and keys. It is printed thick to support the possible pressing of buttons and switches with minimal bowing or flex. Blank top with no holes coming... The holder for the MKS board has a ladder for wire strain relief. Use wire ties to attach the wires to the ladder so the wiring does not pull on the connectors. The USB connector CANNOT be used in this case as it is too close the side wall however, you CAN solder a USB pigtail directly to the underside of the MKS board (see picture of the underside of board). Rear Panel is designed to take the fused and switched iec320 c14 plug. Three Aviation Connector (GX16-10) style 10 pin plugs are designed to handle ALL connections EXCEPT Hot End and bed, those go to the XT60 connectors. The XT60 connectors are deigned to fit TIGHT so solder them BEFORE you insert them into the part. They are also going to sit into a separate XT60 connector holder block. This means you install the connectors into the block and then you slide the block into the opening in the rear panel from the inside out. You can then glue the block in place or let the friction hold it. I designed it so that you can grip the block the while you are inserting or releasing the XT connectors instead of pulling on the connectors themselves. Basically, it acts like a small handle. You need to use the C14 Standoff in order to allow for clearance with the wiring and the top of the MKS board fan shroud. Screw holes are meant for M2 self tapping (not metal threads) everywhere EXCEPT bottom front where M2.5 threaded are meant to be added. Bottom parts have a 1mm gap between the seams to allow for glue expansion. The front LCD panel holder is keyed to the front vent panel and slotted to fit tight. **UPDATE** I just added a custom spool holder that sites on top of this case. No need to use the braces. The clips hold the spool just fine without the lower braces.
With this file you will be able to print Marmo Over-Engineered 3d Printer Control Box - Tevo with your 3D printer. Click on the button and save the file on your computer to work, edit or customize your design. You can also find more 3D designs for printers on Marmo Over-Engineered 3d Printer Control Box - Tevo.