MARU the mechanical puppet
thingiverse
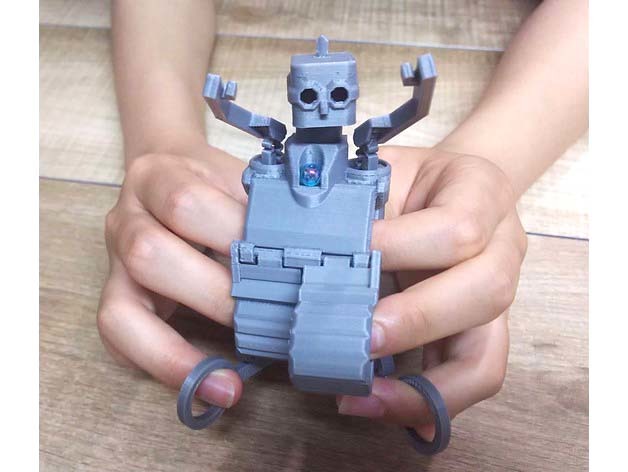
A puppet that is easy to print and assemble. The head and both arms are operated by levers, and the feet are operated by directly inserting fingers. I made it to participate in doll play for my little daughter and to practice 3D CAD. The name has no deep meaning or origin. My daughters named it in their mood. Assembly reference video https://youtu.be/jP_gfVPH3uA 1:Print the body, the three shafts, the head, and both arms. 2:Use a cutter or thin stick file to remove any protrusions or adhesions on each part. The following areas should be carefully shaped. ・The gap between the two bars of the center shaft. ・The pin receiving hole and groove on the shoulder of the arm part, and the gap between the holding plate on the opposite side of the hole and the arm body. ・Square hole in the head part to receive the center shaft. 3:Insert the three shafts into the body. Align the protrusion on the side of each shaft with the notch in the hole in the body and insert it. Insert the center shaft first, and when it is inserted all the way in, turn the lever to the rear side of the body. Lightly move the bars on the left and right shafts to remove any sticking of the pin hinges on the levers so that they can move smoothly. The left and right shafts need to be rotated a little to insert them. 4:Assemble the arms and head. The arm parts can be fitted by inserting the two pins at the tip of the shaft into the holes first and then pushing the shoulders from above. Once the arm parts are in place, move the arm many times while pinching the shoulder parts from both sides so that the holding plate does not open, and it will fit well. (If the arm parts do not fit well, try it with the shaft removed from the body.) That's all :) ・An energy ball (6 mm BBs) can be set on the chest. ・The hand is designed to grab a 1.75 mm object. ・The board visible behind the eyes is designed to be easy to cut. Please cut according to your preference. ・In addition to the required data, I uploaded the data of the following optional parts optionalhead1: He is called ozzy. optionalhead2: He is called omoo This data includes the support. stand: Place the lever that operates the head between the wings. RENAME 06.25.2021: I changed the name of this from MARUZU to MARU because my daughter, who is the godfather, changed her mood.
With this file you will be able to print MARU the mechanical puppet with your 3D printer. Click on the button and save the file on your computer to work, edit or customize your design. You can also find more 3D designs for printers on MARU the mechanical puppet.