Marvin the Martian
thingiverse
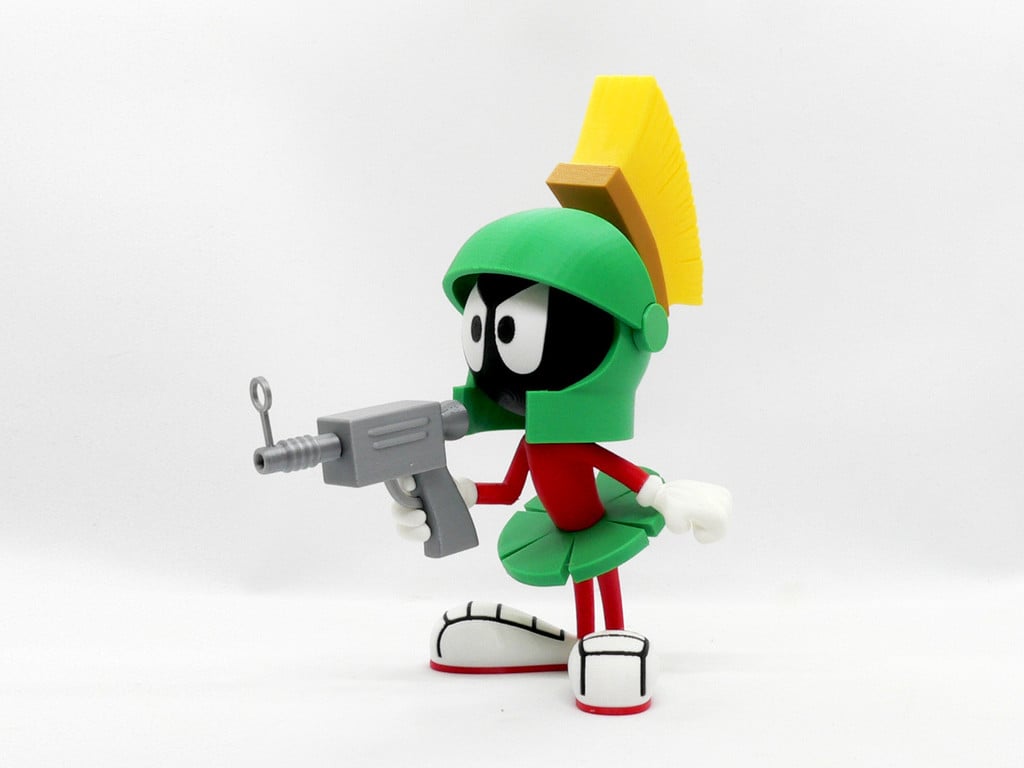
Marvin the Martian is an extraterrestrial character from Warner Bros.' Looney Tunes and Merrie Melodies cartoons. Marvin hails from the planet Mars, but is often found elsewhere. He is often accompanied by his dog "K-9". On numerous occasions, he has tried to destroy the Earth with his "Illudium Q-36 Explosive Space Modulator" No supports are required. Two pieces contains built-in supports, optional parts without the built-in supports are also supplied if you want to use your slicer supports (see notes below). If you have the proper filament colors, no painting is needed. The assembled model is 210mm tall. Enjoy! **visor.stl and helmet.stl files corrected on July 22, 2021** ........................................................................................................... **Print Instructions:** Supports: No Resolution: .2mm Infill: 10% Notes:** Refer to the notes below for a few helpful printing and assembly instructions. ........................................................................................................... **Building the model** Colors Black: (Paramount3D PLA - Black) head eye_black_right eye_black_left shoe_stripes_left shoe_stripes_right shoe_dots (contains four identical pieces) .. Yellow: (Paramount3D PLA - Simpson Yellow) broom_bristles .. Gold: (Hatchbox PLA - Gold) broom_base broom_handle .. Green: (Hatchbox PLA - True Green) visor visor_connector_left visor_connector_right helmet belt .. Red: (Hatchbox PLA - True Red) legs body body_without_supports (optional piece) shoe_red_left shoe_red_right .. White: (Overture PLA - White) eye_white_left eye_white_right shoe_white_left shoe_white_right hand_left hand_right hand_right_without_supports (optional piece) .. The gun is shown with different colors. I used: Silver: (Protoparadigm PLA (out of business) - Silver) gun_body gun_barrel_front gun_barrel_back gun_trigger gun_sight Any color: (hidden piece): belt_pin .. ........................................................................................................... **Printing and assembly tips** Printing tips 1 - No supports are required. Two pieces contains built-in supports, hand_right and body. Optional parts without the built-in supports are also supplied if you want to use your slicer supports 2 - There are some pieces that may need brims or rafts, use your discretion. When setting up my prints I prefer to be conservative, especially since the base of many parts are hidden when inserted into another part. *I used brims on: - hand_left, hand_right - shoe_dots 3 - Do NOT use a brim on the shoe_stripes. The part prints easily without a brim and a slightly thick first layer due to a brim may result in a tight fit. 4 - When removing parts from the printer bed, it's a good idea to place left/right parts into separate containers to help with the assembly process since many left/right parts are very similar. .. Assembly tips: 1 - Take your time gluing the model together and enjoy the process. Give some thought into which parts to glue together as groups and then gluing the groups together. Let the glue for each group set completely before combining groups. 2 - I used E6000 sticky craft glue to put this model together. The sticky glue allows more time to position the parts than a fast drying superglue. I have 'fat fingers' and a shaky hand, so the sticky glue works out best for me, especially with small pieces. Just remember to leave enough time for the glue to set before combining too many parts. 3 - Based on maker feedback I made some of the connections a bit looser. This turned out to be a double edged sword. The looser connections make gluing a bit more fussy. My broom dried at a slight tilt instead of straight! So, for this model, some parts may be easier with a fast drying superglue. 4 - Be sure that the hands are glued properly to the body and the flat parts join nicely. If you have any problem, just clean off a bit from the body connector to ensure a smooth connection. 5 - The gun fits nicely into the hand and does not need to be glued in case you want to swap out the gun with another color or object. My wife could not decide on the gun color until the model was finished so I printed three different guns until she found something she liked. 6 - The visor connectors should be glued into the helmet before attaching the visor. The visor will only fit one way, the flat bed side of the visor should be on top. Take care ensuring left/right connectors are on the correct sides. The full helmet/visor can be dry fitted to ensure everything is in the right place. 7 - Refer to the assembly diagrams in the pictures section as well as the uploaded pictures for putting the model together. The model is meant to be glued. Do not hesitate to ask questions, feedback is essential to making better models.
With this file you will be able to print Marvin the Martian with your 3D printer. Click on the button and save the file on your computer to work, edit or customize your design. You can also find more 3D designs for printers on Marvin the Martian.