Master Sword Sheath
pinshape
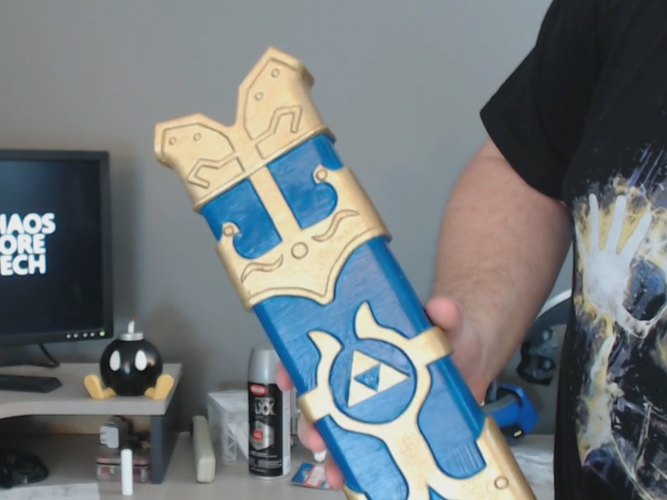
If you want more information and to see it more closely, watch this video: https://youtu.be/Za5byBQs0I4 This is the sheath that goes along with the Master Sword I created here: https://pinshape.com/items/20134-3d-printed-master-sword-full-size-legend-of-zelda I created this sheath in Fusion 360 along with the sword. I printed this on my Robo 3D R1 using Hatchbox White PLA. The settings I used for this are listed below. The whole thing took about 14 hours to print. Print Settings: Layer Height: 0.3mm Infill: 20% Supports: No Raft: No Post-Processing: Step 1: Print and Assemble. Print all the pieces out and use the keys provided to position everything correctly. Step 2: Glue. Use Super Glue to glue all of the pieces in place. Let them sit until the glue completely sets up. We let ours sits for several days. Step 3: Hide the seams. We used Loctite repair putty and just smeared it on the seams in order to cover them up. Step 4: Sanding. Sand any rough spots and make sure to get the repair putty sanded down flush with the rest of the sheath. Step 5: Prime. Apply a couple coats of plastic primer, letting it dry completely after each coat. Step 6: Paint the blue sections. We used an airbrush for this, but any painting technique can be used. Step 7: Paint the gold. Again, any technique can be used, but we went with a small painting sponge to give it a cool texture and allow for easy coverage on these big areas. Just dip the sponge in the paint and dab it all over the areas you want to paint. Step 8: Apply some sort of finishing coat to it in order to protect it from damage to the paint.
With this file you will be able to print Master Sword Sheath with your 3D printer. Click on the button and save the file on your computer to work, edit or customize your design. You can also find more 3D designs for printers on Master Sword Sheath.