Master Sword Triforce Pedestal Stand (Breath of The Wild) (Light-Up)
thingiverse
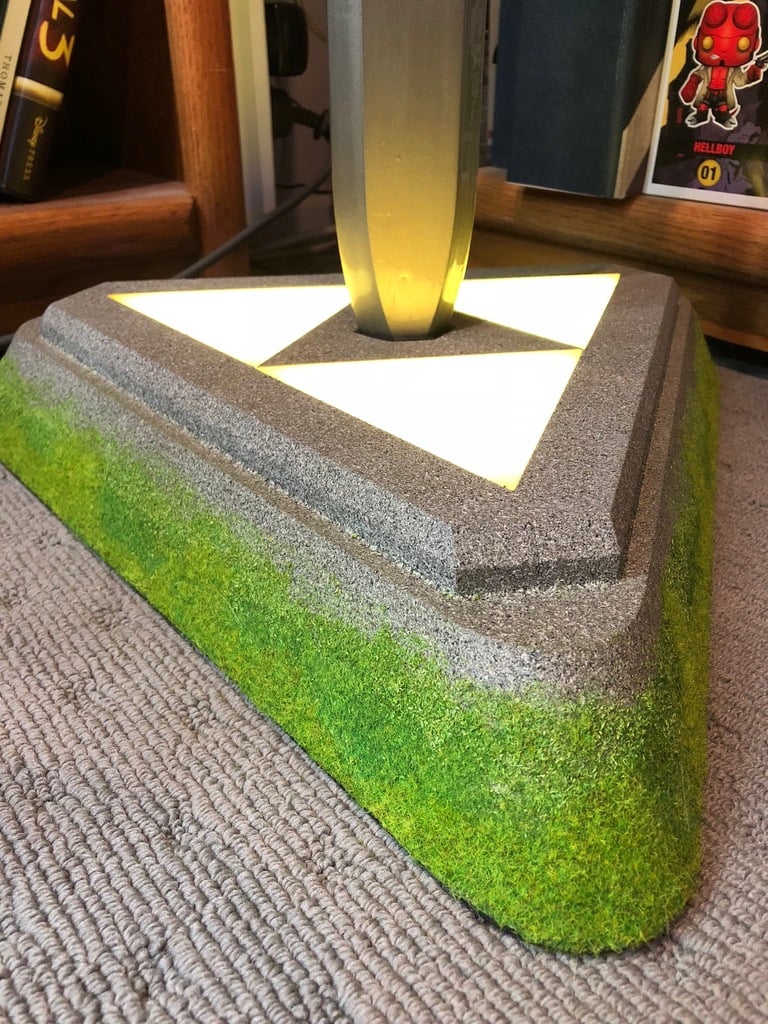
This is a Breath of The Wild style Triforce pedestal for the Master Sword by ChaosCoreTech (https://www.thingiverse.com/thing:1449187). This pedestal lets you display the Sword of Evil's Bane upright, surrounded by the glow of the mythical Triforce itself, if you opt to incorporate lighting into your model. Otherwise, you can make your pedestal's Triforce look however your replenishable hearts desire by making your own custom colour/design Triforce tiles. Hidden inside the pedestal at the bottom of the blade slot is a small momentary switch, upon which rests a button that cradles the tip of the blade. Inserting the blade gently into the pedestal will press the button, lighting the Triforce. A narrow stand screws into the pedestal behind the blade slot and holds the Master Sword in place while remaining hidden behind the blade and hilt, giving the impression that your sword is standing silently in the stone, waiting for as hero to awaken its power once more. Non-printable parts you'll need: Required: - 1 x 1.5m wooden dowel/pipe/rod of 16.3mm-16.8mm in diameter. - 1 x A4 sheet of adhesive-backed felt of foam rubber to pad the inside of the blade slot and the indentations of the stand's pegs. Lighting (Optional): - 1 x Momentary pushbutton switch no wider than 18.5mm in diameter (see diagram above for dimensions) (. - 1 x On/Off pushbutton switch no wider than 8.5mm in diameter (see photo above for dimensions). - 3 x 400mm-500mm LED strips. - 2m electrical wires. - 2 x A4 sheet of adhesive-backed reflective material for the light chambers (see photos above). - 1 x 12v AC-to-DC plug-in power adapter of adequate wattage. - 1 x medium-to-large sheet of plastic or fiberboard to cover any exposed wiring. Things to note: - The blade slot in the pedestal is designed for a Master Sword model that has been given multiple coats of resin for strength and protection, so the slot is a bit wider than the tip of a newly-printed sword blade. If this is a problem for you, I recommend applying adhesive-backed felt or foam rubber sheet to the inner walls of the slot in order to make it a better fit for your blade. - The length of rod, pipe, or dowel that you use for the stand will vary, depending on your particular sword model. Do not glue this part of the stand together until you're absolutely sure of the length and you've tested it by putting the sword on the stand-in-pedestal and ensuring that the tip of the blade presses the button enough while still allowing the rest of the blade to rest in the slot and on the stand. Otherwise, either the button won't be pushed enough to activate the lights if the dowel is too long, or the sword's weight may be put entirely on the button if the dowel is too short. Once you have the dowel's length nearly perfect, try stacking thin washers inside the screw-like part that the dowel fits into in order to fine-tune the stand height. - A main power (on/off) switch fits into the back of the pedestal to allow you to turn the lights off even when the sword is in place, without needing to unplug the pedestal from the wall. - Included in the parts is a short screw-in plug. Use this to keep the stand socket dry while spray painting the pedestal. - If your pedestal is not going to light up, you can leave out the button for the blade tip, as it will rest too low in the blade slot without a switch beneath it. - If your pedestal is going to light up, then you will probably end up tucking the wiring into the recesses in the bottoms of the three triangular base panels and also in the conduits in the bottom of the triangular center base. After wiring is complete, I recommend that you cover these exposed areas, such as by using a large, flat sheet of plastic or fiberboard (see the above photos of the painted bottom cover). - All four lens tiles should be printed in plain transparent filament. To achieve the best lighting results, the insides of the tiles should be sprayed with clear yellow spraypaint. However, for the symbol tiles applying yellow to the actual raised symbols should be avoided. Instead, I found that the best results came from pausing the prints after the last flat layer of the lens and then switching to a solid filament the correct colour to print the symbol itself and at the walls of the tile. The symbols are so thin that light will glow through the solid coloured filament. To further improve the effect, brush on a single coat of clear red/blue/green to the appropriate symbols inside the lens tiles (see photo above). IMPORTANT: Many parts have small circles on their corners. These keep the parts from lifting off of the bed during printing. Break or snip these off after printing is done and then sand the edges smooth if necessary.
With this file you will be able to print Master Sword Triforce Pedestal Stand (Breath of The Wild) (Light-Up) with your 3D printer. Click on the button and save the file on your computer to work, edit or customize your design. You can also find more 3D designs for printers on Master Sword Triforce Pedestal Stand (Breath of The Wild) (Light-Up).