Masterpiece
thingiverse
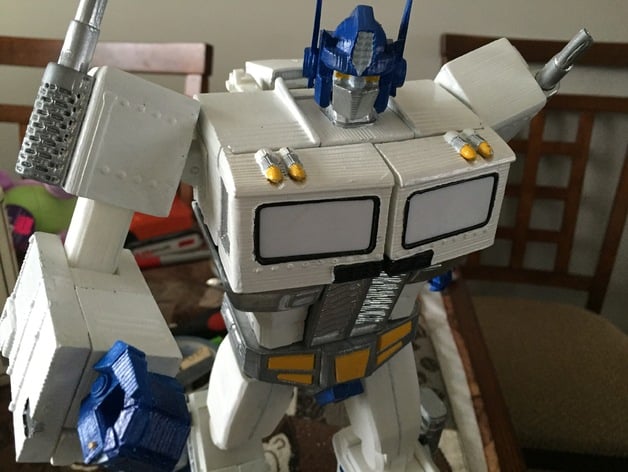
2/12/2018: As I have not revisited this model and other makers would like to, I am taking it out of work in progress mode and changing the license to non-commercial share alike. This is my version of a masterpiece series transformer. 2 goals: -Use only internet sourced referenced images/videos -Must be printable on a DIY quality FFF printer. This is the result. Some videos:https://youtu.be/XhccAJoUFvchttps://youtu.be/ZQiw5GHppZwhttps://youtu.be/ynvqUdc7BWUhttps://youtu.be/OWA1lKc7svghttps://youtu.be/IIyWYp1X6e8https://youtu.be/hNSemlWO2aw 6/21/2016: More visual instruction videos - the forearm 3/13/2016: Uploaded replacements for PegA and PegB. These are named like "InternalWaistSwivel" and are the pegs that hold the front wheel well to the "waist" parts. See the video "Visual Instruction - The FrontWheel" This is still a "work in progress" -because I am uncertain on a final size for some of the joint holes. I have no idea where to get small pins for joining things like the fingers to the hands and other small hinges , so I used round toothpicks. I don't expect anyone to have to use toothpicks, but at least they gave me a "size" to target. In my build all joints/hinges are fastened with round toothpicks or 3mm filament. MAKER ASSIST 3/3/2018 (BurningToothDecay): Hi, you can get metal pins by searching for "metal dowels" instead of "metal pins":https://www.amazon.com/dp/B00B3MFRRK/ref=asc_df_B00B3MFRRK5389622/?tag=hyprod-20&creative=395033&creativeASIN=B00B3MFRRK&linkCode=df0&hvadid=193149947260&hvpos=1o3&hvnetw=g&hvrand=3503051941979194491&hvpone=&hvptwo=&hvqmt=&hvdev=c&hvdvcmdl=&hvlocint=&hvlocphy=9021736&hvtargid=pla-313564871950 its actually a term used carpentry that got carried over into manufacturing. I hope it helps. Everything has been "laid-out" for printability on a RepRap and all files have been run through Netfabb so you should be able to start printing right away. Printing is easy... assembly is not :) Tolerances! Have your printer calibrated as best you can or you will be doing some sanding and it can be easy to over-do it. If you are going to paint, do it up front not after you build it and you'll get nice results but make sure you do not put primer on the surface that will be "fused" together if you used solvent and ABS. The primer will keep the ABS from fusing well, but it keeps it together enough that I'm kinda on the fence about it being a bad thing. - In this way you can actually take parts off without breaking them if you need to replace something. There are a few pieces that under-go stress and must be reinforced to be strong. These are things like the wheel axels and rotational elements on the wheel wells and arms. These have been designed to "require" a 3mm piece of filament (or equivalent/meltable) for reinforcement and in the case on the axels this filament is also melted on the end to keep the wheels on. -It works out Take your time and treat it like a model not a tough toy - I took almost a month to carefully print and put things together, but I was also refining the design as I went along... and I still broke something and hastily painted some things. I will post detailed instructions for certain parts as I can. There are "best" build orders for components as well as dependencies so unless you familiar with the "Master" from which this derived you might want wait for some detailed instructions before glueing everything together. Somethings are common sense so you can put together some components with out problem but others can cause alignment issues if not approached "correctly". Print Settings Printer Brand: RepRap Printer: Prusa V2 Rafts: No Supports: Yes Resolution: .20 Infill: 20% Notes: Print slow enough to avoid any/all warping. Any warping can make assembly "fail". Post-Printing Parts overview (Some painted) Parts overview (Some painted) Parts overview (Some painted) Grill and headlights Hips and waist Stomach, gas tanks and pipes. Wheels Waist and hip joint. Inside waist and hip joint - curly brace ratchet mechanism { Truck front fit test. Cab front fit test. Cab fit test. Cab window fit test. Priming the arms and setting the wrist pivot ( reinforced with 3mm filament) Uhhh... Fusing the arms. Assembled wheel wells. Rear wheel wells and axels (reinforced with 3mm filament) Fusing a thigh (Hip ball joint in place ) Fused leg. Next to first test build. The wrist gasket must be fused and locks the wrist onto the axel. The wrist gasket must be fused and locks the wrist onto the axel. How I Designed This I started with this image and imported it into Solidworks. The front image I created sketches for one half of this image which I scaled to fit an arbitrary height I chose. All of the parts were created in truck form then exported and tested in a Solid-works assembly. Once the Assembly could transform it was on to details. Source image 2 The profile image I scaled and matched this image as best I could with the size of the front robot image. My first modeling attempt. Failed to be printable My first modeling attempt (early in the modeling) Second Modeling Effort (Assembly) My first Assembly ( the one you're building now). defeated -I switched to some other projects for a while and when I felt I had "learned" Solid-works enough to have better control than in the first model I started over and tried again. Here I have learned about assemblies and exported the parts into an assembly to test transformation. I made adjustments to parts where needed.
With this file you will be able to print Masterpiece with your 3D printer. Click on the button and save the file on your computer to work, edit or customize your design. You can also find more 3D designs for printers on Masterpiece.