Matter Gun (Antichamber) Life-Sized
thingiverse
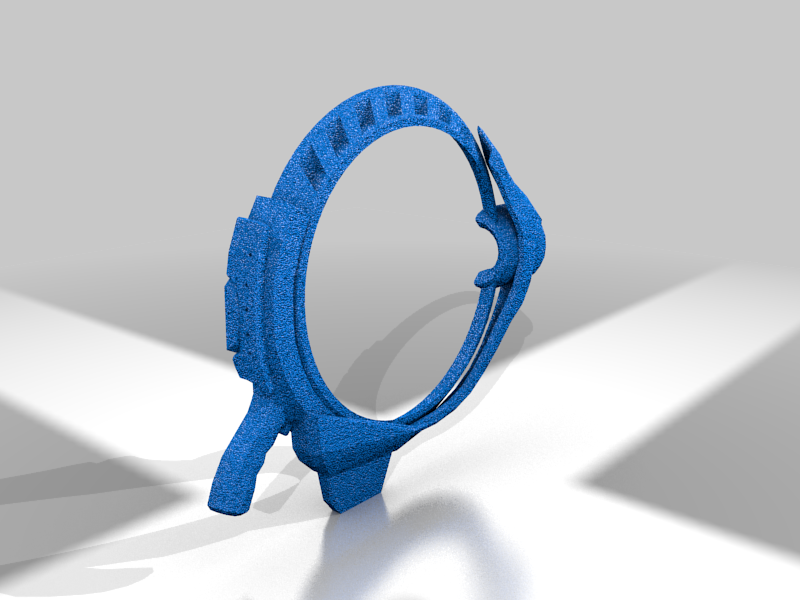
This is a roughly life-sized, print-ready model of the Matter Gun from Antichamber. It's printable without dual extrusion since each of the colored parts are inserts that can be printed separately in a different color. The gun's inner ring spins freely as it does in-game with little to no post-processing necessary. <h3>Settings</h3> <b>SCALE</b> - I printed each of the parts at 72500% scale, but since the in-game scale is pretty ambiguous, you could make it bigger if you wanted. You <i>could</i> make it smaller, but I'm not sure how well it'll print considering how thin some of the parts are. If it's too large to print on your printer, I'd recommend splitting the larger pieces in half (base of the gun, rings, etc.). <b>COLOR</b> - The base parts of the gun (the base of the gun, the stock, and the ring) should all be printed in white (unless you want to use a different base color - you do you). All of the inserts and inner/outer bands should be printed in whatever secondary color you're using for the gun (red/blue/green/yellow/black/etc.). <b>LAYER HEIGHT</b> - I used 0.2mm, but you could increase the quality for less visible layer stepping. <b>ADHESION</b> - I used rafts for each of the pieces. I wouldn't recommend using a brim since you'd run the risk of parts not fitting together as well. <b>INFILL</b> - I printed each of the parts with 5% infill, but you might want to increase that depending on your printer's capabilities and the size you print at. <b>SUPPORTS</b> - I disabled supports for the entire print, but you may benefit from using them on the base of the gun and the rings due to the curved parts. Mine printed fine without supports, though, so your mileage may vary. <b>LAYOUT</b> - This obviously depends on the size of your print bed, but here's how I laid out each of the pieces for my print: all inserts were printed together, each half of the ring/base were printed individually, and both halves of the stock were printed together. <b>NOTES</b> - Make sure that the inserts and wires, if you choose to print those, are laid flat before you print them! Double check to make sure the scale is consistent across each piece. I'd recommend making a checklist to keep track of which parts you've already printed since there's quite a few of them. <b>The wire models are optional</b> and I personally did not print them for my own project. I haven't tested printing them nor have I actually optimized them for printing. They <i>should</i> print fine so long as you lay them on their side and lay them flat, but I haven't tested this myself. <h3>ASSEMBLY</h3> The assembly is fairly straight-forward, so long as everything is done in the right order and you're careful not to break some of the more fragile parts, like the thin band inserts. Feel free to hit me up if you have any questions or run into any issues though! <ol> <li>Glue together ONE HALF of the base of the gun with its two inner bands (IE: attach the upper and lower bands to <i>only</i> the left half of the base)</li> <li>Do the same with one half of the inner ring and its outer band.</li> <li>Glue the remaining ring inserts into both halves of the ring (the circular, flat inserts).</li> <li>Place one half of the inner ring into the base of the gun, making sure that the cylindrical sticky-out-bit sits inside the barrel of the gun and the cylindrical hole in the back sits underneath the pivot in the back of the gun base.</li> <li>Place the other half of the ring on top of that one, but do not snap it in place or glue it together yet.</li> <li>Place the second half of the gun base on top of both halves of the ring, making sure that the pivot is inserted into the cylindrical hole in the back of both rings.</li> <li>Squeeze the two inner rings together. Since the outer band was only glued onto one half of the ring, the other half should snap into place. Be careful not to break the thin outer band while doing this. You <i>can</i> glue the two halves of the ring together if you want, though in my experience glue isn't needed, as the band it snaps into holds it together pretty tightly.</li> <li>The inner ring and base should more or less be locked into place at this point. Separate the two halves of the base just enough to apply glue between them (very little glue should be needed, just enough to keep it tightly held together) - be careful not to break anything apart in the process.</li> <li>Glue the two halves of the stock together.</li> <li>Glue the stock to the back of the gun base.</li> <li>Glue the remaining 14 inserts along the top of the left/right halves of the gun base. Make sure you've got them facing the right way and you're using them on the right side! If you mixed up the inserts and don't know what order they're supposed to go in, the order doesn't matter too much since the differences between them are negligible. Just see which slots they fit into best and put them there - or keep track of the order from the start.</li> <li>You're done!</li> <h3>POST-PROCESSING</h3> None needed! If you decide to print smaller or if your printer is less precise, some slight sanding may be needed for the ring to spin properly, but I had no issue with mine.
With this file you will be able to print Matter Gun (Antichamber) Life-Sized with your 3D printer. Click on the button and save the file on your computer to work, edit or customize your design. You can also find more 3D designs for printers on Matter Gun (Antichamber) Life-Sized.