Max7219 Scrolling LED Sign
prusaprinters
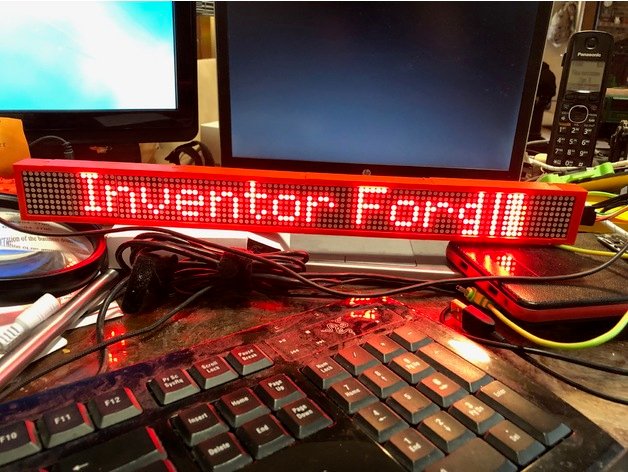
<p>I created this snap fit led sign edge that fits MAX7219 led segments. Pictured here are 12 segments but you should be able to add ans many as you want.</p> <h3>Print instructions</h3><p>MAX7219 LED Array Sign. These parts comprise a frame that fits around 12 8x8 led array segments. You can find them here in 4x arrays. You will need 3 of them.</p> <p><a href="https://www.banggood.com/MAX7219-Dot-Matrix-Module-4-in-1-Display-For-Arduino-p-1072083.html?rmmds=search&cur_warehouse=CN">https://www.banggood.com/MAX7219-Dot-Matrix-Module-4-in-1-Display-For-Arduino-p-1072083.html?rmmds=search&cur_warehouse=CN</a></p> <p>Solder 3 8x8 4 device led ends together and connect the 5 wires out the end with the opening. Run the 5 wires to an arduino power, ground din, cs and clock<br/> power and ground run to 5v and ground the other<br/> Clock goes to 13 // or SCK<br/> Din goes to 11 // or Data IN<br/> CS goes to 10 // or CS</p> <p>You will need 8 of the edge clips and one each of the end connector .stl files</p> <p>You will need the following arduino libraries. You can find then on github.</p> <p>MD_Parola<br/> MD_MAX72xx<br/> MD_UISwitch</p> <p>The code I am running is the MD_Sprites_Library in the MD_Parola examples.</p> <p>you will need to change the hardware type to match your hardware. The ones above are ICSTATION_HW</p> <p>Search for this line:</p> <p>define HARDWARE_TYPE<br/> and replace whatever is on that line with</p> <p>define HARDWARE_TYPE MD_MAX72XX::ICSTATION_HW</p>
With this file you will be able to print Max7219 Scrolling LED Sign with your 3D printer. Click on the button and save the file on your computer to work, edit or customize your design. You can also find more 3D designs for printers on Max7219 Scrolling LED Sign.