Mazda Rx7 Wankel Remix
prusaprinters
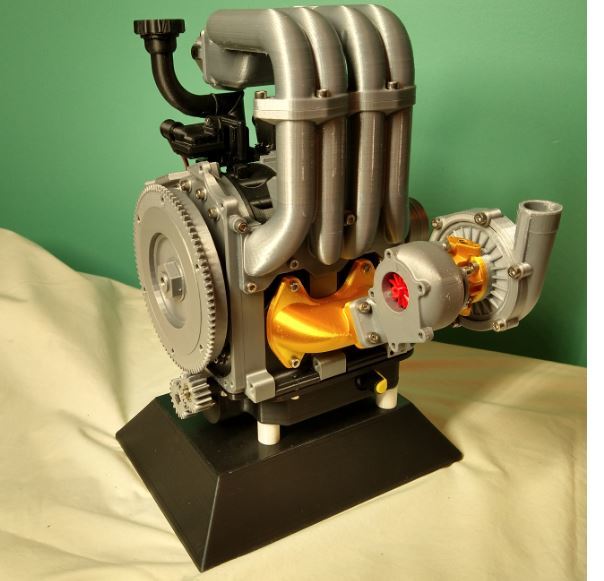
<p>Mazda RX7 Wankel Rotary Engine 13B-REW Remix</p> <p>This model Wankel was designed by ericthepoolboy and is available at thingiverse.com/thing:3006071. MakerRx.com offers a kit of all non-printed parts needed to build the model. <a href="https://www.makerrx.com/collections/projectkits/products/mrx11">https://www.makerrx.com/collections/projectkits/products/mrx11</a><br/> Using this kit really made building it easy. It's a complicated model, taking about 30 hours of assembly time. It's also a lot of plastic, taking about 250 hours of print time.</p> <p>A video is here <a href="https://youtu.be/46ky7EqzZt8">https://youtu.be/46ky7EqzZt8</a></p> <p>When I finally got it assembled, I didn't like the big gap between the block and the intake manifold. So after spending some time looking at similar RX7 engines for sale on Ebay, I designed coils, a bracket to hold them, sparkplugs, and wire boots to simulate an ignition system. I also designed an oil filler tube and cap, to help fill the gap.</p> <p>Also the 'feet' that came with the model kept coming loose. I've also made ericthepoolboy's flathead V8 and designed a base for it, but realized too late that I didn't have any place for storing its power brick when it sat on a shelf. This time I designed a base with a compartment inside for storing its power supply, and a magnetic cover to keep it all neat.</p> <p>And I printed a Mazda logo, just in case someone didn't recognize it for what it is.</p> <p>Assembly Info:</p> <p>Coils:<br/> I watched Eric's Tx and RX Coil Assembly videos, and ended up winding 4 Smart Rotor coils to get 2 working ones. Fortunately the RxMaker kit gives you plenty of wire for making mistakes.</p> <p>It is not explicitly called out in the video, but you make a stack of 3 parts where a Coil Backing plate is clamped between an Assembly Jig and a Coil Assembly Clamp.</p> <p>For the Tx Coil, the stack is:</p> <p>TX_coil_assembly<em>jig</em>-_Scaled.stl<br/> Coil_backing<em>plate</em>-_Scaled.stl (thick ring with holes)<br/> Coil_assembly<em>clamp</em>-_Scaled.stl</p> <p>And for the Rx Coil the stack is:</p> <p>RX_coil_assembly<em>jig</em>-_Scaled.stl<br/> Coiling_backing<em>plate</em>-_Scaled.stl (thin ring)<br/> Coil_assembly<em>clamp</em>-_Scaled.stl</p> <p>Where the same Coil_assembly_clamp is used to make both the Rx and Tx coils.</p> <p>I found the trick to getting a good looking coil is to make sure there is "no" gap between the between the Coil Assembly Jig and the Backing Plate. Before I greased anything, I cut a thin strip of packing tape and used it as a shim to ensure that there was no gap between the inside edge of the Backing Plate and Coil Assembly Jig. If there is space between them, the when you start winding, the wire falls into that space giving you a very uneven wind on you coil.</p> <p>Also the not on the screen in the Tx Coil Assembly video says "Sand the ends of the magnet wire and check for resistance. Reading should be between 16 and 2.2 ohms".<br/> My first coil was 1.6 ohms. So I wound a second one with the same result. After checking with the guys at RxMaker, they suggested that the text should say, "Reading should be between 1.6 and 2.2 ohms." All 4 of my coils were about 1.6 ohms.</p> <p>Spark Plugs and Wires:</p> <p>I used 12 gauge solid wire for the plug cables, which is very stiff. In one photo I found on Ebay, there was a rubber sleeve that held together the wires for the lower plugs. I used some shrink wrap as a substitute for it, and used it to hid where I cut the wire for the front plug. The cut lands in the center of the shrink wrap tube. Before you open the engine to see the rotors, you need to unplug the front lower plug wire, otherwise the stiff 12 ga. wire will break the spark plug off. The cut in the wire allows the front plug wire to rotate as the engine is opened.</p> <p>Ignition Coils:</p> <p>The coil mounting plate is split, so it can separate when you open the engine to see the rotors. The coil with 2 outputs goes in the center, with the single output coils on either end. The rear coil is mounted at 90 degrees. I superglued the coil mounting plates to the bosses on the tops of the respective Rotor Housings. the Coils are attached to the Coil Mounting Plates with M2x4 screws. The boots just press on, and I superglued the Sparkplug Wires to the Boots.</p> <p>Sparkplugs:</p> <p>The Sparkplugs are two parts, so the base can be printed in silver, and the insulator in white. I ran a 4mm drill in the sparkplug holes, and pressed the Sparkplug bases into the Rotor housings. EXCEPT for the Upper Rear plug! One of the screws that are used to mount the Rear Plate to the Rear Rotor Housing is in the way, so I shortened the Sparkplug Base so it would fit to the same depth as the rest of them, and glued it in.</p> <p>When you open the motor, be sure to remove the front lower Sparkplug Boot!</p> <p>Base:</p> <p>I used some 2x4mm magnets that were left over from the RxMaker kit to hold the Base Cover to the Base. The Base can be printed without supports, but I manually added a support for the cord slot inside the Base. After printing, just pop it out with some pliers. But to be honest, the extra slot isn't really isn't necessary.</p> <p>I didn't use any threaded inserts on the "Feet". Just make sure you don't strip them when you screw in the M3x5mm screw into either end.</p> <p>BTW, I tried to add Eric's Wankel design as the Remix Source Files, but the Create New Thing page would not recognize his Thing ID, or any combination of the words in his title; "Mazda RX7 Wankel Rotary Engine 13B-REW - Working Model". I guess it's just another Thingiverse bug. I seem to find a lot of them.</p> <p>But I want to thank Eric for creating a great model. Other than my coil issues, it went together very smoothly, and worked the first time I applied power to it. My only concern is that I might have lost some brain cells using so much superglue... Make sure you have good ventilation!</p> <p>McMaven</p> <h3> Print Settings</h3> <p><strong>Printer Brand:</strong></p> <p>Prusa</p> <p><strong>Printer:</strong></p> <p>I3 MK3S</p> <p><strong>Rafts:</strong></p> <p>No</p> <p><strong>Supports:</strong></p> <p>Yes</p> <p><strong>Resolution:</strong></p> <p>0.15</p> <p><strong>Infill:</strong></p> <p>15%</p> <p><strong>Filament:</strong> Hatchbox PLA Black, white, silk silver</p> Category: Automotive
With this file you will be able to print Mazda Rx7 Wankel Remix with your 3D printer. Click on the button and save the file on your computer to work, edit or customize your design. You can also find more 3D designs for printers on Mazda Rx7 Wankel Remix.