Mean Well LRS-350 PSU Lids for 92mm Noctua Slim Fan
prusaprinters
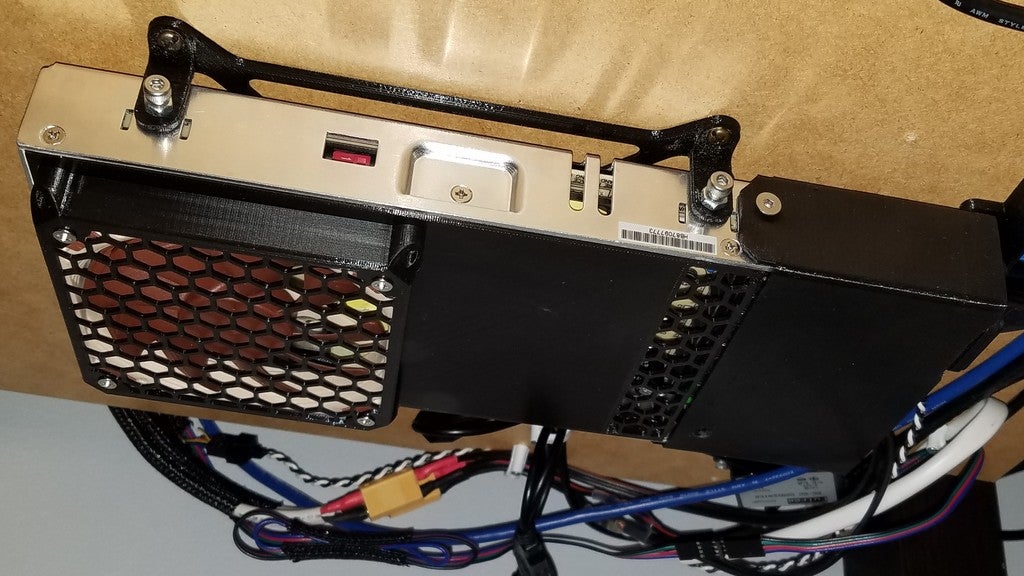
<p>UPDATE 6/9/2020: Added V3 which moves the vent up 20mm to improve compatibility with certain frame mounts. You can use the v2 fan cover with this lid as the only change is moving up the vent.</p> <p>UPDATE 2/20/19: I have added a V2 of the cover that should improve airflow and cover compatibility with terminal covers and frame mounts. The lid is now flush with the case with the fan placed in a separate compartment that attaches with 10mm M3 screws.</p> <p>The stock power supply with the MK3 is definitely one of its weakest components, it has a ticking noise in 110v environments and 'just' meets the printer + mmu2 power requirements. If you want to run LEDs and an Octopi off the same psu you need to upgrade.</p> <p>One of my many mods to the printer was to get a Mean Well LRS-350 24v psu which is the successor to the NES-350 24v, the only real difference being reduced cost (about $20 diff on <a href="https://www.amazon.com?linkCode=ll2&tag=thingiverse09-20&linkId=e4759bff1fa9a55a0f897d801ce2d765&language=en_US&ref_=as_li_ss_tl"> </a><a href="https://www.amazon.com?linkCode=ll2&tag=thingiverse09-20&linkId=e4759bff1fa9a55a0f897d801ce2d765&language=en_US&ref_=as_li_ss_tl"> Amazon</a>), its slimmer case and much noisier performance. The noise when I mounted the psu under my lack enclosure was close to a hair dryer. (PSU mount here: <a href="https://www.thingiverse.com/thing:2487946">https://www.thingiverse.com/thing:2487946</a>)</p> <p>There are many ways to reduce the noise coming from the LRS-350 such as replacing the 12v 60x15mm fan with something more quiet which I tried first to mild success. You could also cut/drill the top of the case and mount a bigger, more silent fan such as a Noctua 60x25mm but this adds considerable height and voids your warranty.</p> <p>My solution was to create an entirely new lid for the LRS-350 which adds 15mm height to the psu and purchasing a Noctua A9x14 (<a href="http://a.co/d/f3x2WTX">http://a.co/d/f3x2WTX</a>) 92x14mm fan. This keeps the whole unit shorter than the NES-350 while remaining cheaper and more silent. There's no reason these lids couldn't work on other Mean Well power supplies that match dimensions and screw holes to the LRS-350.</p> <p>I suggest using PETG for this part due to overall heat. NOTE: Someone has mentioned the possibility of additional electromagnetic interference generated by the psu by removing the metal lid so I may try to print this later in conductive filament. As of right now I have yet to experience any downsides of using petg.</p> <p>There's two options for the lid depending on your ambient temps and mounting location:</p> <ol> <li>Open Mesh Lid - First I tried a completely open mesh solution which places the fan closer to the center. This ran the fan at full speed every 2-5 minutes but only for a minute at most. I was concerned that the fan was blowing directly on the temp sensor so hot spots on the board were not being cooled. If you mount your psu vertically or in an open air area with low ambient temps then this cover will be a better choice for you as its much quieter.</li> <li><p>Tunnel Lid - I attempted to emulate the tunnel airflow of the stock lid on the psu. This is probably safer for the psu components over time in restricted airflow mounting areas like under a lack table. The noise is more audible with this lid with a low hum and it runs for 3-5 minutes every 3-5 minutes. Its similar to computer level noise, very tolerable and probably half the noise of the stock fan. Instructions:</p> </li> <li><p>Make sure the power supply is not plugged in! Please allow a few minutes for capacitors to discharge just in case!</p> </li> <li>Remove the stock lid by removing the 4 screws at the top corners of the case. No other screw needs to be removed! Loosening any other screw could void your warranty as they are locked in place with thread locker. Keep this lid + fan safe somewhere in case you have need for a warranty claim at some point.</li> <li>Unplug the stock fan using some small pliers or gently pry it with your hands.</li> <li>The Noctua fan needs to have the plug replaced with the one from the stock psu fan. Tape off the blue and green wires, yellow noctua fan wire = red stock fan wire, black noctua wire = black stock wire. I used a thick needle to get the cables out of their connectors easily.</li> <li>Pre-thread the PSU mounting holes on the lid using the small screws that hold the stock lid in place.</li> <li>Attach the Noctua fan to the lid using the provided screws. You should guide the wire as shown in one of the above pictures so it doesn't touch psu components. Make sure the airflow direction is blowing into/onto the psu board NOT away.<br/> 6b. (V2 ONLY) Attach the fan cover to the lid using 4 10mm M3 screws. The screw head should be on the inside of the lid.</li> <li>The fan plug goes straight into the power supply fan socket and is controlled independently by the psu according to a temperature sensor on the board. </li> <li>Use the stock lid screws to secure the lid in place. You can now plug and turn on the psu!</li> </ol> Category: 3D Printer Accessories
With this file you will be able to print Mean Well LRS-350 PSU Lids for 92mm Noctua Slim Fan with your 3D printer. Click on the button and save the file on your computer to work, edit or customize your design. You can also find more 3D designs for printers on Mean Well LRS-350 PSU Lids for 92mm Noctua Slim Fan.