Meanwell NES-50 cover with Banana sockets, C14 socket, fuse, switch
thingiverse
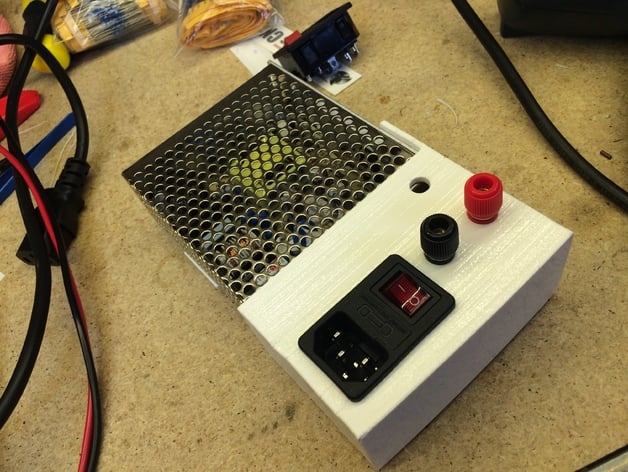
This model is designed to fit a Meanwell NES-50 power supply with identical dimensions. The link to the specifications can be found at http://www.meanwell.com/mw_search/NES-50/NES-50-spec.pdf. The components include rear feet and a main housing/cover. To attach the rear feet, simply screw them onto the underside using M3 short bolts. Similarly, the top cover is retained with two short M3 bolts - one into the bottom and another into the right side (assuming you're viewing it from the terminals end-on). This model also includes provisions for 2 banana sockets with an 8.5mm diameter mounting hole, which can be purchased at http://www.jaycar.com.au/Interconnect/Plugs%2C-Sockets-%26-Adaptors/Banana/Red-4mm-PANEL-MOUNT-Socket/p/PS0406. Additionally, it features a hole for inserting a screwdriver to adjust the voltage without removing the cover. The model also includes a square hole designed for a C14 socket, fuse, and switch - available at http://www.jaycar.com.au/Power-Products-Electrical/Distribution-%26-Interconnect/Moulded-Leads/IEC-Fuse-Chassis-Male-Power-Plug-with-Switch/p/PP4003. Print Settings: * Printer Brand: RepRap * Rafts: No * Supports: No * Resolution: 0.2mm * Infill: 100% It is recommended to use 100% infill and ensure a shell thickness of 1.5mm for optimal results. The walls are 3mm thick, which means your printer won't spend hours on unnecessary zigzaggy infill. There is also a large horizontal bridge of 47mm for the hole for the switch. To avoid any issues, it's suggested to perform a bridge test and see how your printer handles that distance before committing to the print. No support should be necessary. Post-Printing: Assembly involves wiring up the switch/socket/fuse, banana plugs, etc., and putting everything together. Use long wires so you can screw onto the terminals on the PSU as the last step. Leave the switch/socket/fuse module un-clipped while pushing the PSU into the cover to avoid any wire issues. From the photos above, it's clear that there was some warping during printing. This would have been better if a hood had been used over the printer for the duration of the print. The fit is quite tight, and adjustments may be necessary with a knife. To finish the model, use ABS juice in a spray bottle to give it a nice shine. This will help cover up some of the lines from printing but should not take away too much detail. WARNING: Assembling this model involves working with mains voltage, which can be hazardous if not done properly. If you're not licensed to work with mains voltage, consider seeking professional assistance or getting someone who knows what they're doing to handle it for you!
With this file you will be able to print Meanwell NES-50 cover with Banana sockets, C14 socket, fuse, switch with your 3D printer. Click on the button and save the file on your computer to work, edit or customize your design. You can also find more 3D designs for printers on Meanwell NES-50 cover with Banana sockets, C14 socket, fuse, switch.