Mechanical Switch Fidget Click
prusaprinters
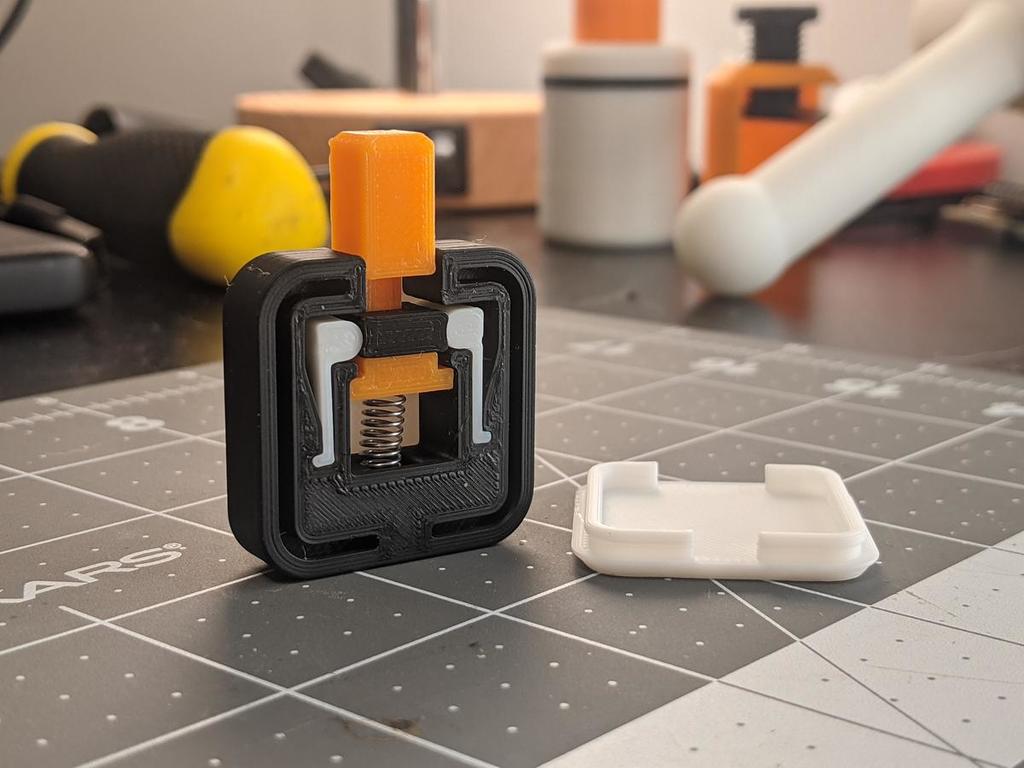
<p>It's loud! It clicks! It's annoying and feels so great! It's <i>even</i> hard to print and assemble!</p><p>This little fidget toy functions like a mechanical switch from a keyboard. It provides an audible and tactile <i>click</i> when pressed and released. The switch has no electrical contacts: its only purpose is to feel pleasant and make noise.</p><p>The print consists of 7 printed pieces and 1 pen spring. Assembly requires a hammer and a block or rag to protect the print.</p><figure class="media"><oembed url="https://www.youtube.com/watch?v=p8NZS9vzLXU"></oembed></figure><p> </p><blockquote><p><strong>⚠️ Heads up, hot shot!</strong> This is a <i>tricky</i> print. This print has small pieces. These have limited bed contact, but require dimensional accuracy. Your flow rate must be nearly perfect, and you need perfect bed adhesion. Also, if your printer has <i>any</i> elephant's foot, then forget about printing this.</p></blockquote><p> </p><h3>Metal Springs</h3><p>The switch fidget requires one metal spring from a common retractable ballpoint pen.</p><ul><li>Diameter: less than 4.8 mm</li><li>Uncompressed Length: at least 18 mm</li><li>Compressed Length: at most 8 mm</li><li>Compression Force: stiffer is better</li></ul><p>The spring needs to provide enough force to overcome the plastic side springs. A stiffer spring operates better and makes a louder "click." I can't describe how much force is required, but it's not much.</p><h3>Printing</h3><p>Recommended settings:</p><ul><li>Nozzle: 0.4 mm</li><li>Layer Height: 0.2 mm</li><li>Infill: at least 15%</li><li>Vertical Shells: 2 or more</li><li>Top/Bottom Layers: 4</li><li>Supports: No</li><li>Material: tested with PLA</li></ul><p>You'll need to print the following:</p><ul><li>2x <i>end caps</i></li><li>2x <i>side springs</i></li><li>1x <i>body</i></li><li>1x <i>button</i></li><li>1x <i>slider</i></li></ul><p>One of the photos shows the correct orientation of the parts. The <i>side springs</i> must print standing up for dimensional accuracy.</p><p>Dimensional accuracy is important, so check out your printer. Make sure your belts are tight and taut. Calibrate your e-steps for your chosen filament. Cutting your flow rate down helps immensely. A replacement nozzle is always a great idea.</p><p>The print also has 4 pieces with small bed footprints. I recommend using a glue stick or other adhesives (hair spray, MagiGoo, Bed Weld, etc.). A brim is not recommended: any remaining brim interferes with the movement. However, a brim may work on the stationary <i>end caps</i>. Printing the parts separately also helps.</p><p>Good luck!</p><h3>Assembly</h3><p>Refer to the images above for correct terminology and orientation. You will need to hammer in the end caps. Be sure to us a rag or wood block between the hammer and the print in order to prevent surface damage.</p><ol><li>Place both <i>side springs</i> in to the slots in the <i>body</i>. The fit will be tight, but don't use the hammer.</li><li>Hammer one <i>end cap</i> in to the <i>body</i>. Work your way around the edge. Don't try to hammer it all in one blow.</li><li>Place the <i>slider</i> in to the <i>body</i> between the two <i>side springs</i>.</li><li>Place the <i>pen spring</i> in to the hole in the <i>button</i>.</li><li>Slide the <i>pen spring</i> in to the <i>body</i> while sliding the <i>button</i> in to the <i>slider</i>.</li><li>Test and adjust the action. Hold the <i>end cap</i> against the <i>body</i> to hold in the other parts. Click and verify the movement is correct. For tuning tips, see below.</li><li>Hammer the other <i>end cap</i> in to the <i>body</i>.</li></ol><h3>Tuning the Action</h3><p>It can be tricky to get the fidget switch's movement to work reliably. Here are some tips to help you out:</p><ul><li>The <i>slider </i><strong>must </strong>be able to move with no resistance.</li><li>The <i>slider</i> needs to snap between the <i>side springs</i> with only the <i>pen spring</i>'s force.</li><li>If the <i>side springs</i> are too close to the <i>slider</i>, sand down their tips. Make sure to keep the round shape. Don't sand the sides of the <i>slider</i>!</li><li>No elephant's foot! If <i>any</i> is present, you'll need to remove it.</li><li>If the print seems to have size issues, reduce your flow rate. Most filaments worked fine, while others needed a 5-10% reduction.</li><li>I had issues with mixing parts printed on different printers. Consider printing and perfecting a switch in a single filament before attempting a complex color scheme.</li><li>Oil will make the action smoother. But, it won't fix a mechanism that doesn't work already.</li><li>When testing, hold the <i>end caps</i> snugly. Feel for any bumps or scratching while clicking.</li><li>Make sure the <i>slider</i> is not rubbing against the <i>end caps</i>. You may need to sand the top or bottom of the slider. Don't sand the sides of the <i>slider</i>!</li><li>Once you snap it together, it's impossible to open without breaking it...</li></ul>
With this file you will be able to print Mechanical Switch Fidget Click with your 3D printer. Click on the button and save the file on your computer to work, edit or customize your design. You can also find more 3D designs for printers on Mechanical Switch Fidget Click.