Mechanical wall clock
prusaprinters
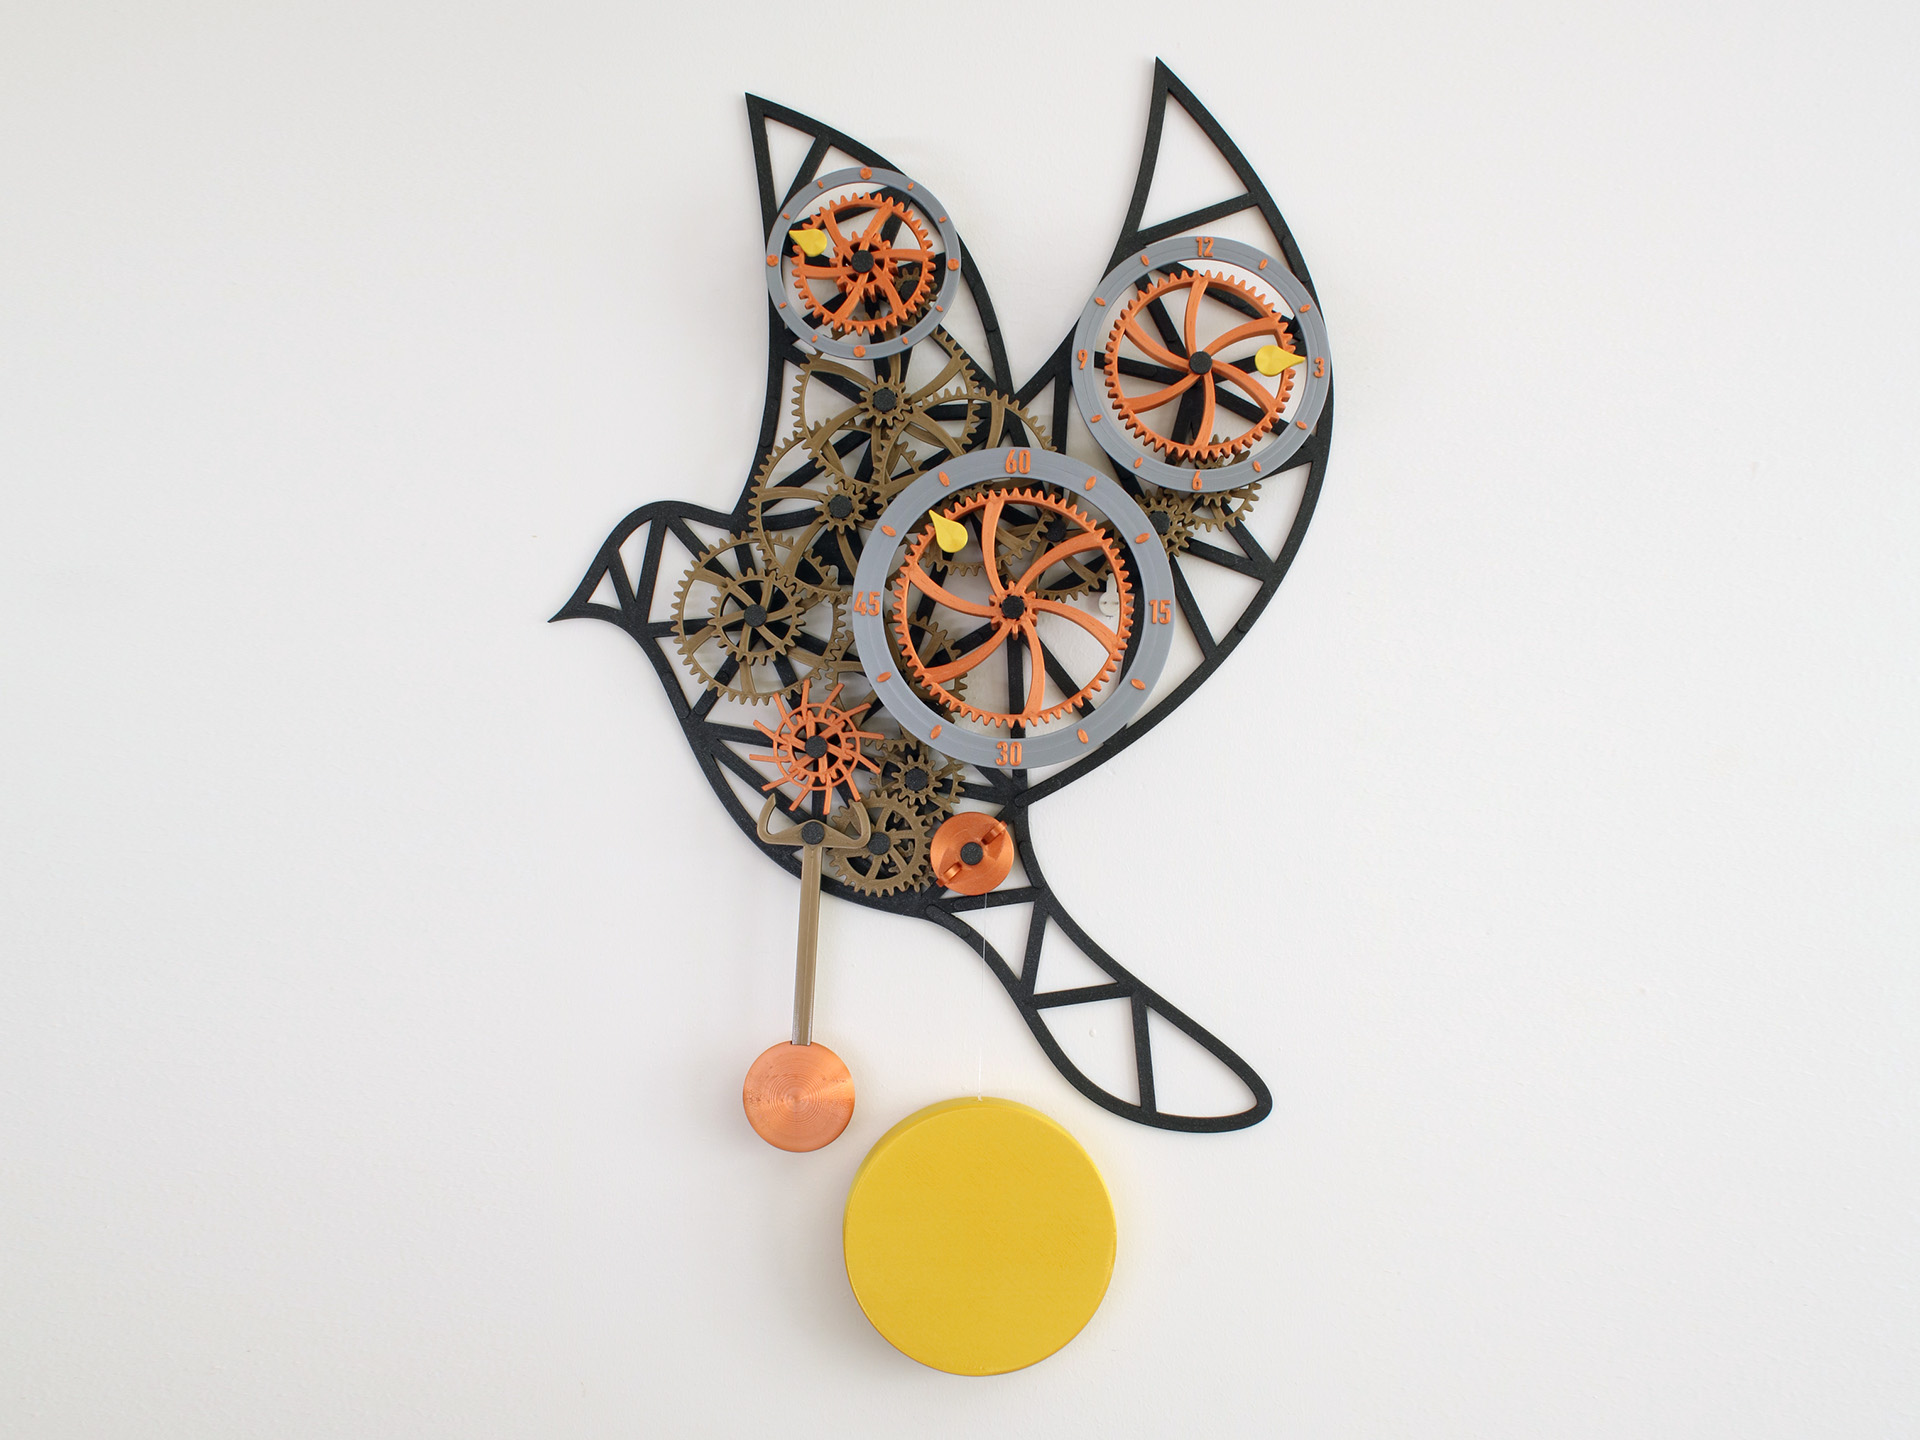
<figure class="media"><oembed url="https://vimeo.com/564219806"></oembed></figure><p>This is a fully printed functional mechanical clock. All parts are dimensioned to fit on build plates at least 18x18cm.</p><p>When assembled the clock measures 60x42cm (weight not included).</p><p>The weight is designed as a container with screw lid which can be filled with rice or sand.</p><p>Total running time will depend on how high up on the wall you hang it. With the smallest reel the weight will drop ~111cm per hour (54 min per meter) for the standard version. With the tail feather remix the weight will drop ~9.6cm per hour (10h 25m per meter).</p><p>Below are tables with the relation between reel center size and how fast the weight drops.</p><p><i>Table 1. Dropping speeds for original version</i></p><figure class="table"><table><thead><tr><th>Reel size</th><th>cm per hour</th><th>time per meter</th></tr></thead><tbody><tr><th>16</th><td>111</td><td>54 min</td></tr><tr><th>24</th><td>166</td><td>36 min</td></tr><tr><th>32</th><td>221</td><td>27 min</td></tr></tbody></table></figure><p><i>Table 2. Dropping speeds with tail feathers remix</i></p><figure class="table"><table><thead><tr><th>Reel size</th><th>cm per hour</th><th>time per meter</th></tr></thead><tbody><tr><th>16</th><td>9.6</td><td>10h 25m</td></tr><tr><th>24</th><td>14.4</td><td>6h 57m</td></tr><tr><th>32</th><td>19.2</td><td>5h 12m</td></tr></tbody></table></figure><p> </p><p><i><strong>Update 2021-06-20: </strong></i>Added remix of tail feathers which increases running time of the clock. See section <i>Tail feathers remix.</i></p><p> </p><h3>Print settings</h3><p><strong>Layer height:</strong> 0.2mm</p><p><strong>Infill:</strong> 10-20% (pendulum weight 100% infill)</p><p><strong>Seam:</strong> All shafts and gears have a small notch for the seam. Make sure when slicing that the seam is placed in that notch (in PrusaSlicer seam position should be <i>Nearest </i>or <i>Aligned</i>, in Cura it should be set to <i>Sharpest corner</i>).</p><p><strong>Top infill:</strong> I used concentric infill for the top layer which in my experience gives a smoother top surface.</p><p> </p><h3>Post processing</h3><p>No post processing of parts should be needed but to be sure, check that the top surface of all gears and nuts is smooth. If it is not, gently sand down any imperfections.</p><p> </p><h3>Additional parts</h3><p>Almost everything for this clock is printed but you will need a few things:</p><ul><li>A string or fishing line for the weight. I recommend a fishing line or other thin (diameter <1mm) but strong string.</li><li>Silicone spray or other suitable (non greasy) lubricant for the moving parts</li><li>Something to fill the weight with, e.g. rice or sand.</li><li>Glue if the press fits are not tight enough</li></ul><p> </p><h3>Testing tolerances</h3><p>Start by printing the models <i>press_tolerance_test</i> and <i>rotation_tolerance_test</i> from the folder <i>Common parts</i>.</p><h4>Press fit tolerance</h4><p>Use the press fit test to decide which press fit parts to print. The pieces should be held together tightly but you should be able to assemble them without a hammer.</p><p>If press fit #1 is too loose, use glue when assembling the press fit parts. If press fit #2 is too tight, use more force when assembling or check your printer/settings.</p><h4>Rotational tolerance</h4><p>Use the rotational test to decide which rotational parts to print.</p><h5>Cylinders</h5><p>Place the cylinders on the shaft and try to spin them. Select the one with lowest number which can spin freely.</p><h5>Nuts</h5><p>Select the nut with the lowest number which is easy to screw on and off.</p><p> </p><h3>Color scheme</h3><p>These are the filaments I used and the parts I used them for</p><h5><a href="https://shop.prusa3d.com/en/prusament/711-prusament-pla-prusa-galaxy-black-1kg.html">Prusament Galaxy Black</a></h5><p>Used for backplate, nuts and connectors.</p><h5><a href="https://shop.prusa3d.com/en/prusament/1417-prusament-pla-oh-my-gold-blend-970g.html">Prusament Oh My Gold</a></h5><p>Used for hands and weight.</p><h5><a href="https://www.3dprima.com/filaments/pla-1-75mm/primaselect-pla-1-75mm-750-g-bronze/a-21818">PrimaSelect Bronze</a></h5><p>Used for most gears and pendulum arm.</p><h5><a href="https://www.3dprima.com/filament/pla/primaselect-pla-glossy-1-75mm-750-g-antique-copper/a-25576">PrimaSelect Antique Copper</a></h5><p>Used for time gears, reel, escapement gear, pendulum weight and markings on the time rings.</p><h5><a href="https://www.3dprima.com/filaments/pla-1-75mm/primaselect-pla-1-75mm-750-g-silver/a-21840">PrimaSelect Silver</a></h5><p>Used for the time rings.</p><p> </p><h3>Printing</h3><p>You need to print three (3) instances of the part <i>gear_48-12_rx</i>, all other parts which require multiple instances already have them in the .3mf files. (Three instances of <i>gear_48-12</i> will not fit on most build plates which is why I decided to only add one instance).</p><p>The parts are divided in folders (and have suffix, <i>_pX </i>for press fit, <i>_rX </i>for rotational) depending on their tolerances, print only those who match what you selected from the tolerance tests.</p><p>You do not need to print all <i>reel_center_X</i> pieces directly, start with <i>reel_center_s</i> if you are using a fishing line or other thin (<1mm diameter) string for the weight, otherwise <i>reel_center_m</i>. You only need to print other dimensions if needed later.</p><p> </p><h3>Lubrication</h3><p>For proper functionallity it is crucial to lubricate the moving parts correctly. I used silicone spray applied with a small brush.</p><p>Lubricate the parts as indicated with orange in the picture below.</p><figure class="image"><img src="https://media.prusaprinters.org/media/prints/69291/rich_content/d315c5ed-64be-4df7-a857-936f13513068/lube.png#%7B%22uuid%22%3A%22eeb22046-c066-42f7-a06e-a4b6fca68ec5%22%2C%22w%22%3A2302%2C%22h%22%3A1401%7D"></figure><p> </p><h3>Assembly</h3><h4>Backplate</h4><p>The order in which the backplate parts are assembled are not important unless you use glue.</p><p>If you decide to use glue in the puzzle joints I would recommend to assemble them in their numbered order as this will let you apply glue to the pins which will always be pressed down into the slots when assembled in order.</p><p>Lay the parts on a flat surface and press them together.</p><p>When all backplate parts are put together, secure them with the connector pieces, one over each joint.</p><figure class="image"><img src="https://media.prusaprinters.org/media/prints/69291/rich_content/7df8fd47-c418-426c-85ef-ead721e8cdb3/backplate_assembly.png#%7B%22uuid%22%3A%22d3d8fdd2-f7d5-4265-8842-82687a7eb437%22%2C%22w%22%3A1676%2C%22h%22%3A1150%7D"></figure><h4>Wall mounting</h4><figure class="image image-style-align-right image_resized" style="width:50%;"><img src="https://media.prusaprinters.org/media/prints/69291/rich_content/9c213787-22b7-42ed-a6bb-3a97ea8c5483/measurements.png#%7B%22uuid%22%3A%2240140af5-db61-499f-8c90-b1461b552ac2%22%2C%22w%22%3A896%2C%22h%22%3A1215%7D"></figure><p>When you have the backplate assembled you should decide where to hang the clock. The distance between the center of the mounting points is 15cm.</p><p>Mount the clock to the wall before continuing with the assembly.</p><p> </p><p> </p><p> </p><p> </p><p> </p><p> </p><p> </p><p> </p><p> </p><h4>Gears</h4><p>Attach the gears in the order pictured below. Secure each gear with a nut with the same letter as the shaft. Shafts and nuts marked with “R” are normal right handed threads, shafts and nuts marked with “L” are left handed threads.</p><p>All gears have their number of teeth in the name, so if you do not know which gear is which you can count the teeth.</p><p>Gears <i>27-10, 36-12, second_36-12</i> and <i>minute_60-12</i> should have the smaller gear pointing towards the back, all other double gears should have the smaller gear pointing forwards.</p><p>For each gear you attach, make sure it can rotate freely (should be able to keep rotating by it self after you turn it). For all gears until the last (minute gear) it should be relatively easy to spin the entire chain of gears by turning the last added gear. If there is significant resistance, make sure the tolerances are correct, that there are no imperfections in the print causing resistance and that both the shaft and gear are properly lubricated.</p><figure class="image"><img src="https://media.prusaprinters.org/media/prints/69291/rich_content/09a2b8ee-f92e-4ba0-bcda-8280056ba82c/ga_1-2.png#%7B%22uuid%22%3A%2257963f87-3dad-4338-ba8f-93a944d40f58%22%2C%22w%22%3A1808%2C%22h%22%3A1212%7D"></figure><figure class="image"><img src="https://media.prusaprinters.org/media/prints/69291/rich_content/3bf73e2a-2b0d-4a3f-ab33-887175798090/ga_3-4.png#%7B%22uuid%22%3A%22a248d0d7-e044-4ebb-849b-9c95d8b8c383%22%2C%22w%22%3A1808%2C%22h%22%3A1212%7D"></figure><figure class="image"><img src="https://media.prusaprinters.org/media/prints/69291/rich_content/df3f8cfb-1bee-4825-b786-6e5af9452fce/ga_5-6.png#%7B%22uuid%22%3A%2227ec9bdf-26a1-4394-b170-215aba6a5b37%22%2C%22w%22%3A1808%2C%22h%22%3A1212%7D"></figure><figure class="image"><img src="https://media.prusaprinters.org/media/prints/69291/rich_content/bf1a1979-0373-46e8-b24b-c4e1f6deaedc/ga_7-8.png#%7B%22uuid%22%3A%224a89d738-6c20-4833-94b9-e356f57699ea%22%2C%22w%22%3A1808%2C%22h%22%3A1212%7D"></figure><figure class="image"><img src="https://media.prusaprinters.org/media/prints/69291/rich_content/ee014f27-26d1-4970-a285-64bbafeb0986/ga_9-10.png#%7B%22uuid%22%3A%22ecce8048-6143-4ea4-8502-2d2ab662f0da%22%2C%22w%22%3A1808%2C%22h%22%3A1212%7D"></figure><figure class="image"><img src="https://media.prusaprinters.org/media/prints/69291/rich_content/8f6b1830-ce22-4d5b-9432-08740d78eacf/ga_11-12.png#%7B%22uuid%22%3A%2217b20a1a-e026-4729-8751-00ceb1dc94b8%22%2C%22w%22%3A1808%2C%22h%22%3A1212%7D"></figure><figure class="image"><img src="https://media.prusaprinters.org/media/prints/69291/rich_content/38c0c9f9-09e4-41e9-ac12-4d2c26c412a5/ga_13-14.png#%7B%22uuid%22%3A%22cedeedd4-3fc5-4c5c-9657-5b36e645c618%22%2C%22w%22%3A1808%2C%22h%22%3A1212%7D"></figure><figure class="image image-style-align-left image_resized" style="width:50%;"><img src="https://media.prusaprinters.org/media/prints/69291/rich_content/6c397ec7-655e-463c-a560-6f11ead73196/ga_15.png#%7B%22uuid%22%3A%22e9686f63-1cc6-4ded-b324-9d66375769ee%22%2C%22w%22%3A904%2C%22h%22%3A1212%7D"></figure><p> </p><p> </p><p> </p><p> </p><p> </p><p> </p><p> </p><p> </p><p> </p><p> </p><p> </p><p> </p><p> </p><p> </p><h4>Rings and hands</h4><figure class="image image-style-align-right image_resized" style="width:50%;"><img src="https://media.prusaprinters.org/media/prints/69291/rich_content/aad95e6e-c629-4926-ba1a-65591fc8f33d/rings_and_hands.png#%7B%22uuid%22%3A%22c29c1fe7-607f-4cec-8ccf-c5fcce57c1c0%22%2C%22w%22%3A892%2C%22h%22%3A1212%7D"></figure><p>Attach the rings to the pins on the backplate. If the press fit is too loose, add a drop of glue in each hole on the back side of the rings.</p><p>Attach the hands to the time gears and rotate the minute and hour gears so they each point straight upwards. Each hand has a letter stamped on the back to indicate which gear it fits on (S for seconds, M for minutes, H for hours).</p><p> </p><p> </p><p> </p><p> </p><p> </p><p> </p><p> </p><h4>Pendulum</h4><p>Connect the two parts of the pendulum weight using the pendulum pins and glue if needed.</p><p>Insert the pendulum nut and the pendulum arm and turn the nut until the notch on the back of the pendulum arm is in line with the top of the weight.</p><p>Attach the pendulum to the backplate and secure it with a nut.</p><p>Check that the pendulum can swing freely, you should be able to get it to swing at a constant rate by gently turning the escapement wheel clockwise. If not, remove it and resolve any issues causing resistance (print imperfections, lubrication etc.)</p><figure class="image"><img src="https://media.prusaprinters.org/media/prints/69291/rich_content/fb523e53-dbdc-4d20-afa5-83456f51825f/pendulum_assembly_and_attachement.png#%7B%22uuid%22%3A%22ebdffb9d-361a-4ae4-a449-904321b1d9f3%22%2C%22w%22%3A1628%2C%22h%22%3A1140%7D"></figure><h4>Reel and weight</h4><p>Start by cutting the string for the weight to a proper length, it should reach from the remaining shaft on the backplate to the floor.</p><p>Tie the string to the weight and add a piece of tape on the inside to cover the hole to prevent leaking when filling the weight.</p><p>Fill the weight with rice or sand and screw on the lid. For me 3 dl of rice was enough, but the weight holds up to 3.9 dl.</p><p>Attach the other end of the string to the reel center piece. If you are using a fishing line with the <i>reel_center_s</i> piece, pull it through the hole in the plate and tie a small stopping knot on the other side, for example a <a href="https://www.animatedknots.com/double-overhand-stopper-knot">double overhand stopper knot</a>. If you are using another center piece, tie the string around the pin as you did with the weight. Cut off any excess string.</p><figure class="image"><img src="https://media.prusaprinters.org/media/prints/69291/rich_content/5ddc9bf3-7212-4dc3-a628-9675063c693c/reel.png#%7B%22uuid%22%3A%22d8c209f1-87ae-4187-af2a-8d3bb0de7aed%22%2C%22w%22%3A1292%2C%22h%22%3A715%7D"></figure><figure class="image image-style-align-right image_resized" style="width:50%;"><img src="https://media.prusaprinters.org/media/prints/69291/rich_content/966cf933-a295-4693-8618-330f98c2effa/reel_weight.png#%7B%22uuid%22%3A%2263ee5c8c-c8e4-4ae2-b16e-feef65b62037%22%2C%22w%22%3A670%2C%22h%22%3A1146%7D"></figure><p>Assemble the reel as shown in the picture above left to right, use glue for the handles if needed. If you are using the center piece <i>reel_center_s</i> make sure the stopper knot lies between the spokes of the ratchet. Turn the ratchet counter clockwise when inserting it into the gear.</p><p>Attach the reel to the backplate and secure it with a nut.</p><p>Congratulations! You are now done with the assembly. Now it is time to test and tune the clock. Wind it up by turning the reel counter clockwise and give the pendulum a gentle push to start it.</p><p> </p><p> </p><p> </p><p> </p><p> </p><p> </p><p> </p><p> </p><p> </p><h3>Adjustments</h3><h4>Reel and weight</h4><p>To function properly the right amount of force must be applied to the pendulum, this is tuned with the reel center piece and the weight. The pendulum should continue to swing a bit past the point where it stops the escapement wheel but not so far that it is stopped bu the escapement wheel, see picture below.</p><p>If the pendulum is not swining far enough you can:</p><ul><li>make sure the parts are properly lubed</li><li>increase the mass of the weight by filling it with more or heavier material</li><li>use a bigger reel center piece</li></ul><p>If the pendulum swings too far (hits the inner part of the escapement wheel) you can:</p><ul><li>use a smaller reel center piece</li><li>decrease the mass of the weight</li></ul><figure class="image"><img src="https://media.prusaprinters.org/media/prints/69291/rich_content/3c33f8fe-6cc8-49b3-b1ad-57634895b572/pendulum_swing.png#%7B%22uuid%22%3A%22686250ac-5245-4b9f-b18e-9ad9fd082037%22%2C%22w%22%3A2316%2C%22h%22%3A1074%7D"></figure><h4>Pendulum period</h4><p>To adjust the speed of the clock you can alter the period of the pendulum by turning the screw inside the pendulum weight (accessible from the back). Moving the weight upwards will decrease the period and make the clock run faster, downwards will make the clock run slower.</p><p>In theory the clock speed will be adjusted by ~12 seconds per hour by moving the weight 1mm up or down.</p><p>The period of the pendulum should be 0.75 seconds, which means it should take 9 seconds for the escapement wheel to make one full revolution.</p><h4>Adjusting time</h4><p>To adjust the time, remove the screw holding the minute gear and pull it out 5-10mm and turn it. This will turn the minute and hour gears without interacting with the rest of the gears. Push the minute gear back and replace the nut.</p><figure class="media"><oembed url="https://vimeo.com/564224040"></oembed></figure><p> </p><h3>Tail feathers remix</h3><p>This is a remix wich allows you to replace the tail feathers (backplate_08) with a new version with additional gears to increase the running time of the clock.</p><p>Assemble and test the original version of the clock before printing this remix (if you plan to print this you can ignore backplate_08 when printing the original version, all other parts will still be used).</p><h4>Printing</h4><p>Print the parts in the folder <i>Tail remix</i> (models with “remix” in the file name). Use same print settings and tolerances as with the rest.</p><h4>Lubrication</h4><p>Lubricate all remix parts as described above.</p><h4>Weight</h4><p>Due to the additional gearing in the remix you will need a much heavier weight. I have not provided any printable version for this since it would be ridiculously large. I recommend testing how much weight you need for reliable operation by using various objects as weight and then finding a nice rock with the correct weight to use (I use a 4.7kg rock with reel_center_24).</p><p>Remember to protect your wall by adding felt pads to the back of the rock to prevent scratches.</p><h4>Assembly</h4><p>Start by removing the reel and tail feathers from the clock. Attach the new tail feathers and secure it with the connectors.</p><p>When the new tail feathers are attached you should add a screw at the new mounting point. This is really important to handle the mass of the new weight.</p><p>Attach the gears and reel in order as picured below. Gears <i>24-11</i> and <i>24-12</i> should have the smaller gear pointing towards the back.</p><figure class="image"><img src="https://media.prusaprinters.org/media/prints/69291/rich_content/b5b088e1-f935-437b-9493-30b0374551a1/assembly_1.png#%7B%22uuid%22%3A%22f3516731-0b74-4781-a5d4-f573fd5cf641%22%2C%22w%22%3A1200%2C%22h%22%3A538%7D"></figure><figure class="image"><img src="https://media.prusaprinters.org/media/prints/69291/rich_content/1ea876ef-1be9-4117-8b4b-f18f9d86dd47/assembly_2.png#%7B%22uuid%22%3A%223bb2db1a-599b-41b2-960c-79074b73e7bb%22%2C%22w%22%3A1200%2C%22h%22%3A538%7D"></figure><figure class="image"><img src="https://media.prusaprinters.org/media/prints/69291/rich_content/f78d3298-d5ed-4bc6-9af0-d346119136bf/assembly_3.png#%7B%22uuid%22%3A%226ae4b56a-3b72-4603-8779-9a3fd14751fe%22%2C%22w%22%3A1200%2C%22h%22%3A538%7D"></figure><figure class="image"><img src="https://media.prusaprinters.org/media/prints/69291/rich_content/a319d672-7e2d-43cf-9535-13a43ec3e0bd/assembly_4.png#%7B%22uuid%22%3A%222967e492-152c-4d43-8e81-eb23c11c7478%22%2C%22w%22%3A1200%2C%22h%22%3A538%7D"></figure><p>Done! Now the remix is assembled and you can start testing how much weight you need.</p>
With this file you will be able to print Mechanical wall clock with your 3D printer. Click on the button and save the file on your computer to work, edit or customize your design. You can also find more 3D designs for printers on Mechanical wall clock.