MeCreator2 - Plexiglas Hood & Accessories
thingiverse
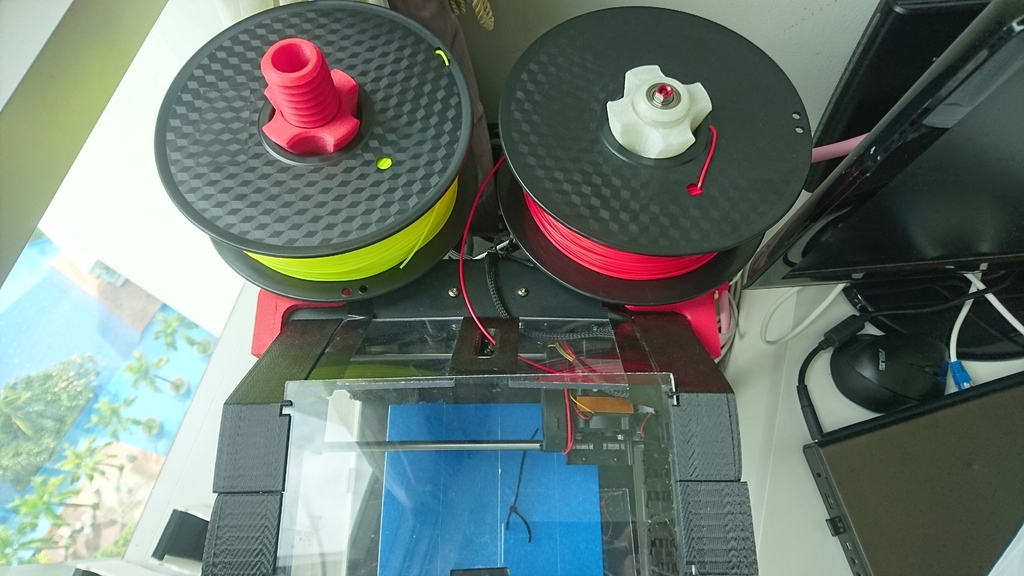
MeCreator2 - Plexiglas Hood & Accessories Update 13.10.2017: Since my Printer also safely arrived in Singapore and i finally had time to unpack all my stuff. I had an idea and just designed an spoolholderarm because all old ones are designed to snap in where my hood is. I come up with an easy solution it snaps in on the side and the weight of the spool holds the arm in place. Then I mirrored it and now even have 2. The plexiglas piece on top of the hood i just switched with the plexiglas on the back I love this big Screw Design for easy Removing the spool from this Thing https://www.thingiverse.com/thing:2026642 I used it and just Screwed it with a 8mm Bearing and some washer from a fidget spinner (No tears I hate this things) (Left side is Remixed / Right side is original the Difference is only the distance of the Bearings inside the Screw) I will upload soon. Update: I just for Information I added some pictures from additional changes i made recently on my printer. 1. I always had issues with my cooling fan. I recently found out it was completely blocked by support material left from the geetech printed fan duct version. I recommend checking this if you have issues too. I decided NOT to go anymore with the geetech version of cooling i installed now this easy Design https://www.thingiverse.com/thing:2408527 Now it rocks and the best part is now you can see whats going on nothing is blocking your sight anymore. 2. I also want to share the Thing i used for the x axis cable chain. after just a few prints the cables where almost broken because of the sharp frame. I used https://www.thingiverse.com/thing:124700 and the best part is it fits 1:1 you don't have to change anything there. I´ve printed: 13x cable_chainunit.stl 1x cablechaindrive_small.stl (Fits perfect you need 10mm long M3 Screws instead of the 8mm ones) 1x cable_chainmount.stl (You can tape it or mount it on the frame) I splitt the right Plexiglas side for the purpose of supporting it on 13mm hight. Its not necessary because it is self supporting. I just wanted it perfectly even. The cables fit through without dissembling!!! you just have to unwind it down front where the inlet of the cable chain is. and the to long cables you can just squeeze into the base of the printer. All Printed well slightly wrapping issue but noting serious. Uploaded more files. -Guide = fillament inlet -Cover = to fill the gap left from the display. -ClipPlexi2Frame = fits to hold the right and left side on the frame. -Clip_Plexi2Plexi = holds together the splitted right wall side (i did this because it supports the cable guide) -Door Handle = to snap open close (since the dimension depend on the hinge holes it could be No fit for you also is to say the knop is very small should change it some day) This Design have a big advantage: -filament is coming from the Top middle -reduces the noice significant -it provides maximal visibility full enclosed. -better heat control There are 4 Glas holders symmetrical just print 2 normal and 2 X mirrored. It is designed to hold 4mm Plexiglas and everything is easy to mount almost self-supporting. 1.Clip in the 4 holders. 2.use 6 small cable zipper to connect front and back side. 3.slide in the plexiglas panels fist the back then front and in the end the top one. The top Plexiglas is split and has a filament inlet also in the files. All can be made from 3x 250mmx500mmx4mm Plexiglas plates. ca.15€ Plexiglas Dimensions: HOOD: 2x 210mm x 108mm x 4mm 2x 100mm x 90mm x 4mm Walls/Door: 1x 250mm x 280mm x 4mm 1x 250mm x 130mm x 4mm 1x 250mm x 270mm x 4mm 1x 250mm x 160mm x 4mm
With this file you will be able to print MeCreator2 - Plexiglas Hood & Accessories with your 3D printer. Click on the button and save the file on your computer to work, edit or customize your design. You can also find more 3D designs for printers on MeCreator2 - Plexiglas Hood & Accessories.