Mediacenter Gehäuse Raspberry Pi 3
prusaprinters
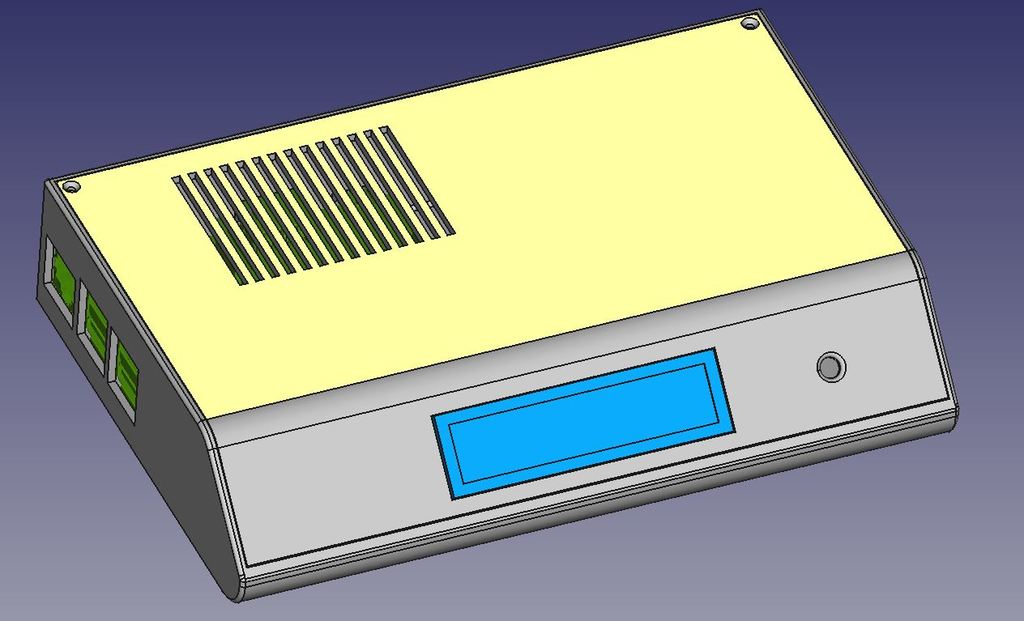
<p>05.05.2017: Fertig. Bei mir läuft alles unter OSMC (<a href="https://osmc.tv/">https://osmc.tv/</a>)</p> <p>Es gibt jetzt 2 Varianten des Deckels. Variante 1 ist wie gehabt, Variante 2 hat zusätzlich noch ein Loch (12,5mm) für den Einbau eines Tasters, z.B. <a href="http://www.ebay.de/itm/282415146746?_trksid=p2057872.m2749.l2649&var=581550037376&ssPageName=STRK%3AMEBIDX%3AIT">http://www.ebay.de/itm/282415146746?_trksid=p2057872.m2749.l2649&var=581550037376&ssPageName=STRK%3AMEBIDX%3AIT</a></p> <p>Hier noch der Link zum Einbau des LCD 1602 Displays mit I2C (Nur bis Step 1): <a href="http://www.raspberrypi-spy.co.uk/2015/05/using-an-i2c-enabled-lcd-screen-with-the-raspberry-pi/">http://www.raspberrypi-spy.co.uk/2015/05/using-an-i2c-enabled-lcd-screen-with-the-raspberry-pi/</a></p> <p>Hier der Link zu Installation: <a href="https://discourse.osmc.tv/t/howto-lcd-hd44780-throught-i2c-port-extender/16904">https://discourse.osmc.tv/t/howto-lcd-hd44780-throught-i2c-port-extender/16904</a></p> <p>Und das habe ich als Pegelwandler benutzt: <a href="http://www.ebay.de/itm/172110795634?_trksid=p2057872.m2749.l2649&ssPageName=STRK%3AMEBIDX%3AIT">http://www.ebay.de/itm/172110795634?_trksid=p2057872.m2749.l2649&ssPageName=STRK%3AMEBIDX%3AIT</a></p> <p>Wer dann noch einen An-/Austaster anschließen will: <a href="http://www.forum-raspberrypi.de/Thread-tutorial-hoch-und-runterfahren-mittels-taster-incl-status-led">http://www.forum-raspberrypi.de/Thread-tutorial-hoch-und-runterfahren-mittels-taster-incl-status-led</a></p> <p>26.04.2017: Ich arbeite gerade an einer neuen Version, da ich feststellen musste, dass die 10mm Radien beim Druck zu Problemen führen können. Auch werde ich den Ausschnitt für das Display überarbeiten. Hinzu kommt außerdem (optional) ein Befestigungsloch im Deckel für einen "ON/Off-Taster".</p> <p>Ich werde demnächst auch die Verdrahtungen und die E-Bauteile posten.</p> <p>EN: I still rework this thing cause i realised that there could be a problem with the 10mm radius at printing. Also i rework the cut for the lcd-display in the cover. Additionally ther will be a cutout for an (optional) on/off pushbutton.</p> <p>I will also publish the wirring and the needed parts.</p> <hr/> <p>Eingangsposting:</p> <p>Hier mein Enwurf eines Mediacenters für den Raspberry Pi 3.</p> <p>Im Deckel ist ein LCD-Display (HD44780 I2C 1602) vorgesehen, außerdem ein Loch für einen IR-Empfänger (TSOP4838).</p> <h3>Print Settings</h3> <p><strong>Printer:</strong></p> <p>Anet A8</p> <p class="detail-setting rafts"><strong>Rafts: </strong> <div><p>No</p></div> <p><strong>Supports:</strong></p> <p>No</p> <p class="detail-setting resolution"><strong>Resolution: </strong> <div><p>0,2mm</p></div> <p><strong>Infill:</strong></p> <p>30%</p> </p></p> Category: Electronics
With this file you will be able to print Mediacenter Gehäuse Raspberry Pi 3 with your 3D printer. Click on the button and save the file on your computer to work, edit or customize your design. You can also find more 3D designs for printers on Mediacenter Gehäuse Raspberry Pi 3.