Meeseeks Box
prusaprinters
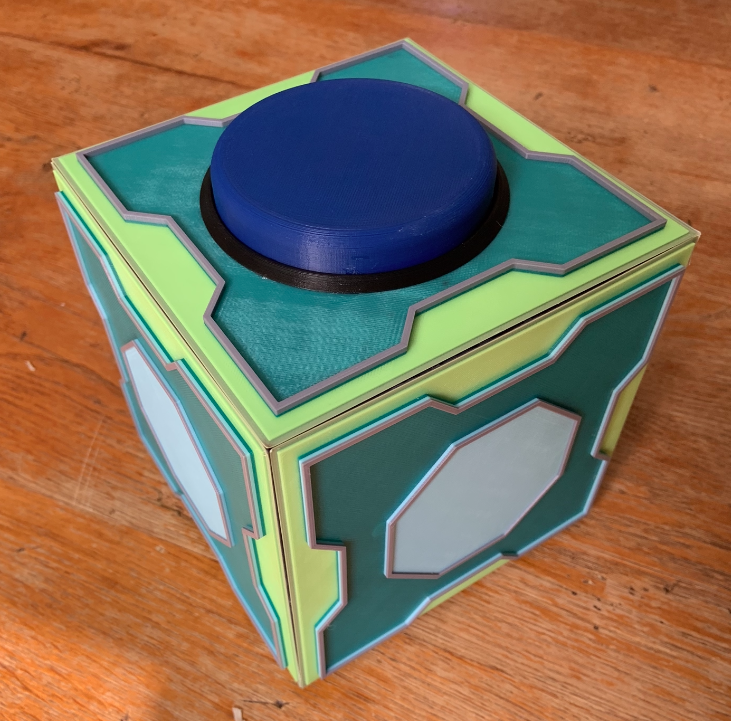
<p>Everyone needs a <a href="https://rickandmorty.fandom.com/wiki/Mr._Meeseeks_Box">Meeseeks Box!</a>.</p> <p><a href="https://www.rickandmorty.com/">Rick and Morty</a> fans will know how to use the appropriately and responsibly.</p> <p><em>Note</em>: Please only request small, achievable tasks.</p> <p>This is a multi-part print that you will need to build after the individual component pieces are complete. Designed as a multi-color print via layer-hight-based filament changes, be prepared for lots of layer-changing. I used 6 different colors of PLA (listed below) to complete this project.</p> <p>Included gCode contains the final version prints I used - meaning, layer-height-based filament changes, brims (where needed) and most multiples needed. The only exception are the box sides, you will have to print that multiple times on your own.</p> <p>Total Print Time: 42h 30m<br/> Assembly Time: 2h 00m</p> <p>Questions, please ask.</p> <p><em>Note</em>: Failure to follow these steps exactly will result in a non-functioning, decorative, Meeseeks box. So, pay close attention if you want a Mr. Meeseeks to help you clean up at the end. Remember just keep your requests simple. They're not gods.</p> <h3>Print instructions</h3><p><strong>How I designed this</strong><br/> I designed this as a "hard" project for me to learn Fusion360. It was the perfect model to start with as it was multi-part, required many "sketches" to build and extrude, and it required many different skills to complete.</p> <p>I reference sides in this posting, please refer to the "orientation" image (2nd image) to help describe faces.</p> <p><strong>PLA Colors Used</strong><br/> Inland PLA - Peak Green (Left, Right, Front, Back, Bottom)<br/> Inland PLA - Green (Left, Right, Front, Back, Top, Bottom)<br/> Inland PLA - Blue (Button, Button Housing, Corner Brackets)<br/> Inland PLA - Light Blue (Left, Right, Front, Back, Bottom)<br/> Inland PLA - Black (Button Ring)<br/> Inland PLA - Grey (Left, Right, Front, Back, Top, Bottom)</p> <p><strong>Printing Instructions</strong></p> <p><strong>Step 1 - Sides & Bottom - ~5h 15m (x5, ~26h 30m Total)</strong><br/> <em>Print Settings:</em></p> <ul> <li>Raft: NO</li> <li>Brim: YES</li> <li>Supports: NO</li> <li>Infill: 5% - Gyroid</li> </ul> <p>I started with the Sides and Bottom of the box first.</p> <p>You will be printing 5 "sides" to complete the box - Front, Back, Left, Right and Bottom. They are all the same, and each require 4 filament changes and 4 different PLA colors. Grey, Peak Green, Green, and Light Blue</p> <p>Each side takes approximately 5h 15m to complete.</p> <p>Brims are turned on for the Front, Back, Left, Right and Bottom faces as the corners tend to pull away as they cool. Leaving brims on will help ensure good bed adhesion and perfectly straight edges - required for a nice assembly.</p> <p>No need for supports or rafts as all vertical angles are 45º or less and should print fine with most printers.</p> <p><em>Layer Changes / Colors / Timings</em></p> <ul> <li>Layer 1 - 19: Grey, ~02:45</li> <li>Layer 20 - 26: Peak Green, ~00:45</li> <li>Layer 27 - 33: Green, ~01:10</li> <li>Layer 34 - 40: Light Blue, ~00:40</li> <li>Layer 41 - 46: Grey, ~00:13</li> </ul> <p><strong>Step 2 - Top - ~4h 30m</strong><br/> <em>Print Settings:</em></p> <ul> <li>Raft: NO</li> <li>Brim: YES</li> <li>Supports: YES</li> <li>Infill: 5% - Gyroid</li> </ul> <p>You will be printing 1 "top" to complete the box - Top.</p> <p>The top requires 3 filament changes and 3 different PLA colors. Grey, Peak Green, and Green.</p> <p>The top takes approximately 4h 30m to complete.</p> <p>Brims are turned on for the Top face as the corners tend to pull away as they cool. Leaving brims on will help ensure good bed adhesion and perfectly straight edges - required for a nice assembly.</p> <p>No need for supports or rafts as all vertical angles are 45º or less and should print fine with most printers.</p> <p><em>Layer Changes / Colors / Timings</em></p> <ul> <li>Layer 1 - 19: Grey, ~02:15</li> <li>Layer 20 - 26: Peak Green, ~00:35</li> <li>Layer 27 - 33: Green, ~00:50</li> <li>Layer 34 - 46: Grey, ~00:50</li> </ul> <p><strong>Step 3 - Button - ~3h 30m</strong><br/> <em>Print Settings:</em></p> <ul> <li>Raft: NO</li> <li>Brim: YES</li> <li>Supports: NO</li> <li>Infill: 5% - Gyroid</li> </ul> <p>You will be printing 1 button to complete the box.</p> <p>The button requires 1 PLA colors. Blue.</p> <p>The button takes approximately 3h 30m to complete.</p> <p>Infill is low for this print as I just wanted the button to be lightweight.</p> <p>Brims are turned on for the Button as the guide tabs tend to pull away as they cool. Leaving brims on will help ensure good bed adhesion and perfectly straight tabs - required for a nice assembly when placed in the button housing.</p> <p><strong>Step 4 - Button Housing - ~3h 20m</strong><br/> <em>Print Settings:</em></p> <ul> <li>Raft: NO</li> <li>Brim: NO</li> <li>Supports: NO</li> <li>Infill: 25% - Gyroid</li> </ul> <p>You will be printing 1 button housing to complete the box.</p> <p>The button housing requires 1 PLA colors. ANY, I chose Blue as it was already in the printer from the previous step.</p> <p>The button housing takes approximately 3h 20m to complete.</p> <p>I increased infill for this part as it will receive some additional stresses as the button is pressed on the final print. It may not be necessary - you decide.</p> <p><strong>Step 5 - Corner Braces - ~3h 20m</strong><br/> <em>Print Settings:</em></p> <ul> <li>Raft: NO</li> <li>Brim: YES</li> <li>Supports: NO</li> <li>Infill: 25% - Gyroid</li> </ul> <p>You will be printing 8 corner braces to complete the box - all 8 are contained in the gCode file.</p> <p>The corner braces require 1 PLA color. ANY, I chose Blue as it was already in the printer from the previous step.</p> <p>The braces takes approximately 3h 20m to complete.</p> <p>Infill is higher for this print as I just wanted braces to be solid and effective in the construction and use of the box.</p> <p>Brims are turned on for the braces as the print tends to pull away as it cools. Leaving brims on will help ensure good bed adhesion and perfectly straight edges for the braces - required for a nice assembly.</p> <p><strong>Step 6 - Button Ring - ~0h 35m</strong><br/> <em>Print Settings:</em></p> <ul> <li>Raft: NO</li> <li>Brim: NO</li> <li>Supports: NO</li> <li>Infill: 10% - Gyroid</li> </ul> <p>You will be printing 1 button ring to complete the box.</p> <p>The button ring requires requires 1 PLA colors. Black.</p> <p>The button takes approximately 35m to complete.</p> <p>Infill is 10% for this print as I just wanted the ring to be lightweight.</p> <p>Brims are turned on for the button ring as the print tends to pull away as it cools. Leaving brims on will help ensure good bed adhesion and perfectly straight ring surfaces - required for a nice assembly when placed over the button on the final print.</p> <p><strong>Assembly Instructions</strong><br/> <strong>Step 0 - Materials Needed</strong><br/> I started by cutting out a 50mm x 50mm x 30mm piece of foam sponge material. This was left over from a packing box. The idea was to find something soft and spongy that would return to its original shape when pressed. This will be used as the "spring" to make the button push back up once pressed.</p> <p>I like to work with cyanoacrylate glues (aka <a href="https://en.wikipedia.org/wiki/Cyanoacrylate">SuperGlue</a>) on my PLA prints. It works really well, but can be messy if you get sloppy with it. Sometimes I use an accelerator. You can buy any glue / accelerator you want, I generally work with <a href="https://www.amazon.com/Akfix-Adhesive-Activator-13-50-Accelerator/dp/B07BTLL5L5/ref=asc_df_B07BTLL5L5/?tag=hyprod-20&linkCode=df0&hvadid=312448434195&hvpos=1o1&hvnetw=g&hvrand=2579140294411997317&hvpone=&hvptwo=&hvqmt=&hvdev=c&hvdvcmdl=&hvlocint=&hvlocphy=9007222&hvtargid=pla-570328952123&psc=1">Akfix 705</a>.</p> <p><strong>Step 1 - Button / Button Housing</strong><br/> Version 1 of my design had a printed "spring" that worked, but broke after repeated use. V2 removed the spring and I used the foam instead.</p> <p>The foam was placed inside the button housing, and the button (tabs down) were snapped into place in the button housing.</p> <p>I've attached an image of the button and button housing (side view) to show you how it all fits together.</p> <p>You can now press the button as many times as you would like.</p> <p><em>Note</em>: Pressing the button will not call a Meeseeks as the box is not complete yet.</p> <p><strong>Step 2 - Attaching the button housing to the Top face of the box.</strong><br/> Remove any support material from the bottom of the top face, so that you expose a 1mm deep channel that will accept the top edge of the button housing. The button itself will poke though the top surface.</p> <p>CAREFULLY, I can't stress this enough, put super glue on the underside channel on the top face. Any messy glue will likely get on the top surface of the button, in the button mechanism or other areas. If any glue gets on the button or in the mechanism, your box will not work correctly and a Mr. Meeseeks will not be called. Be careful.</p> <p>Set this part aside and let it dry completely.</p> <p><strong>Step 3 - Attaching the button ring to the Top face of the box.</strong><br/> Now, place the black button ring over the top of the button (which is now poking through the top face). Using super glue, glue the button ring to the top face only, not the button.</p> <p>CAREFULLY, again I can't stress this enough, super glue gets everywhere if you are sloppy, so make sure only to put the glue on the bottom of the ring and not the button. If any glue gets on the button or in the mechanism, your box will not work correctly and a Meeseeks will not be called. Be careful.</p> <p>Set aside the completed top / button face.</p> <p><strong>Step 4 - Glue the corner braces to the bottom face.</strong><br/> Select the ugliest print (of the 5 you printed) of the "side". This is now your "bottom" face. Place the colored side down, grey side up, and begin to glue the corner braces to all 4 corners of your bottom face.</p> <p>Be careful to align the edges of the corner braces with the inner edge, not the outer edge. The 45º angle chamfer will be used to fit the other corners together and the braces need to be set back slightly and aligned to this inner edge. See photos, "Corner - Bottom - Front Left" and "Corner - Bottom - All" if this is unclear.</p> <p>If you do this poorly, assembly will be a problem, and Mr. Meeseeks will not be summoned when you press the button. So, take care to do this well.</p> <p><strong>Step 5 - Glue the corner braces to the remaining faces.</strong><br/> Lay out your remaining faces as shown in the picture "All Corners - Annotated" to understand the layout and step for the remaining corner braces.</p> <p>First work on the "Back" face by placing two corner braces on the far right sides. This will, eventually become the top of the back face.</p> <p>Next, add one brace to the top and one brace to the bottom face as show in the "All Corners - Annotated" image.</p> <p>If you did it correctly, you will NOT have any braces glued to the "Front" or "Top" faces at all. If you do, figure it out on your own, I'm not your mother, and you won't have a Mr. Meeseeks to help you until you do it correctly. So, be smart. Figure it out. Don't be a Jerry about it.</p> <p><strong>Step 6 - Assemble the Back, Left, Front and Right faces</strong><br/> This next step involves a lot of glue. With this glue, there can be lots of fumes. You should probably work in a well ventilated area. Or don't - I'm not your mother.</p> <p>Start by gluing the "Back" face to the "Bottom" face.</p> <p>Set aside and let things really dry. The box will be so much stronger if you let everything dry completely.</p> <p>Now, glue in the "Left" face. Let things dry.</p> <p>Now, glue in the "Right" face. Let things dry.</p> <p>Now, glue in the "Front" face. Let things dry.</p> <p><strong>Step 7 - Add the Top surface</strong><br/> Everything better be dry if you are at Step 7.</p> <p>Not just dry-ish, I mean full on DRY.</p> <p><strong>Meeseeks Box Use</strong><br/> Just keep your requests simple.<br/> They're not gods.</p> <p><img alt="Mr Meeseeks" src="https://vignette.wikia.nocookie.net/halofanon/images/3/3b/Screen_Shot_2017-09-26_at_7.36.02_PM.png/revision/latest?cb=20170926233739" title="Mr Meeseeks"/></p> <p><strong>Testing your Meeseeks Box</strong></p> <p>When you press the button, a Mr. Meeseeks will pop into existence and utter this <a href="https://www.myinstants.com/instant/rick-and-morty-mr-meeseeks/">statement</a>.</p> <p>Any other behavior means you screwed something up.</p> <p>Sorry.</p>
With this file you will be able to print Meeseeks Box with your 3D printer. Click on the button and save the file on your computer to work, edit or customize your design. You can also find more 3D designs for printers on Meeseeks Box.