Mega BBQ Heatermeter Fan
thingiverse
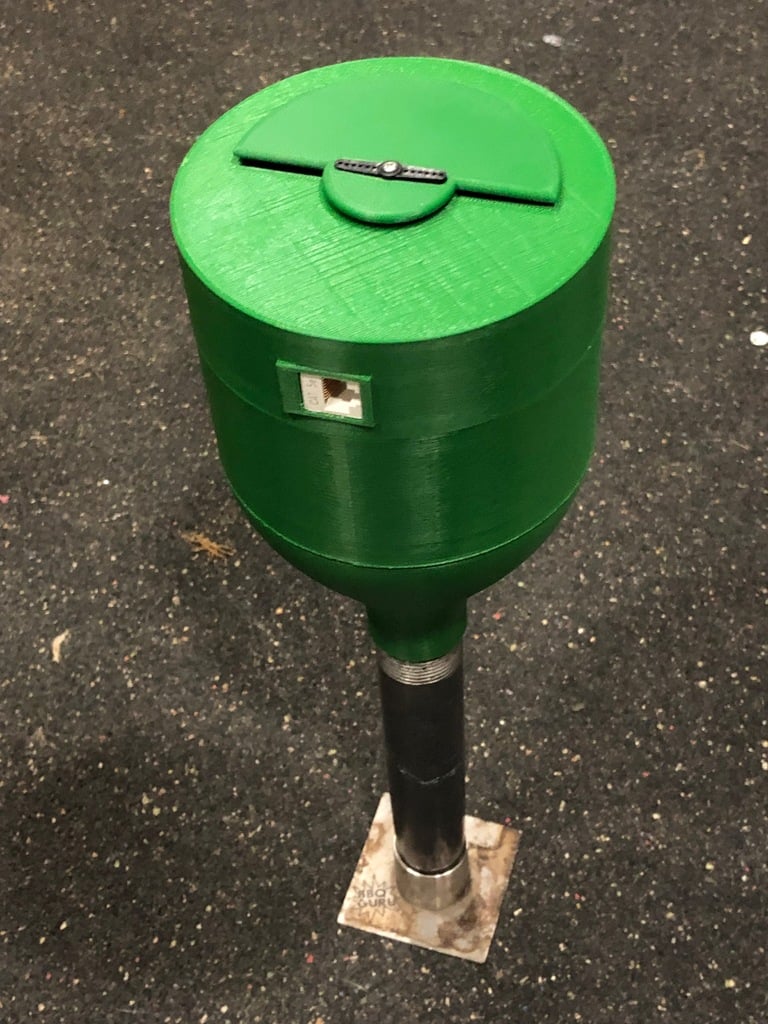
I currently have a couple of HeaterMeter devices that I built out and I wanted to have a more custom high volume fan housing for my 80mm. I intentionally was not looking to make this as small as possible, so just realize that this housing is not intended to be small. I live in Texas, things are big. I designed it to be used with a 1" threaded pipe as a connector. What I have done in the past is purchased a 1" galvanized pipe. You can purchase whatever size you want. In order to get it to seat in my BBQ Guru Air inlet port, I used my grinder to grind off the threads of one end until it inserted snug into the fitting. Here is the link to my adapter. https://www.bbqguru.com/storenav?CategoryId=2&ProductId=14 When I design I try to achieve two main goals with all my builds - as few of supports needed, and snug/easy connection between the parts that don't require glue. In order to get the parts to fit together, I chose to build the fan housing as the one that requires supports in order to build up the raised floor for the fan. So while I did not achieve no supports for this build, they are minimized. Here is the link to the fan that I purchased from DigiKey. http://tinyurl.com/y35ekqol I liked the size and airflow that it provides. Note that it you will need to fasten the fan to the housing using M4 or M5 screws and nuts. I made two cutouts to screw them in. I used some short M5 screws and nuts and it secured it nicely. Note: Fan label is pointed to the BBQ as this is going the direction of the air movement. For the servo, you can use the MG90S servo. They are more beefy and still pretty cheap. I bought mine on ebay http://tinyurl.com/yxtcj588 Servo just gets screwed into the housing or glue in if you wish For the cat5 connection I just used a standard keystone connector. With a little filing, I got it to fit nice and tight. I took a couple of pictures to help guide the configuration of the keystone with the wires, but here is the wiring Keystone # Servo Fan 1 na na 2 na na 3 5V Red na 4 Fan/Servo Ground Brown Black Note these are wired together and then connected 5 Fan Power na Red 6 Servo signal Orange na 7 na na 8 na na Damper blade gets screwed in last, just make sure that you note the orientation after you connect it up. I suggest that you first connect it to your HeaterMeter to turn it on and set for manual 0%, then you know the servo is in the correct orientation. Also check your configurations for the servo pulse range. Mine is set at 570 - 2700. The build does take a while. On my printer it took 11 hours for the fan housing, 9 for each of the pipe end and the damper housing. Just an hour for the damper blade. Update August 23 2019 - I changed the base of this to no longer need any supports at all and it is even stronger than before. I have made a few of these now for people - and they work perfect - particularly for larger Eggs or BBQs
With this file you will be able to print Mega BBQ Heatermeter Fan with your 3D printer. Click on the button and save the file on your computer to work, edit or customize your design. You can also find more 3D designs for printers on Mega BBQ Heatermeter Fan.