Melting Dali Clock
prusaprinters
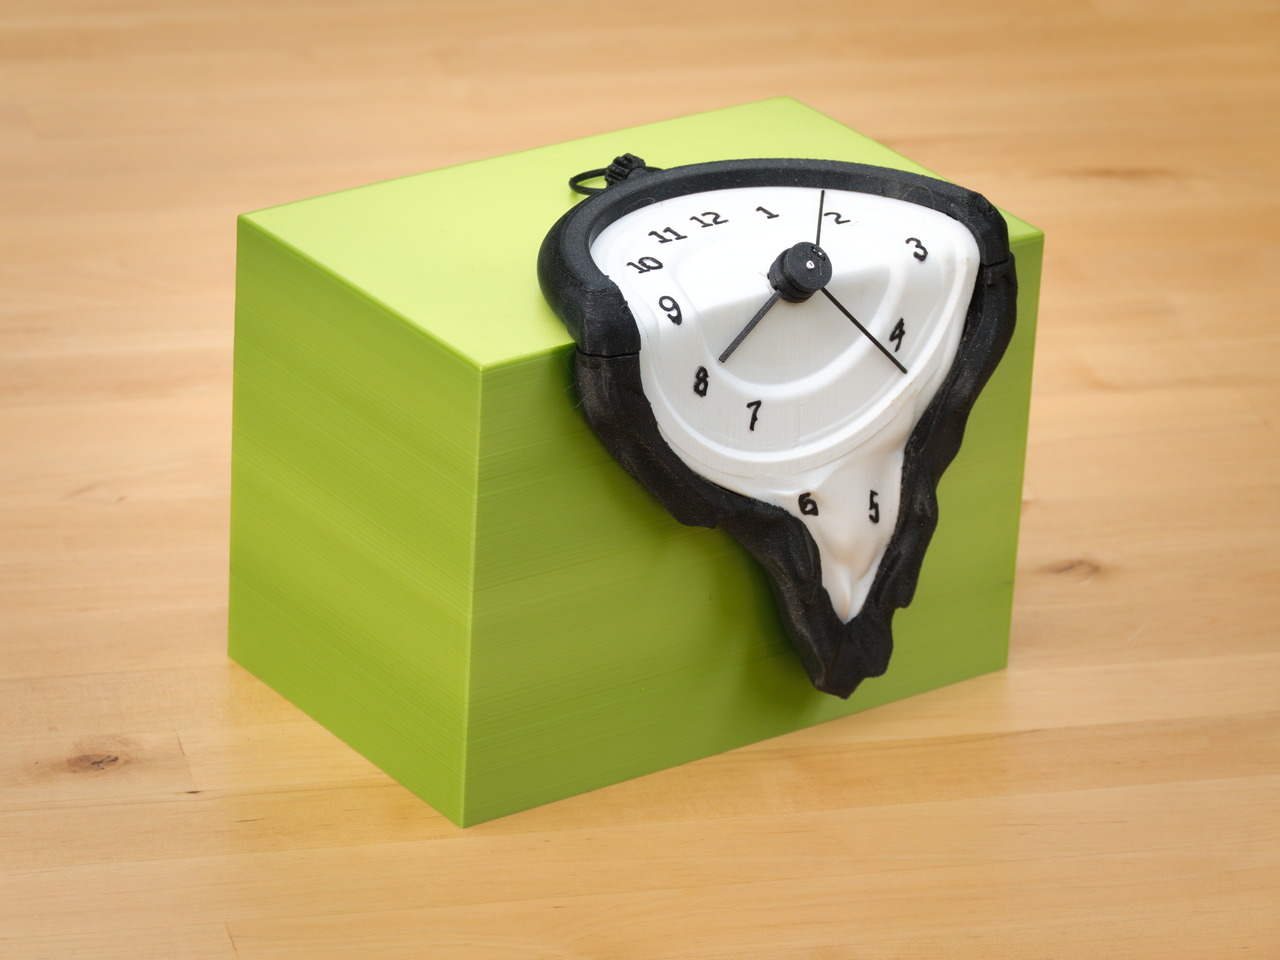
<p>This is a working melting clock from the famous painting <a href="https://en.wikipedia.org/wiki/The_Persistence_of_Memory">The Persistence of Memory</a> by Salvador Dali.</p><p>The 3 clock hands orbit in the horizontal plane for the “regular” part of the clock that lies on the green block and switch to a vertical plane when they reach the “molten” part of the clock that drips of the table. And vice versa on the way up.</p><p>This clock is built using a DIY quartz clock replacement mechanism that you can buy at various places. I ordered a <a href="https://www.bol.com/be/nl/p/gws-quartz-uurwerk-nieuw-los-uurwerk-kopen-en-vervangen-gws-hr1688-20-high-torque/9300000022164957">high torque version</a>, but received a regular version instead.</p><p>The design could still use some fine-tuning, though, as the second hand sometimes sticks for two seconds at the same place while its axis already turns to the next position. The next clock tick, the second hand then jumps two seconds ahead. So time is still kept correctly, only it advances in an even more non-linear way than the scale indicates, which some may find fitting the time warping concept of this clock. By moving the second hand holder a little higher, the problem has already been reduced a lot, as you can see in the new video. Remark that also the other hands can get stuck for a while and then catch up, as you can see for the minute hand in the middle part of the video that is 10x faster than real-time. </p><figure class="media"><oembed url="https://youtu.be/__Cz53tLYzE"></oembed></figure><p>For the crown wheel at the top of the clock (which is turnable by the way), I used a gear from the <a href="https://www.prusaprinters.org/prints/28314-lego-technic-compatible-gears-with-custom-sizes">Lego Technic compatible gears with custom sizes</a> print by marian42. I had hoped to drive the settings wheel of the quartz mechanism with the crown wheel of the clock via some (beveled) gears. But I started too late with this project for the contest submission deadline and Fusion 360 wasn't exactly cooperating this time (probably because of my lack of experience with the sculpting tools), so I had to skip that part. But adding the gears would probably have added too much drag to the clock mechanism anyway. Therefore, I was already contemplating mechanisms to only connect the gears when the time needs to be adjusted.</p><h3>Print Instructions</h3><p>I printed everything in PETG, except for the green box which is in PLA, because this is what I had laying around in black and white colors. But I guess PLA will do just as well.</p><p>Have a look at the .3mf files for the details on how I printed the different parts and in which orientation. Most things are standard but for things requiring higher accuracy I did some experiments with 0.10 mm and 0.15 mm layer height and selected the layer height that gave the best results. Sometimes I increased the number of vertical perimeters to avoid infill. Except for the clock face, nothing requires support.</p><p>Here are some special remarks:</p><ul><li>The clock face is meant to be printed in vertical position with the 3 o'clock side facing down. This way it gets the smoothest surface and the least amount of friction around the corner points. It needs supports on the print bed only. I added a support blocker around the digit 5 to avoid messing up the clock surface.</li><li>I printed the hand holder parts (tube and disk) all separately to minimize stringing.</li><li>The molten clock border (vertical black part) has to be printed vertically. I added a brim of 15 mm to keep it steady.</li></ul><h3>Assembly Instructions</h3><p>Verify that the diameter of the hand holding tubes on your clock mechanism match with the inner diameters in the design (5.25mm for the hour hand and 3.30mm for the minute hand). Otherwise, you cannot reuse the parts I supplied. </p><p>The clock hands have to be inserted in the corresponding clock discs from the inside of the disc and pulling them outwards. Make sure that they are hanging very loose and can go easily from almost 0 to 90 degrees with respect to the axis of the tube. It is gravity that does the trick here and if there is too much friction, the clock will not work.</p><p>In my clock mechanism the pin to connect the second hand has a diameter of 0.8 mm. To connect this to the second hand holder disc, I bought a plastic tube of 1mm inner diameter from a modeling shop. I pinched one side a bit to make it flatter. This seems to work, but maybe I will have to glue it on the pin. I didn't do so yet because I'm worrying that the glue may glue the whole mechanism together.</p><p>Test that all the tubes fit nicely on the mechanism before installing it. Work from the outside to the inside (first hour, then minutes, and finally second hand holder).</p><p>The clock mechanism has to be inserted in the base from the inside and fastened with the nut supplied by the clock mechanism on the outside.</p><p>The digits have to be glued in the embossed parts on the clock face. Notice that the 3 and the 9 have to be round after gluing. If they are to thick to keep them nicely follow the clock face, you should reduce their height in the slicer to make them more flexible.</p><p>The molten clock frame at the bottom has to be slipped over the clock face. You will need to file a bit of the edges that stick up at the bottom of the clock face to make it fit. I had too many problems trying to fix this in Fusion 360. </p><h3>Updates</h3><p>2021-06-29 Made skewed ‘3’ and ‘9’ numbers thinner to bend more easily<br> Added pins to better connect melted frame top and bottom</p><p> </p><p> </p><h3> </h3>
With this file you will be able to print Melting Dali Clock with your 3D printer. Click on the button and save the file on your computer to work, edit or customize your design. You can also find more 3D designs for printers on Melting Dali Clock.