Merkur XR4Ti 2Din radio mount
thingiverse
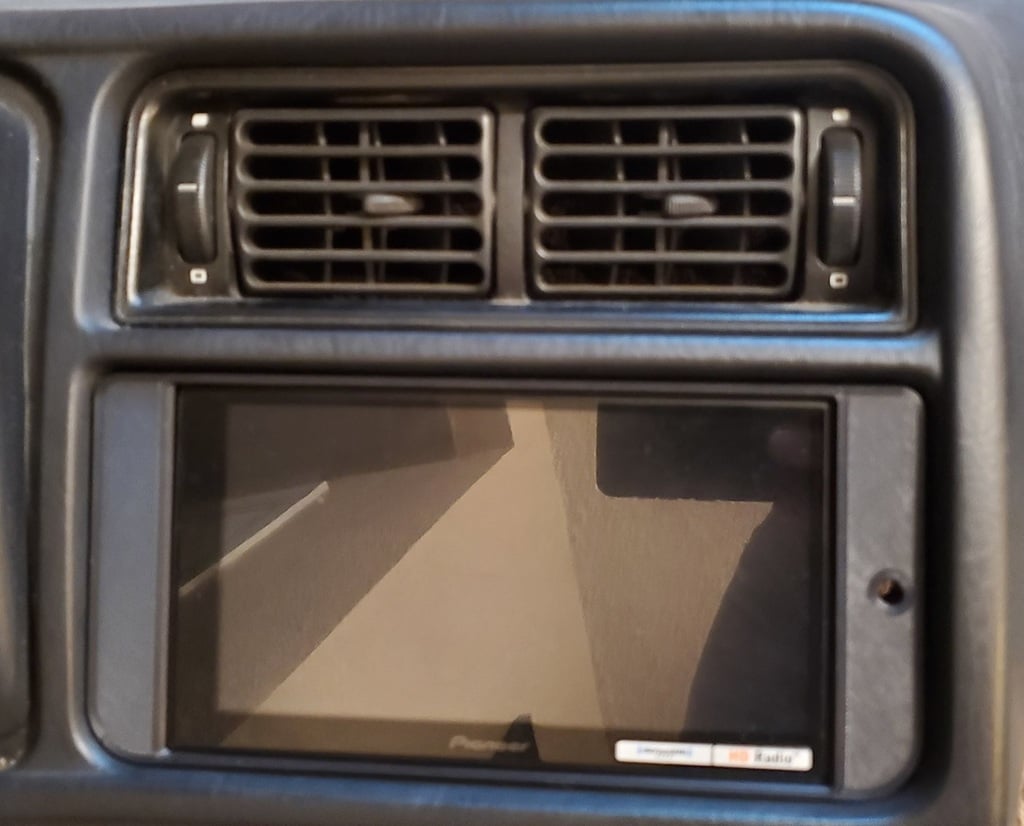
This is a double DIN radio mount for the Merkur XR4Ti. It replaces the clock, vehicle display and warning lights below the center vent. Installation will require removal of the lower passenger dash for access. I designed and installed this while my dash was completely out so it was easier. The mount and brackets were designed around a Pioneer DMH-W4660NEX head unit. The mounting holes in the side brackets may not fit other radio manufacturers. The brackets are mounted to the radio using countersunk screws since there's not a lot of room between the bracket and frame. The brackets and trim clips are bolted to the inner mount using M3x20mm socket head screws. There are 4 heatserts inserted into the frame prior to mounting since I don't really like threading machine screws into plastic. I used a digital media receiver (no CD/DVD) since there is not enough room for a full depth head unit without deleting the center vents. The inner frame/mount replaces the factory plastic mount for the clock/display/lights. The replacement uses factory screws to mount to the dash. The dash opening is trimmed about 1mm on the top and bottom to clear the radio face. No other cutting is necessary. Materials required: - ABS filament and printer capable of printing ABS. I did not try PETG as I'm not sure if it would handle the temperatures under the dash. Likewise PLA is not suitable since it will deform and sag. I don't have experience with ASA, though I imagine it would work. - 4x M3x20 socket head screws for mounting the clips and brackets to the inner frame - 4x M3x6x5 heatserts (longer ones are fine too). I used the leftovers from my Voron build, use other types at your own risk. There should be enough material to drill out the holes slightly if needed. - Double Din head unit. Simplified assembly instructions: - Print 1x frame, 1x front trim plate, 1 each left & right brackets, 1x LED mount, 4x trim mounts - Be sure to install the 4 heat inserts into the mounting frame - Remove the original plastic frame from the dash - Install the large inner mount/frame using factory screws. There mounting holes are slotted to allow for alignment - Bolt brackets to the sides of the radio using countersunk screws - Slide the radio and brackets in from the front - Insert each M3x20 bolt through each trim mount, then insert through the bracket, tighten to secure the radio - The hole to the right of the radio is for an alarm LED. The opening is based on DEI/Avital LED. First insert the led into the mount/sleeve, then insert the whole assembly into the faceplate trim. - The front trim plate snaps onto the bolted down mounts. The left side mounts on the faceplate are purposely trimmed flat to avoid cutting the dash. This is a work in progress, I make no guarantees as to the fit with other head units or cars. I will most likely add another version that has the M3 screws threading into the frame instead of heat inserts.
With this file you will be able to print Merkur XR4Ti 2Din radio mount with your 3D printer. Click on the button and save the file on your computer to work, edit or customize your design. You can also find more 3D designs for printers on Merkur XR4Ti 2Din radio mount.