Mickey/Minnie Echo Dot (3rd Gen) Stand (Multicolour print)
thingiverse
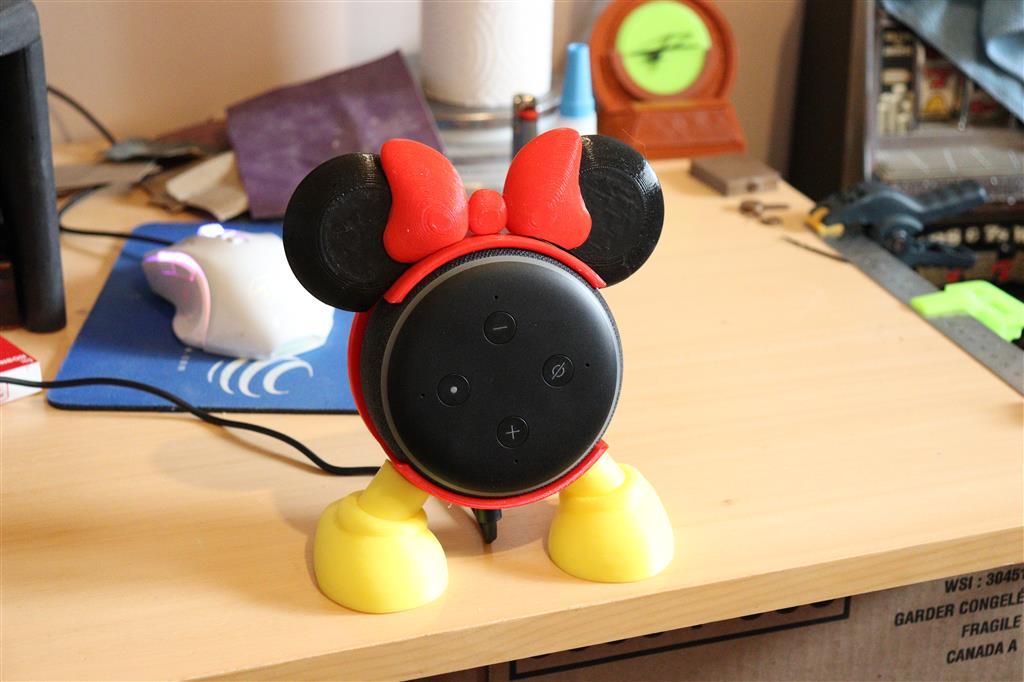
Well wasn't this frustrating, after 9 hours of printing I found out the cable coming out of the echo was too close to the bottom after all was said and done. :( So another several hours redesigning things. I had issues trying to set the legs without pegs, and the main body broke due to a flaw in the original files for the echo holder I was using.. so... I completely rebuilt a lot of the parts, and then rebuilt them again after a final print. This design is now fully tested and printed and I had no issues anywhere. (yay :) ) - the echo holder (main v2) - its a mm wider so that the echo doesnt stress it so much going in and out - The holding collar is thicker so that it has more rigidity - I removed the top cut-out (this cuts off 30 min of printing supports there and makes the top easier to handle) - The master cut outs are now curved so that there is even more strength to those areas - removed the odd peg system and put in 2 pegs for the legs, simple round pegs with logs of clearance, just to help to put into the right location without huge hassles - I recommend 50% fill for the holder, you want strength here, and it does not add much to print time - the legs - these are hollowed with tolerance for the new pegs body and feet - the cupped section will attach to the body - The feet - removed the odd shaped pegs and centered in new pegs, these have a good amount of tolerance as they are just to make sure the feet go in the right spot - the ears - rebuilt and cut to contour to the top - for a more fuller loot print out 2 sets of ears and glue them together - this is a very nice look - the bow - The bow was contour cut to sit on the ears nicely Assembly instructions - I put the main holder on the desk, then put on the ears all flat to the desk - I placed the bow onto the ears and moved things until they nicely settled - I pulled the bow off and put on superglue then put the bow back onto the ears exactly - I let this set (if you arent using the bow just eye up the ears how and where you like them - If you opted for the nice full ears and printed them twice after the bow/ear combination has set you can now easily glue the halves together and set - I sanded the bottom of the legs to fit snug into the feet (just to remove elephants foot), if this is real snug no glue is needed - For the connections of the legs to the body, I used superglue and let it sit and dry nicely THEN attach the feet, this gives you the optimal chance to set everything nicely for balance as the feet placement can affect this. I didnt have any issues getting things up, the power cable adds a small point of contact, if this is an issue for you just stretch the legs on the Z-axis a few more MM - If you are gluing the feet to the legs use white glue for the connections so you get some time to play and settle things nice and flat - when the base and legs are dry, you can set the ears or ears/bow combination centered to the top and glue in place - enjoy your mickey/minnie echo stand :) My Print settings - Everything printed at .30 - bed 55 degrees (dropping it 10 degrees every 20 layers) - head 205 degrees - Supports for the bow (buildplate only) and the main body (everywhere) The original design here was for a google mini (https://www.thingiverse.com/thing:3408715), Took a smart design and tore it down to made it work with the Amazon Echo Dot (Gen 3. I have labelled these for a multicolour print, I used Red from Amazed yellow from Simax3d and black from Geeetech. All worked well together. The mickey parts where remixed and mostly rebuilt by me from the original google mini thing, the echo base was remixed and rebuilt from : https://www.thingiverse.com/thing:3337820. Options - print out a second set of ears for a fuller look - glue all the legs together - if the cable coming out of the bottom bothers you, you have a few other options, drill holes in the top behind the ears/bow so that the cables can go there, or just rotate your echo and use the side ports. It's a versatile design to fit whatever works best for you. If you enjoy my prints or remixes please consider becoming a Patron! https://www.patreon.com/rkxdesigns Becoming a patron gets you early access to files and opportunities to get involved with the creative process. Early STLs, images of works in progress, and voting for upcoming designs!
With this file you will be able to print Mickey/Minnie Echo Dot (3rd Gen) Stand (Multicolour print) with your 3D printer. Click on the button and save the file on your computer to work, edit or customize your design. You can also find more 3D designs for printers on Mickey/Minnie Echo Dot (3rd Gen) Stand (Multicolour print).