Micro Hexcopter Frame
thingiverse
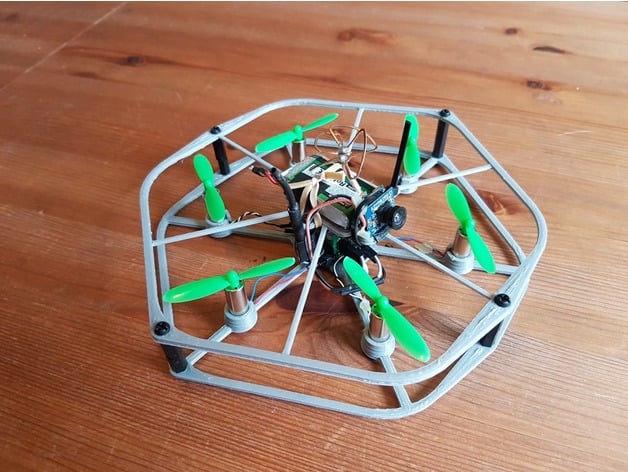
This is a custom micro FPV hexacopter frame design I've been working on for use with 8520 coreless motors. The idea is to get more lift when carrying 750 mah 1s batteries that I'm using over what standard quad setups can provide. It comes out at about 16 grams +/- for the printed frame. I've added in some tolerance for printing with ABS to account for shrinkage when printing. You may need to modify sizing slightly to suit the material you're printing with to fit the motors - mine shrinks by 1mm across the diameter of the motors, so I sized the file accordingly. Custom Section Parts & Tools: 6 x 8520 Coreless Motors 6 x 60-65 mm Propellers (3 x CW, 3 x CCW) 1 x SP Racing F3 EVO Brush Flight Control or other similar board with 6 motor attachments 1 x 1s 500-750 mah Battery 1 x PPM receiver with at least 4 channels - ideally 5 to 6 for an arming switch and flight modes 1 x Small Elastic Band 6 x M3 Plastic/Nylon Standoffs - approx. 30mm high 12 x M3 Plastic Screws 6 x 20mm cable-ties/zip-ties 10 cm two-sided tape 1 x Soldering Iron & Solder 1 x Wire Cutters Optional: 1 x Micro FPV Camera/Transmitter 1 x Hot Glue Gun & Glue Sticks Assembly: Print both parts at 100% infill. Place board, measuring cable run from motor mounts to the board. Cut and solder motors in appropriate motor positions, attach receiver and power connector - confirm polarity before powering as not all batteries are the same. Apply two-sided tape to base of flight controller and place on lower frame. Press fit each motor into their motor mounts - be careful with wires. Test they spin in correct direction. Zip-tie flight controller to lower frame. Attach all standoffs to upper frame. Place elastic band around one mid-frame standoff and stretch it around top side of frame, looping other end around standoff on the other side. Cut more two-sided tape and attach to top of flight controller. Press receiver onto tape on top of flight controller - zip-tie if necessary. Connect lower frame to upper frame. Use zip-ties to tidy/connect receiver's antennae to frame safely away from props. Place two-sided tape on camera mount position. Use receiver to provide power to camera. Place camera in position, test and zip-tie to finalize. Bind receiver, connect to flight controller software and complete initial set-up. Attach propellers, ensuring correct placement for motor spin direction. Fly/enjoy. As an optional step, you could hot-glue your motor leads to supports to add strain relief, as well as above any other cables as they insert onto flight controller.
With this file you will be able to print Micro Hexcopter Frame with your 3D printer. Click on the button and save the file on your computer to work, edit or customize your design. You can also find more 3D designs for printers on Micro Hexcopter Frame.