MicroCube
thingiverse
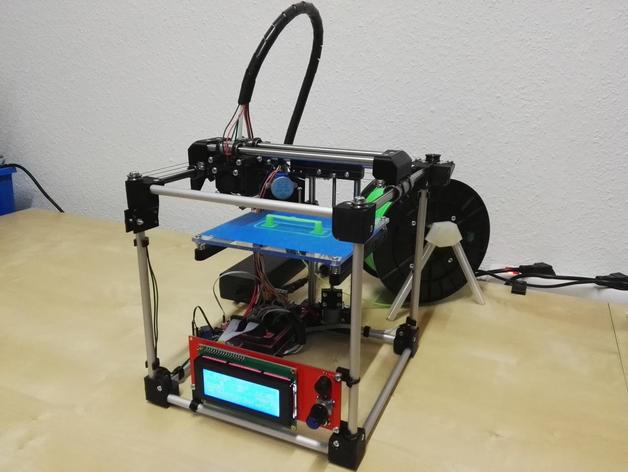
It appears that you've provided a detailed manual or instructions for building and setting up a 3D printer called the MicroCube. The document covers various aspects, including: 1. **Materials and Components**: - Lists the necessary materials and components required to build the printer. - Specifies the dimensions of several parts, such as the aluminium tubes and the print bed. 2. **Electronics**: - Requires a custom setup for the 28BYJ-48 motors, suggesting a bipolar hack is needed. - Describes how to extend the wires from the motors and connect them in sequence with the RAMPs board. - Provides guidance on setting current limits at the RAMPs board before powering it up. 3. **Mechanics**: - Explains that the printer is designed as an H-bot, utilizing a fishing line along with ball bearings to guide it. - Discusses the extruder setup, which uses two motors for direct drive bowden and requires balancing spring tension. 4. **Software**: - Specifies firmware (Marlin 1.1.0 RC7) and provides configuration.h as a starting point. - Offers detailed settings for the MicroCube's mechanical and motor configurations in the configuration.h file, including core XY kinematics, print area dimensions, motor speed, and acceleration values. 5. **Assembly**: - Includes an assembly guide in PDF format (MicroCube assembly guide.pdf). 6. **Sample Prints and Todo List**: - Mentions printing 3DBenchy as a reliability test and notes the result was surprisingly good. - Lists various tasks that need to be completed, including setting up part cooling fans, endurance testing, and possibly improving the extruder setup. Given this detailed guide, building the MicroCube seems like a complex project requiring attention to detail in both mechanical assembly and electronic configuration.
With this file you will be able to print MicroCube with your 3D printer. Click on the button and save the file on your computer to work, edit or customize your design. You can also find more 3D designs for printers on MicroCube.