Microlight print head for Rat Rig V-core 3.1
thingiverse
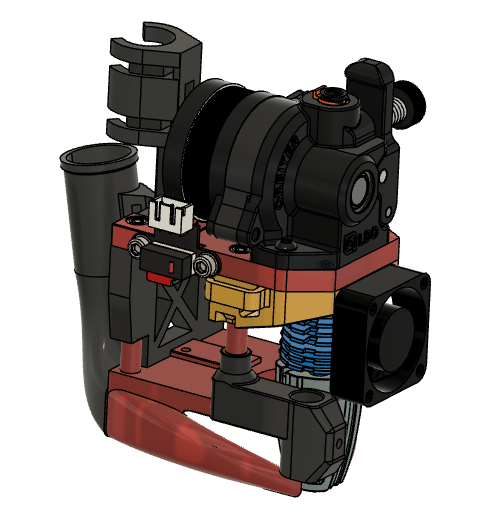
The Microlight print head is probably the lightest print head for a Rat Rig V-Core 3.1. Compatible with the Orbiter 2 extruder and both Rapido UHF and Dragon UHF hot ends Key features: - Very light - Supremely rigid - Very simple - Very low part and screw count. - Very fast and nice to work on for maintenance, etc 1. Recommend printing in either ABS or ePAHT-CF. I use ePAHT-CF for all parts other than the front supports (as it aesthetically nice to have these in a different colour) as I always have it on hand and it is both more rigid and tougher than ABS. I heat treat all ePAHT-CF parts at 150C for 2 hours in a kitchen oven post printing to anneal them, which makes the parts MUCH more rigid and also ensures they do not suffer from pressure/temp creep over time. Lessor nylons like PA12-CF are not recommended. 2. Microlight can be used without frame mounted belt tensioners as it is surprisingly easy to adjust belts by one tooth at a time with the belt retainers. When you work on it and take it apart leave the ferrules in the belt loops and remove them from the carriage just by undoing the vertical screws. This way you don't need to readjust belt tension. 3. Everything other than the bottom plate prints without support. I use PrusaSlicer organic supports when printing the bottom plate which work great. 4. The belt ferrules all need to be 9 mm long, I have modelled them at 9.25 mm so they can be sanded to exact length. 5. Anything with a 4 mm hole in it gets a threaded insert. 6. Before assembly drill all nominal 3 mm holes with a 3 mm drill. 7. X- end stop and 8mm probe hole are designed to have no threaded insert and be self-taping. 8. Sand the CPAP pipe outlets on a flat surface to get a good interface between them and the ducts on the bottom plate. They have been modelled slightly longer to accommodate this. When they are sanded enough the CPAP pipe will rest snugly against the zip tie support on the back plate. 9. Use 1 x zip tie to fasten CPAP pipe to back plate zip tie support. 10. Use 1 x zip tie in threaded thru lower slot to mount umbilical cord to umbilical cord post. 11. Use 1 x zip tie threaded through the upper slot to hold the CPAP hose to the umbilical cable mount. 12 Heat sink and part cooling fan wires go thru the right hand side cable management tab, which is slightly larger and longer than the one on the left hand side. 13. Highly recommend as always regardless of which print head you are using, with with a Rapido (both versions 1 and 2), that you put stand-off spacers over the 3 titanium screws that fasten the heat sink to the hot end. (Use some old/spare 2 mm heat break tubing to do this). Length for each stand-off is 2.5mm. This will make the Rapido much more stable, aid print quality and prevent the heat break from fatigue cracking. If there are any questions or suggestions please let me know in the comments. BOM 1 x 3010 part cooling fan. 4 x 3 mm x 46 mm top to bottom plate clamping srews 1 x 3mm x 6 mm CPAP pipe mounting cap screw 2 x 3 mm x 16mm Orbiter mounting cap screws 2 x 3mm x 8mm X stop mounting cap screws 4 x 3mm x 6mm MGN carriage mounting cap screws (If these bottom out grind shorter to 5 mm) 2 x 3mm x 16 mm cap screws to mount 3010 heat sink fan. The Microlight belt mounting system was inspired by a VzBot print head. Update 04-12-24 Now compatible with Dragon UHF hot end as well as the Rapido UHF hot end thanks to tweak done to the front support by PlastNiklas. Update 14-08-23 Added optional offset duct. This duct provides slightly improved part cooling across a wider range of fan speeds and print shapes.
With this file you will be able to print Microlight print head for Rat Rig V-core 3.1 with your 3D printer. Click on the button and save the file on your computer to work, edit or customize your design. You can also find more 3D designs for printers on Microlight print head for Rat Rig V-core 3.1.