Microswitch holder for filament detection (two versions)
thingiverse
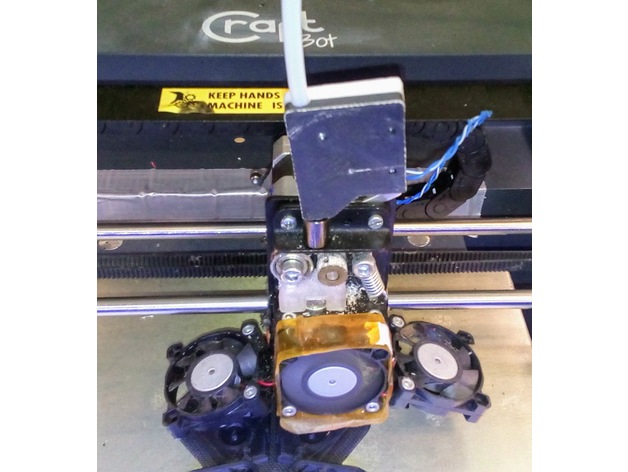
A holder for detecting filament using a microswitch is necessary for pausing prints when filament runs out. To use it next to the filament roll (easier with no need to route wiring through signal chain, but a lot of filament remains unprinted), print "Shell 1" and "Shell 2", any normal material for 3D-printing will work. If you plan to put it directly on the extruder (if you have a direct extruder, you must route the wiring through the signal chain, but only a few cm of filament will stay unprinted. It might be better to print it with ABS in this case, PLA might get soft in this hotter area), print "Shell1 (for head with teflon).stl" and "Shell 2". When installing, cut off 1.5 cm of teflon tube and insert it in the bottom hole of the shell1 and the top hole of the extruder where you would normally insert the teflon. Connect the microswitch to OctopPi header as shown on the hand-drawn diagram (3.3V through the microswitch to parallel-connected pull-down resistor and capacitor, microswitch side connected to GPIO2, other side to ground), use the Octopi header pinout (downloaded from Raspberry Pi website for your reference) as a guide for pin numbers. You could also just connect the microswitch between the IO pin and ground, but you might have problems with noise (false alarms). Install Filament sensor plugin in OctoPi and configure it as instructed: If you use the same pinout as me, add the following lines to YAML (easiest way is to use YAMLPatcher plugin): plugins: filament: pin: 2 bounce: 400 Restart and you are done. Each time the filament runs out, the Octopi will enter pause mode. Print Settings Printer: Craftbot original Rafts: No Supports: No Resolution: 0.2mm Infill: 25% Notes: Rotate both parts with smooth side down for printing. ABS or PLA work equally well, unless you are going to put it on the printing head, in that case ABS might be better. Shell 1 and 2 do not need supports, Shell1 (for head with teflon) probably not as well, but you might use it to get a nicer looking hole for the teflon. Post-Printing Installation and use Insert a normal 3D-printer microswitch (the type with the little wheel at the end of the arm) onto the little pegs and screw together using 3 M3 screws and nuts. Version near the filament roll (Shell 1): Attach to printer. Insert the filament through the bottom hole, insert the Teflon tube in the hole on top. Version on the printing head (Shell1 (for head with teflon).stl): Jam a 1.5 cm long piece of teflon tube into the extruder where teflon tube would normally go, put the bottom hole of the Shell1 on top of that. Insert the filament from top, insert the Teflon tube in the hole on top.
With this file you will be able to print Microswitch holder for filament detection (two versions) with your 3D printer. Click on the button and save the file on your computer to work, edit or customize your design. You can also find more 3D designs for printers on Microswitch holder for filament detection (two versions).