MIDI to CV Converter
thingiverse
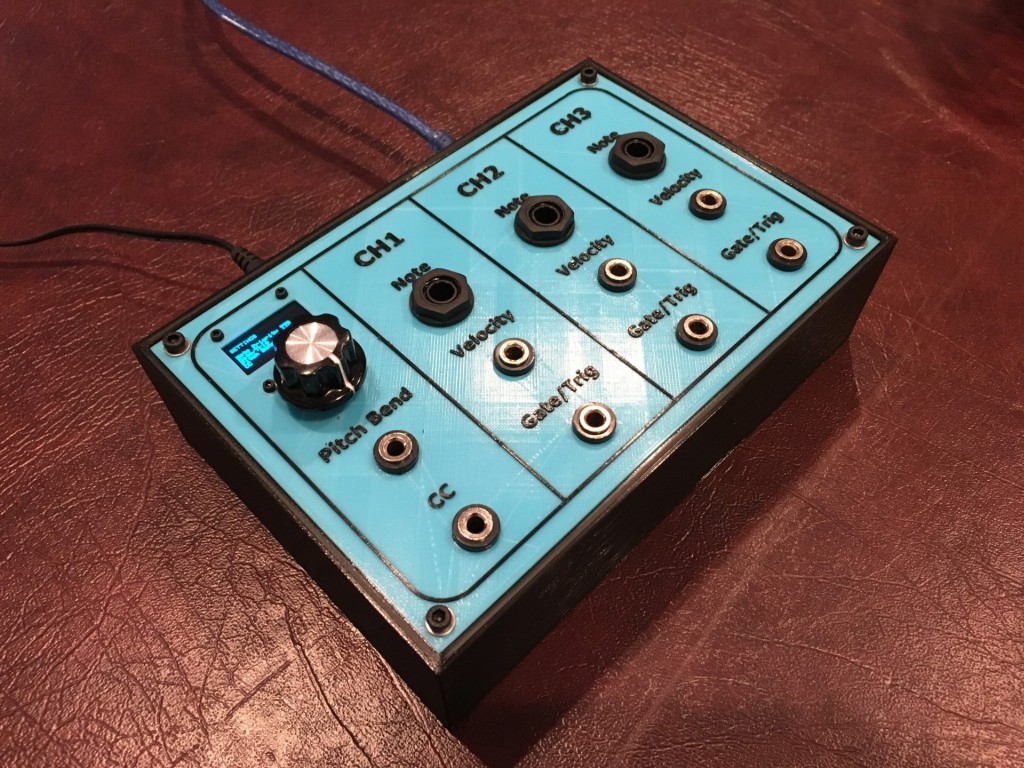
This MIDI-to-CV converter is an ideal interface between your computer or iPad and a high-quality analog synthesizer (for example, see https://www.thingiverse.com/thing:2704888). It can independently drive up to three oscillators with 1V/octave CV inputs. Connection to an iPad requires the USB camera adapter but is well worth it considering the numerous great MIDI sequencer apps. This device boasts the following features: * A USB MIDI interface * Three-channel Note CV output (88 keys, 1V/octave, MIDI channels 1-3) using a 12-bit DAC * Configurable note priority for each channel (Top Note, Bottom Note, or Last Note Priority) * Note scale factor calibration configurable in software * Five-volt Gate/Trigger outputs, where each channel can be independently configured to either output a gate (output high for the entire length of time that note is on) or trigger (20 msec pulse each time a new note is initiated) * Velocity CV output (0 to 4V) for each channel * Pitch Bend CV output (0.5 +/- 0.5V), which can be configured for channel 1, 2, or 3 * Control Change CV output (0 to 4V), which can be configured for channel 1, 2, or 3 * An OLED user interface used for setting parameters and saving to EEPROM This device uses the Teensy 2.0 USB development board. The schematics and assembly instructions can be found at: https://github.com/elkayem/usbMIDI2CV_MC. The 3D printed panel must be printed with supports for the OLED screen mount. There is a recessed area on the back side of the panel that fits the screen mounting shape. I recommend purchasing the screen from DIYMall, as the hole pattern was designed specifically for that screen. Others may also fit. Supports are not required for the case. The panel includes raised text and must be printed with two colors. Most slicers include a "pause at height" plugin, which will move the hot end out of the way and allow you to switch filaments. The panels are 3mm thick, and the letters are 0.45mm thick. I printed with 0.15mm layer thickness, allowing the letters to be printed in three layers. Add the command to pause after finishing printing the 3mm layer, so you can change the filament color. One tip: If your printer is disabling the stepper motors after pausing, you may need to insert M84 S0 at the start of the G-Code. I did.
With this file you will be able to print MIDI to CV Converter with your 3D printer. Click on the button and save the file on your computer to work, edit or customize your design. You can also find more 3D designs for printers on MIDI to CV Converter.