38120 LiFePO4 Battery Cell Holder with Case
prusaprinters
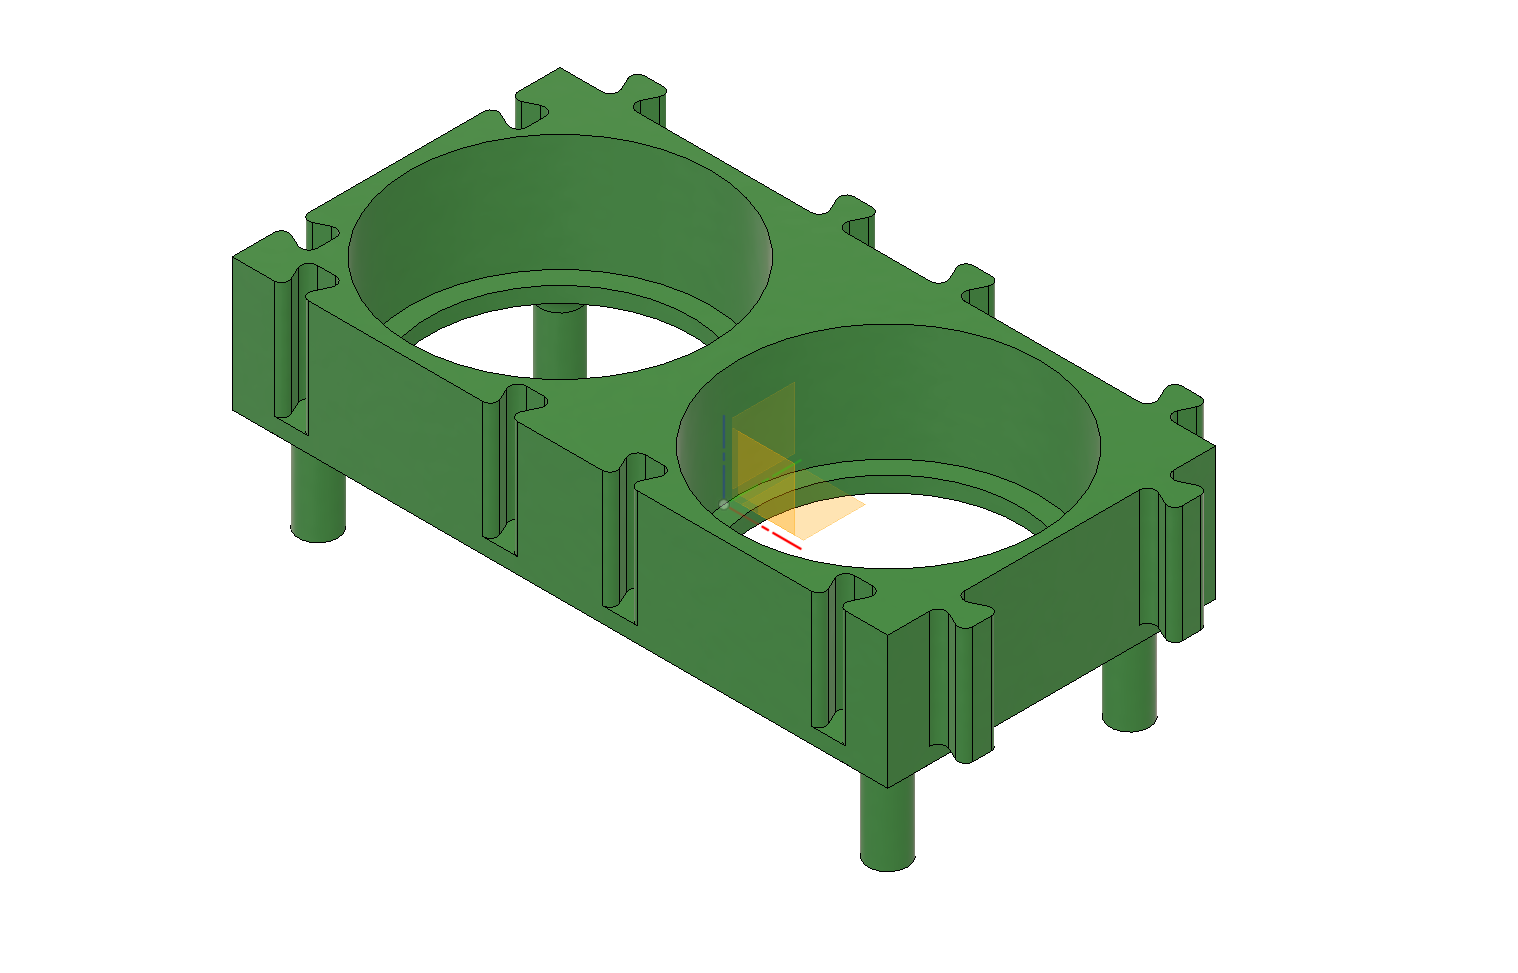
<p>This is my custom design for battery holders for 38120 LiFePO4 Battery cells.These parts can be used to make any arrangement of 38120 Cells in any series or parallel configuration!</p> <p>For my specific project, I made a 4S 8000 mAh battery made out of 38120 Headway Cells. I Used the battery holders to connect these in a straight line. The dovetails on the battery holder part allow you to configure them in any way that you like.</p> <p>I also made a case for this battery. This case only works for the 4S configuration that I did for my batteries. However, I have provided the source files for the case so that it can be modified to your needs.</p> <p>All source files are provided. Please credit me, as I have credited those who have helped to inspire my design, if you decide to remix the design!</p> <h3>Print instructions</h3><p><strong>Print Settings</strong><br/> I printed this in prusament PETG, but you can really print this in any material that you want.</p> <p>0.3 Layer height with 15% Infill. Settings are not really too important, just make sure its somewhat rigid.</p> <p><strong>Detailed Description of Project</strong></p> <p><strong>Battery Holder</strong><br/> I designed the battery holder part off of the existing injection molded battery holders for 38120 headway cells. A link to these parts can be found here:<br/> <a href="https://www.greenbikekit.com/headway-38120-battery-holder.html">https://www.greenbikekit.com/headway-38120-battery-holder.html</a><br/> A 3d model of this part can be found here for reference:<br/> <a href="https://grabcad.com/library/electric-vehicle-parts-headway-38120mm-x-2-cells-holder-1">https://grabcad.com/library/electric-vehicle-parts-headway-38120mm-x-2-cells-holder-1</a></p> <p><strong>38120 Headway Battery Cell (can be either 8 Ah or 10 Ah)</strong><br/> Here is a link to the file for the 38120 Headway cell that I used for test fitting the assembly. I used an 8Ah cell in my build, but the 10Ah model works find just as well.<br/> <a href="https://grabcad.com/library/headway-38120-10-ah-cell-1">https://grabcad.com/library/headway-38120-10-ah-cell-1</a></p> <p><strong>Bus Bar</strong><br/> I made the bus bars out of a copper sheet of around 1 mm in thickness. I printed out the bus bar part, and then used it as a stencil to trace out the outline and mark the holes. I then cut out the outline, and drilled the holes. The two outer holes need to be large enough to allow a M6 screw to pass through for the headway cells. For the inner hole, I used an M3 screw.</p> <p><strong>BMS</strong><br/> The middle connection was used to connect to a balance cable, as well as make individual cell connections for the BMS. The BMS I used can be found here:<br/> <a href="https://www.electriccarpartscompany.com/12V-4S-40A-EV-Lithium-LiFePO4-BMS-Battery-Management-System">https://www.electriccarpartscompany.com/12V-4S-40A-EV-Lithium-LiFePO4-BMS-Battery-Management-System</a><br/> I have also uploaded a model of the BMS for reference.</p> <p><strong>Case</strong><br/> I made a custom case for my 4S configuration. The dovetails in the case restrict the motion of the assembled batteries.</p> <p><strong>Top</strong><br/> I made a top for the case as well. It has openings to allow the discharge cable and balance cable to pass through. I used an XT60 Connector for the discharge cable, and a 4S (5 Pin) JST-XH connector for the balance cable.</p> <p>I also added a slot to insert an m3 nut so that the top can be fastened to the case.<br/> Zipties also work just fine. You can pass the ziptie through the hole on the side and out of either the XT60 or JST-XH hole on top.</p> <p><strong>Putting it all together!</strong><br/> Pre assembly:<br/> Make or buy a 4S balance cable</p> <ol> <li>Put the cells in the holder</li> <li>crimp m3 ring connectors to the inner 3 balance and BMS cables, and crimp m6 ring connectors to the outside balance and BMS cables</li> <li>Using an M3x6 Brass screw and an m3 nut, fasten the balance and bms ring connectors to their respective busbar. (balance and bms ground cable to negative battery terminal, balance and bms cable 1 to cell 1 (1st bus bar), balance and bms cable 2 to cell 2 (2nd bus bar), and so on...</li> <li>Screw on the bus bars to the batteries</li> <li>Solder the discharge cable and connector (XT60) to your BMS according to the wiring diagram</li> <li>Crimp B- cable to m6 ring connector, and main discharge positive to m6 ring connector.</li> <li>Screw on the Balance, BMS, Discharge+, and B- cables (M6 ring connections) to their respective main positive and negative terminals of the battery. Consult the wiring diagram for more info.</li> <li>Place the whole assembly into the case, aligned with dovetail slots</li> <li>Place top part ontop of case</li> <li>Fasten top to case with screws or zipties.</li> </ol> <p>Thats it! you can now use the battery!</p> <p>For safety reasons, Please be sure to balance charge the battery if you use any series configuration. If you do not know what this means, please look up what it is before attempting to use the battery!</p>
With this file you will be able to print 38120 LiFePO4 Battery Cell Holder with Case with your 3D printer. Click on the button and save the file on your computer to work, edit or customize your design. You can also find more 3D designs for printers on 38120 LiFePO4 Battery Cell Holder with Case.