Minecraft Torch with wall mount
thingiverse
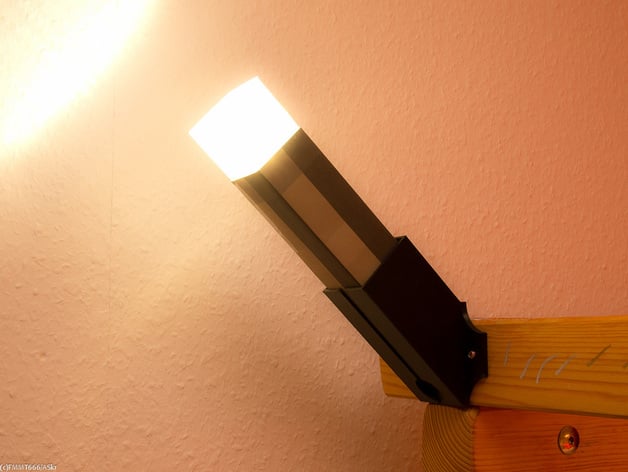
A Minecraft (tm) torch with wall mount and decals, for flashlights or other, custom light sources. You expect your children to help in the household? Print this - problem solved. Promised ;-) Short assembly/parts video:http://www.youtube.com/watch?v=WBvu3jul6pA Instructions Do NOT print the included STL files. These are only examples to clarify the "printing number" in the OpenSCAD source file. This file also contains a lot of explanations and (hopefully) other helpful notes. You'll need a flashlight with a rear button. Preferably, the top lens can be detached. By default, the torch has the dimensions (40 x 40 x 200)mm. Any flashlight up to a length of ~140mm and a diameter < ~34mm can be used. If it does not fit, the torch's size needs to be increased. Keep in mind that this also requires scaling the the print-sheet, with the Minecraft torch decals on it. The flashlight edition of the Minecraft Torch consists of: bottom part (handle; the torch itself) top part (the "flame") fixture ring, to hold the flashlight in place pusher, fits inside fixture ring and pushes the flashlight power botton For the "power cord edition", please see the notes in the OpenSCAD source file. unpack "Screw_Library.zip" to the same path as the OpenSCAD file open the OpenSCAD file in an editor (or the OpenSCAD IDE) scroll down and find the line PRINTPART = 22; // choose which part to print This is where you specify which of the parts should be printed. Each of them is listed in a table, right above this line and most of the parts are included in the download section. the table above the print part selection line clearly shows what the selected part can be used for: PRINT -> printing export of final parts TEST-PRINT -> printing export of reduced test prints EDIT -> for tuning/viewing/editing inside OpenSCAD SHOW -> shows an overview of what you designed The three test parts 10, 11 and 12 are shown in the image: top left: where the flashlight's head should fit in top right: thread of the "bottom part" (the torch itself) bottom: the thread of the fixture ring Print these to make sure that the head of the flashlights and the threads fit. The small prints save a lot of time and material. begin to modify it ;-) Yes, it definitely will take some time, but I am sure you'll get the clue. The OpenSCAD source file also contains an ASCII drawing which might help identifying the parameters and what geometry they change. ... NOTES FOR PRINTING: BOTTOM PART: Print top-down, like already prepared in the STL output (print mode). TOP PART: Needs to be printed in "vase mode", with no infill and open top. Usually one perimeter line is all you need. Keep an eye on "tTopCut", which determines how much material is cut off the bottom part to make the top part slide on it. FIXTURE RING: It should not be required to add support structures. The overhanging thread will print nice if you slow down the machine a little (30..50mm/s) and keep the layer height
With this file you will be able to print Minecraft Torch with wall mount with your 3D printer. Click on the button and save the file on your computer to work, edit or customize your design. You can also find more 3D designs for printers on Minecraft Torch with wall mount.