MINI delta 3D printer
prusaprinters
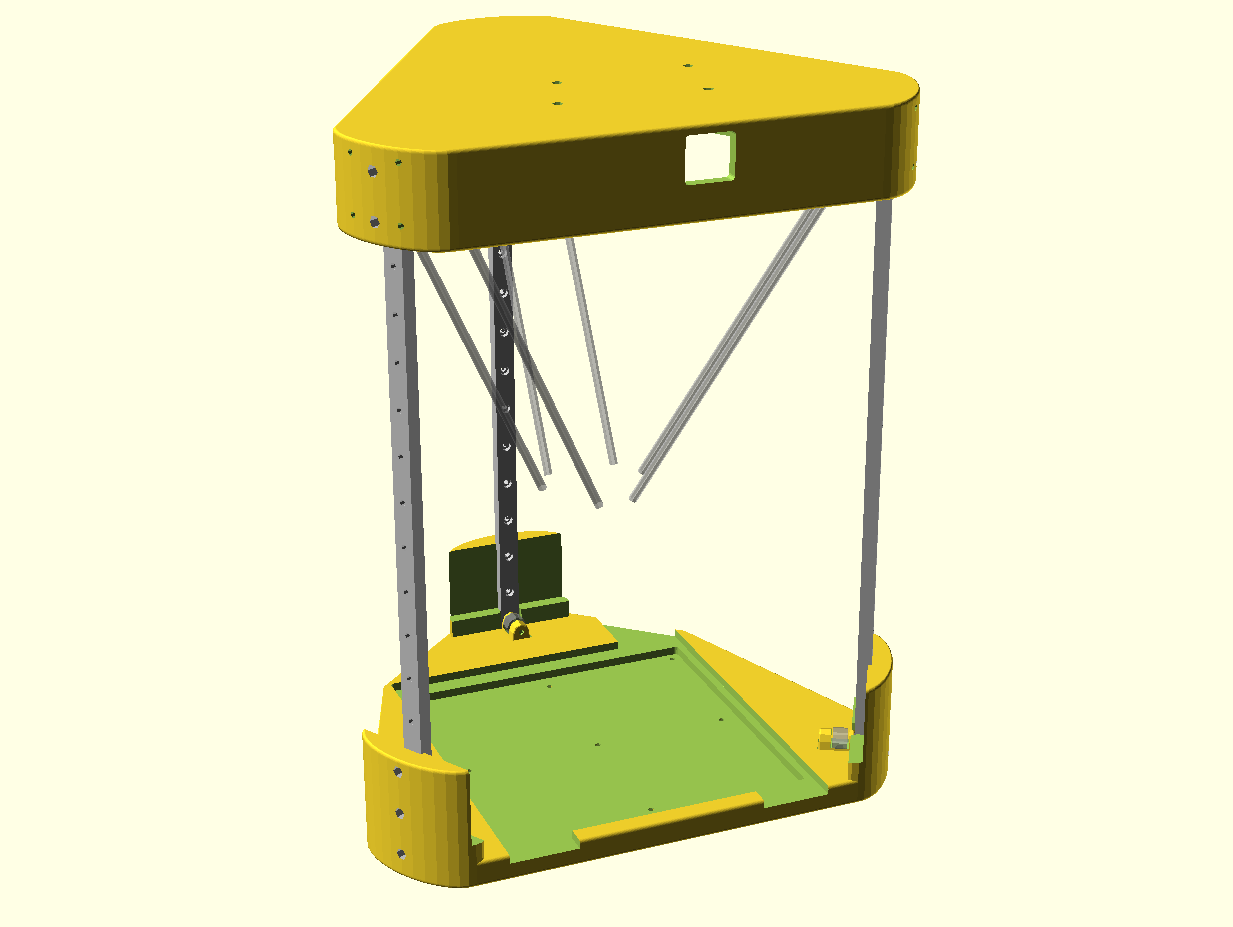
<p>This is one of the simplest 3D printers. But there are some unsolved issue so it's for advanced makers currently. You need:</p><ul><li>Prusa MINI (kit)</li><li>3x MGN 12H linear rails (400 mm or more - defines final height of the printer)</li><li>3x 16T GT2 idler or pulley</li><li>GT2 belt, you need ~6x the length of the linear rails</li><li>6x carbon fiber rods with 3mm fisheye at ends, 150-180 mm should be OK</li><li>a lot of extra M3x8 (they are used extensively)</li></ul><h3>Printing</h3><p>Base and top needs at least 310 mm printer (Creality CR-10). PETG is preferred. Print it on the flat side, no supports needed.</p><h3>Assembly</h3><p>This is for skilled builder because I don't have any assembly manual. However, there are just few parts so it's straightforward.</p><p>Cables of the bed have to be prolonged. Use thick copper wires since there's high current.</p><p>Use extruder and display parts from Prusa MINI. There are no special places to fit them (todo) so hang them to the top. There are holes in the top for the extruder zip ties (ropes).</p><h3>TODO</h3><ul><li>extruder mount</li><li>display mount</li><li>ball bearing carbon rods - they give more freedom (not just a few centimeters of a build space), improve rigidity and are service-free</li><li>big fan for extruder (there's no mount yet :-( )</li></ul><h3>FW</h3><p>You have to built the FW. There's a configuration file for the original FW. However, you have to break the appendix on original boards. Not all features work (live Z) and you have to calibrate the printer and then put the calibration into FW and build it again (and upload again). There's no way how to use EEPROM to store them. For the first time, you have to guess the calibration values.</p><h3>Calibration</h3><p>Run</p><ol><li>G33 P2</li><li>G33 P3</li><li>G33 P10</li></ol><p>You cannot run G33 P10 directly because it could fail. P2 will do coarse calibration that enables more refined calibration. Save the calibration results and put them into configuration file.</p><h3>Rods</h3><p>If you buy carbon rods and fisheyes separately they don't have the same length. It's better to print a frame that will keep the same length during gluing. You can use superglue but avoid dripping into a fisheye.</p><h3>Prototype</h3><p>I've built a prototype with 400 mm rails and 200 mm rods with fisheyes. The printing area is only ø100 x 130 mm. This is due to long rods and small angles of the fisheyes. Moreover, the fisheyes have to be lubricated and would grind. The goal is to use 3/7 mm bearings with shared axis so the twin rods are in the same (y) angle all the time.</p>
With this file you will be able to print MINI delta 3D printer with your 3D printer. Click on the button and save the file on your computer to work, edit or customize your design. You can also find more 3D designs for printers on MINI delta 3D printer.