Mini Dust Collection for small CNC Machines
thingiverse
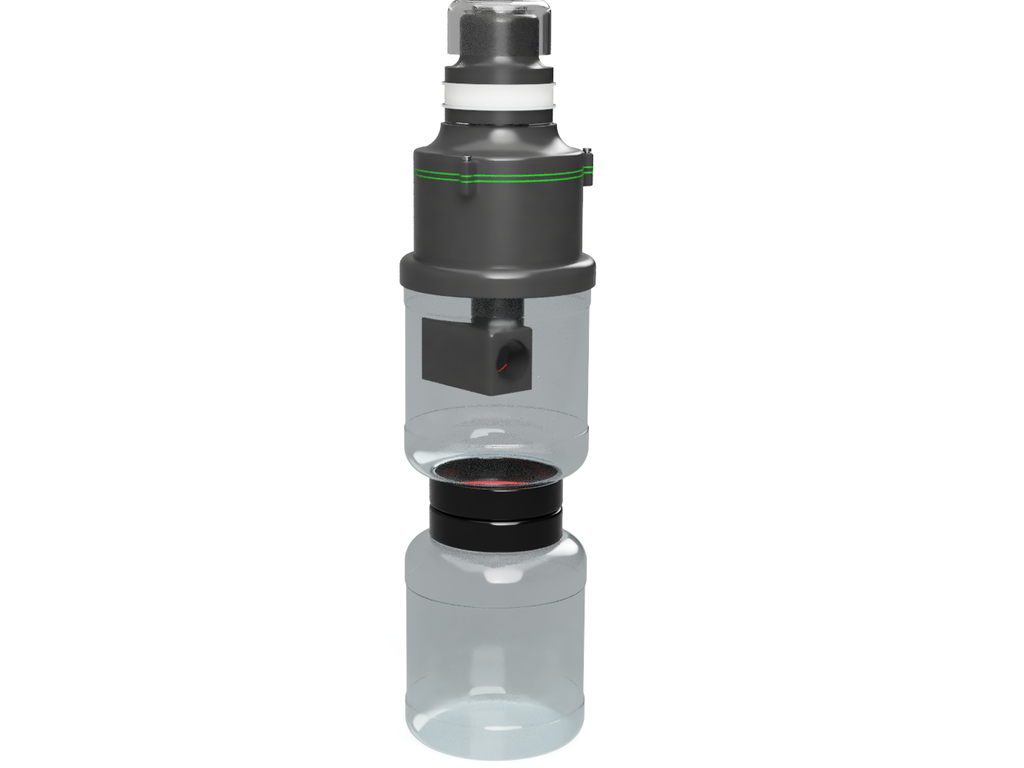
# Mini Dustcollection for small CNC Machines ##[Youtube Video](https://youtu.be/MbW23jdZvIU) ##[Snapmaker Vacuum Attachment](https://www.thingiverse.com/thing:5806725) ##[Laser Exhaust Attachment](https://www.thingiverse.com/thing:5847375) ##[Exhaust Extension](https://www.thingiverse.com/thing:5847318) This is the second version of a Mini Dustcollection. This version comes with a more powerful motor and a much improved suction power. To provide an easier, more economical and more flexible 3D printing, some parts need to be glued together. The assembly is described below in single steps. You will need these additional parts for the assembly: * [M4 female thread](https://tinyurl.com/2j6c5zvr) * [M4 screws](https://tinyurl.com/2lwa8fma) * [HEPA Filter](https://tinyurl.com/2e2ohohk) * [Motor](https://tinyurl.com/2lwzn4um) * [Foam rubber](https://tinyurl.com/2r2jrj3l) * [Power supply](https://tinyurl.com/2mbasc3w) * [Hose](https://tinyurl.com/2gcmc5h2) * [Round container](https://tinyurl.com/2k5umbhd) The selected motor fits directly onto the motor connector (without rubber seal) and does not need to be screwed or glued. If another motor is used, the connection must be adapted here. The connection from the Cyclon to the suction element is provided via a hose with an inner diameter of 30mm. The pictures correspond to the order of assembly. #Assembly instructions ##Step1 Glue the parts MotorConnector and FilterConnector together as shown in picture 2. Then you can put the filter on the lower part and fix it with the FilterCap. This should fit pretty well and sometimes the lower ring gets jammed a bit. So no force but with feeling. It should look like shown in picture 4. ##Step 2 Two sealing rings have to be cut from the moss rubber. These are glued to the top and bottom of the seal ring. ##Step 3 Use a soldering iron to insert the internal threads into the holes provided. Simply push them on and press them in. However, the temperature should not exceed 200 degrees. The internal thread stores the heat and then quickly melts through the plastic. Once the thread has cooled down, the parts can be screwed together. This should then look as shown in Figure 8. ##Step 4 Now the connecting element to the cyclone container is glued under the filter case. If everything was printed true to size, it fits exactly into the recess (Fig. 9). ##Step 5 To put everything together, cut the holes in the bottom and side of one of the two containers. This can be seen in the red markings in Figure 11. Then the suction access TubeAdapter and CyclonTop are glued to the container. An epoxy adhesive or 2-component adhesive should be used for this. You must ensure that the bondings are airtight. ##Step 6 Finally, the two containers must be joined together. To do this, cut a hole in the lid as shown in Fig. 14. Then glue the two lids together (Fig. 15/16). Then screw the containers together and the Dustcollection is ready. Das ist die zweite Version meiner Mini Dustcollection. Diese Version kommt mit einem stärkeren Motor und einer deutlich verbesserten Saugleistung. Um einen einfacheren, sparsameren und flexibleren 3D Druck zu bieten, müssen mache Teile zusammengeklebt werden. Der Zusammenbau wird unten in einzelnen Schritten beschrieben. Diese Teile brauchst du zusätzlich für den Zusammenbau: * [M4 Innengewinde](https://tinyurl.com/2j6c5zvr) * [M4 Schrauben](https://tinyurl.com/2lwa8fma) * [HEPA Filter](https://tinyurl.com/2e2ohohk) * [Motor](https://tinyurl.com/2lwzn4um) * [Moosgummi](https://tinyurl.com/2r2jrj3l) * [Netzteil](https://tinyurl.com/2mbasc3w) * [Schlauch](https://tinyurl.com/2gcmc5h2) * [Behälter](https://tinyurl.com/2k5umbhd) Der ausgewählte Motor passt direkt auf den Motorconnector (ohne Gummidichtung) und muss nicht verschraubt oder verklebt werden. Sollte ein anderer Motor verwendet werden, muss hier die Verbindung angepasst werden. Vorgesehen ist die Verbindung vom Cyclon zum Absaugelement über einen Schlauch mit 30mm Innendurchmesser. Die Bilder entsprechen der Reihenfolge des Zusammenbaus. #Bauanleitung ##Step1 Klebe die Parts MotorConnector und FilterConnector wie in Bild 2 gezeigt zusammen. Dann kannst du den Filter auf das untere Teil stecken und mit der FilterCap fixieren. Das sollte ziemlich genau passen und manchmal verklemmt sich der untere Ring etwas. Also keine Gewalt sondern mit Gefühl. Sollte dann so ausschauen wie in Bild 4 gezeigt. ##Step 2 Aus dem Mossgummi müssen zwei Dichtringe geschnitten werden. Diese werden auf die Ober- und Unterseite des Sealrings geklebt. ##Step 3 Mit einem Lötkolben lassen sich die Innengewinde in die vorgesehenen Löcher einfügen. Einfach aufstecken und eindrücken. Die Temperatur sollte jedoch nicht über 200 Grad liegen. Das Innengewinde speichert die Hitze und schmilzt dann schnell durch den Kunststoff. Ist das Gewinde abgekühlt können die Teile verschraubt werden. Das sollte dann so ausschauen wie in Bild 8 gezeigt. ##Step 4 Jetzt wird das Verbindungseleent zum Cyclonbehälter unter das Filtercase geklebt. Wurde alles maßhaltig gedruckt, passt es genau in die Aussparung (Bild 9). ##Step 5 Um alles zusammenzufügen müssen in einen der beiden Behälter die Löcher in den Boden und die Seite geschnitten werden. Auf Bild 11 ist das an der roten Markierungen zu erkennen. Dann werden der Saugzugang TubeAdapter und CyclonTop an den Behälter geklebt. Hierfür sollte ein Epoxydkleber oder 2 Komponentenkleber verwendet werden. Du musst darauf achten, dass die Verklebungen luftdicht abschließen. ##Step 6 Zuletzt müssen die beiden Behälter noch miteinander verbunden werden. Dazu muss in die Deckel ein Loch wie in Bild 14 gezeigt geschnitten werden. Danach werden die beiden Deckel zusammengeklebt (Bild 15/16). Dann die Behälter zusammenschrauben und fertig ist die Dustcollection.
With this file you will be able to print Mini Dust Collection for small CNC Machines with your 3D printer. Click on the button and save the file on your computer to work, edit or customize your design. You can also find more 3D designs for printers on Mini Dust Collection for small CNC Machines.