Mini-ITX Media Center PC (8L)
thingiverse
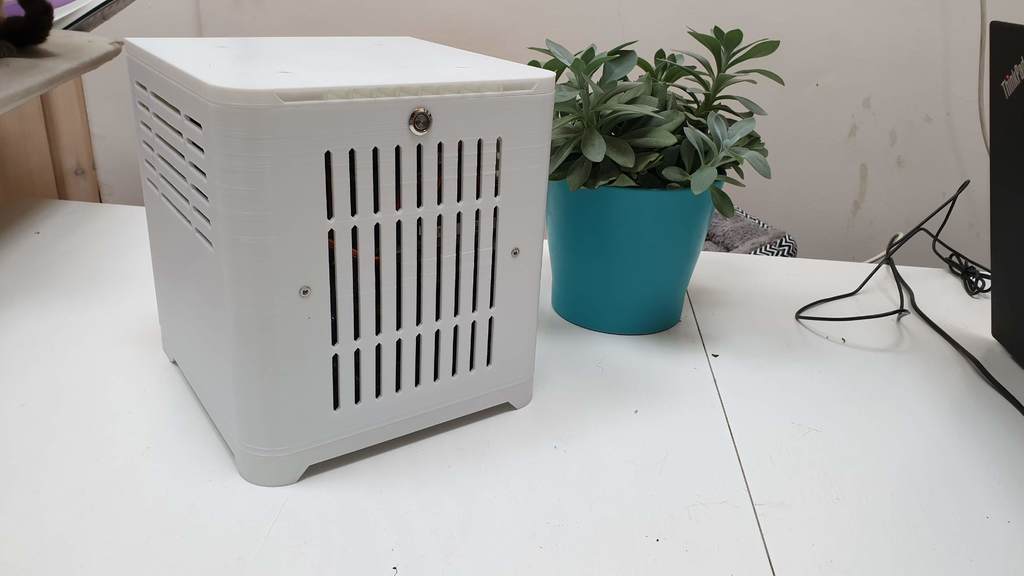
I needed an affordable computer to connect to our projector, it had to be compact enough to fit snugly between the couch and bookshelf, and I wanted it to be built using mostly standard parts. I also wanted it to be printed in as few pieces as possible. The design allows for adequate cooling with the option to stack items on top of the computer. The case supports a standard ATX power supply (I would stick to one roughly 140mm) and a Mini-ITX Motherboard. In the base there is space for two 2.5" SSD/HDD's, you will need to print and super glue the mounts in place. CPU cooler height is limited based on whether you put a fan in the top panel: 15mm 120mm slimfan in top, max 60mm CPU cooler (configuration in the pictures) 25mm 120mm fan in top, max 50mm CPU cooler (untested but should work) No top fan , max 75mm CPU cooler (untested but should work) Important when installing the motherboard panel: Do not fully screw in the motherboard panel! When you screw in the motherboard panel start by half screwing in one side, then check the hole alignment on the other side, you will need to screw more or less on the first side to align the holes, once aligned, screw the countersunk screws in until they are flush with the case but don't over tighten. For some unknown reason completely screwing in the motherboard panel will apply torsion to the case and force it to lose shape and the top will no longer close, to avoid this the motherboard has quite a loose fit to the rest of the case. Since the panel rests on top of the power supply it is not an issue. Here's what you'll need: -M3x8mm counter sunk screws (to connect the feet to the main body and to attach the motherboard panel) -M3 nuts -Motherboard standoffs (the hex part needs to be 6mm tall) https://www.aliexpress.com/item/32863502961.html?spm=a2g0s.9042311.0.0.27424c4dDZiiqn -PC Screw Set https://www.aliexpress.com/item/32953068713.html?spm=a2g0s.9042311.0.0.39114c4dQzJ4tv -12mm Momentary switch (I bought one and wired it myself, but there are options you can buy) https://www.aliexpress.com/item/32718818979.html?spm=a2g0s.8937460.0.0.704a2e0eBdJqYH Part orientation: Feet- You will need to rotate the feet 180 degrees for printing. For the main body please refer to the image where I have enabled supports everywhere, however I have added support blockers to make sure there are only supports on the motherboard IO and power supply area, support blockers also added to the screw holes. For all other parts supports from buildplate only, so that screw holes can form properly. This computer doesn't have Wifi so I got a USB Wifi dongle and made a little antenna cradle, the files for that are here: https://www.thingiverse.com/thing:4404198
With this file you will be able to print Mini-ITX Media Center PC (8L) with your 3D printer. Click on the button and save the file on your computer to work, edit or customize your design. You can also find more 3D designs for printers on Mini-ITX Media Center PC (8L).