Mini/Micro FPV Quad
thingiverse
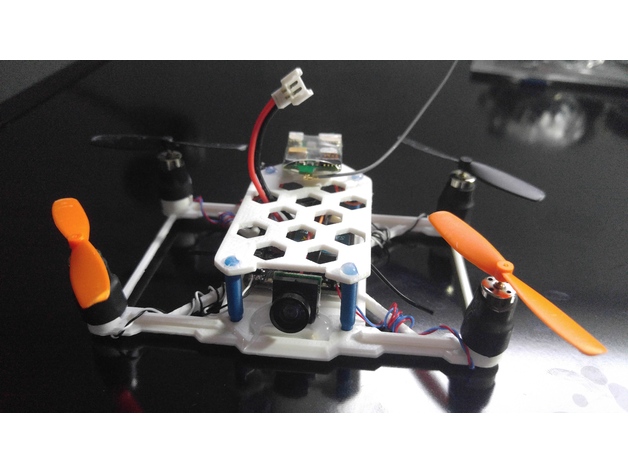
This is a tiny little FPV quad I designed for a few parts I wanted to reuse. I wanted something that was a lot more durable than other options, but wasn't outrageously heavy, and this is it (I dont have a working scale, so I cant confirm the weight aspect, but it is very durable and flies very well). This quad can definitely take a beating, but isn't invincible. It is one of my first attempts at modelling and i'm pretty happy with the result! That said, I am totally open to any suggestions or requests anyone may have. Some Notes/Heads up: The standoffs (pictured blue) should fit snugly into place depending on how well tuned your printer is, but I would still recommend a dab of hot glue on all ends to hold them in place. I used too much in the photos. Camera will require some sort of mounting component, I just used hot glue. (With my model it got out of hand quickly, you don't need that much glue) I locked the motors in with some heat-shrink tubing, they fit tightly but the heat-shrink ensures they won't move in flight. The feet haven't really been tested too thoroughly, I designed them to be disposable, and primarily to protect the motor wires under the arms. The feet slide along the arm, but don't fall off. They just snap onto the arm, and do their job. My flight controller is held in place by foam tape, as is my VTX, and Rx (Above my FC) Longer end of Standoff goes into lower plate. Specs: Made to house a Flight controller up to 34x34mm. Designed to hold 8.5x20mm brushed motors (snugly) Total Footprint= 71x112mm Lower to Upper Plate= 16mm Camera Mount to Upper Plate= about 14mm between closest edges Top Plate= 64x40mm As I said, I am open to any and all suggestions or requests, and will do my best to answer any questions you have. If you want to know anything about my build or the hobby itself, I will provide the info on my quad and hopefully answer your question. NOTE: The completed quad above is an older version than the empty frame or the files supplied. I have since added a place for a rubber band to strap the battery in and other minor tweaks. Ignore dirty work table. Print Settings Printer Brand: PowerSpec Printer: PowerSpec 3D Pro Rafts: Doesn't Matter Supports: No Resolution: 0.15 to 0.20 Notes: I use rafts when printing the standoffs, ensures they will stay in place and are easy to snap off. Lower Plate: 0.15-0.2 res., 20-80% infill. (I usually go 0.15, 50%, but I haven't really tested . the pros and cons of other settings) Upper Plate: 0.15-0.2 res., 10% infill or up. (I usually go 0.15, 15%. Again, this is just what . has worked for me) Standoffs: 0.2 res., 20% infill or up. (I usually go somewhere between 70-90%, probably . overkill) Feet: 0.2 res., anywhere below 15% infill How I Designed This Fusion360 I designed my first version in about 2-3 days (of minimal work) while learning the software. It could have easily been completed much sooner, but as said, I was learning. And now I definitely recommend Fusion360 to anyone and everyone who wants to start modeling. It can do so much more than 123d Design (which i had been using) and is much less scary than Blender 3D.
With this file you will be able to print Mini/Micro FPV Quad with your 3D printer. Click on the button and save the file on your computer to work, edit or customize your design. You can also find more 3D designs for printers on Mini/Micro FPV Quad.